Normal vs abnormal motions of the knee
To understand the functions of the knee ligaments, how they get injured, and how their injury would cause abnormal/unstable knee motions, you first need to make sure you can recognize normal motions of the knee. So, you'll first practice simulating the normal motions of the knee that you'll repeat later as you remove each ligament to test for abnormal motion and instability.
The sections below will walk you through simulating anterior-posterior translation, longitudinal rotation, and varus-valgus rotation, each at near full extension of the knee and at 90 degrees of flexion. Practice each motion multiple times with all of the ligaments in place until you get a good feel for what is the normal range of motion. Once you start removing ligaments, you can always reattach the ligament to remind yourself of the normal motion. For this entire activity, you'll hold the femur still and move the tibia relative to a static femur.
Anterior-posterior translation
Normal range of motion
Simulate anterior-posterior (AP) translation of the tibia at near full extension of the knee and at 90º of flexion, using the video below as a guide; here "near full extension" means about 20º short of full extension (about 160º between the femur and tibia).
Video showing how to simulate anterior-posterior translation at near full extension and at 90º of flexion. Note that unlike the video, your knee kit won't have muscles and/or the patella attached. That's OK—these are not needed to simulate this motion.
With all of the ligaments intact, you should only be able to translate the tibia approximately 1 cm (10 mm) in total. You can use your ruler to verify this. You can also think of this as the tibia moving 5 mm anterior and 5 mm posterior relative to its neutral/average position (i.e., when the tibia is in the middle of its motion path).
Abnormal range of motion
You can recognize abnormal AP translation as movement of the tibia greater than 5 mm either in the anterior or posterior direction from its neutral position.
Rendering of excess AP translation
Longitudinal rotation
Normal range of motion
Next, simulate longitudinal rotation (i.e., rotation about its long-axis) of the tibia at near full extension of the knee and at 90º of flexion, using the video below as a guide.
Video showing how to simulate longitudinal rotation of the tibia at near full extension and at 90º of flexion. Note that unlike the video, your knee kit won't have muscles and/or the patella attached. That's OK—these are not needed to simulate this motion.
You don't need to worry about measuring the number of degrees the tibia can rotate in each direction. Rather, pay attention to the articular cartilage surfaces where the femur and tibia contact one another. Notice how at the point of contact during normal motion (and in a healthy knee), there are is always articular cartilage on each side/bone.
Video or rendering showing that point of contact between bones occurs at a point where there is articular cartilage on both bones (continuous cartilage contact)
You do not want bone-on-cartilage or bone-on-bone contact at a joint (that's what happens with osteoarthritis—not good!). You want continuous cartilage contact for smooth (and pain-free) motion.
Abnormal range of motion
Abnormal longitudinal rotation will look something like the following, with the tibia rotating so far relative to the femur that there is no longer any articular cartilage at the point of contact on one or both bones.
Rendering of excess long-axis rotation
Varus-valgus rotation
Normal range of motion
Lastly, simulate varus-valgus rotation of the tibia at near full extension of the knee and at 90º of flexion, using the video below as a guide.
Video showing how to simulate varus-valgus rotation at near full extension and at 90º of flexion. Note that unlike the video, your knee kit won't have muscles and/or the patella attached. That's OK—these are not needed to simulate this motion.
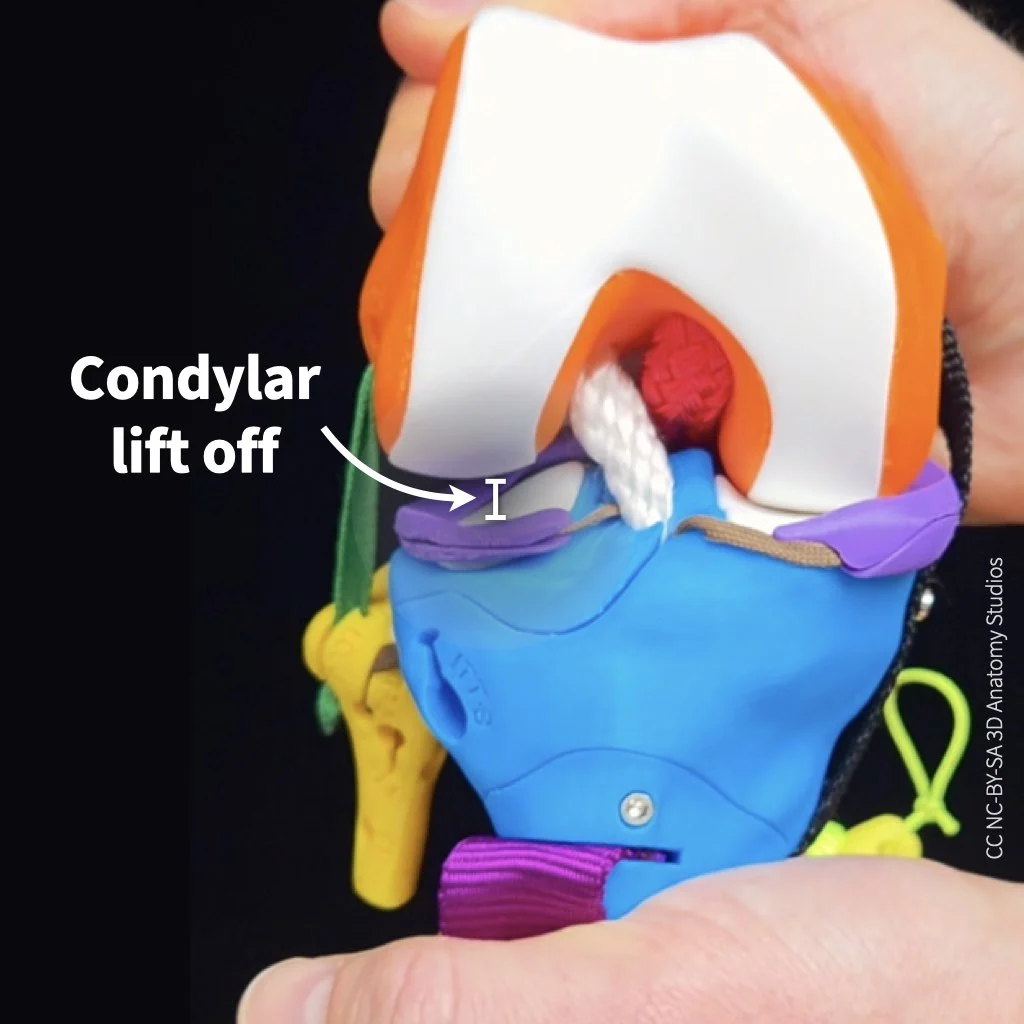
As you simulate this rotation, take a close look at where the femur and tibia are contacting one another inside the joint. During varus rotation, a gap forms between the lateral condyles of the femur and tibia. During valgus rotation, a very small gap opens up between the medial condyles (hardly visible). This gap formation is called lift off.
Video showing lift off between the lateral femoral condyle and lateral tibial condyle during varus-valgus rotation. The knee is flexed at 90º, the view is the from the anterior, and the patella has been pulled down to show the condyles.
During varus rotation, a normal lift off between the lateral condyles is about 2 mm at near full extension and about 10 mm at 90º of flexion. During valgus rotation, the amount of lift off between the medial condyles is less than 1 mm.
Normal maximum lift off between the lateral femoral condyle and lateral tibial condyle during varus-valgus rotation.
Abnormal range of motion
If there's abnormal motion during varus or valgus rotation, you'll see greater than normal lift off between the lateral or medial condyles, respectively.
Rendering of excess varus-valgus rotation showing extra lift off between condyles