HSKN:: What are the functions of the knee ligaments?
- Activity Guide
- Activity worksheet (Self-guided)
- Introduction
- Materials needed
- Normal vs abnormal motions of the knee
- Simulating ligament injuries through a knockout experiment
- Connecting knee ligament functions to knee injuries
- References cited
- Activity as a Station
- Educator Guide
Activity Guide
A full guide to this activity that students can follow for self-guided learning or that you can use to prepare a demonstration or set up a lab station
Activity worksheet (Self-guided)
Use the worksheet below for the self-guided activity. If you are setting this activity up as a station, use this worksheet instead.
Introduction
If you've ever had a severe knee injury or read about one, you're likely familiar with an account like the following: "I moved in the wrong way, I heard a pop, and then I felt the pain." The knee, like pretty much all other joints in our body, is held together (in part) by ligaments. These ligaments are strong cords that function to guide normal joint motion. But when a joint, like the knee, is forced to move in an abnormal way, one or more ligaments are stretched beyond their limit, they can tear or snap (the "pop"), resulting in joint instability (because the ligament can no longer function properly) and pain. This example illustrates the basic principle that ligament function, joint motion, and joint injury are all causally connected:
- If ligament A functions to limit excess motion in direction X, then...
- the motion that can injure ligament A is excess motion in direction X
- and injury of ligament A can cause pain or instability when moving in direction X.
If you want to fully understand knee joint injuries, you need to also understand the functions of the knee ligaments and the motions that these ligaments normally limit.
But how do you evaluate the function of a ligament? In molecular biology, the function of a cellular component (e.g., a protein) is evaluated by "knocking it out." Cells are blocked from producing the protein and the resulting phenotype gives you an indication as to what the function of that protein is. For example, if a cell with a knockout has membrane abnormalities, you have a clue that the protein may help to form the cell membrane. This is the classic "knockout" experiment: an abnormal result gives you a clue about normal function.
In this activity, you'll do a ligament knockout experiment with your knee kit. You'll knock out each of the ligaments of the knee and simulate a range of normal knee motions to discover which motions have become abnormal (the phenotype). Through these simulations, you'll simultaneously learn the function of the ligament, the particular motion(s) that can injure that ligament, and the motion(s) that could cause pain or instability if the ligament is injured. With this understanding, you'll then be able to answer several challenge questions about why some ligaments are more commonly injured than others, why some ligaments are commonly injured together, and why landing from a jump in a particular way can reduce the chances of injuring your knees.
Materials needed
For this activity you’ll need:
- The worksheet for this activity (either opened in a PDF viewer on a desktop/tablet computer or printed out).

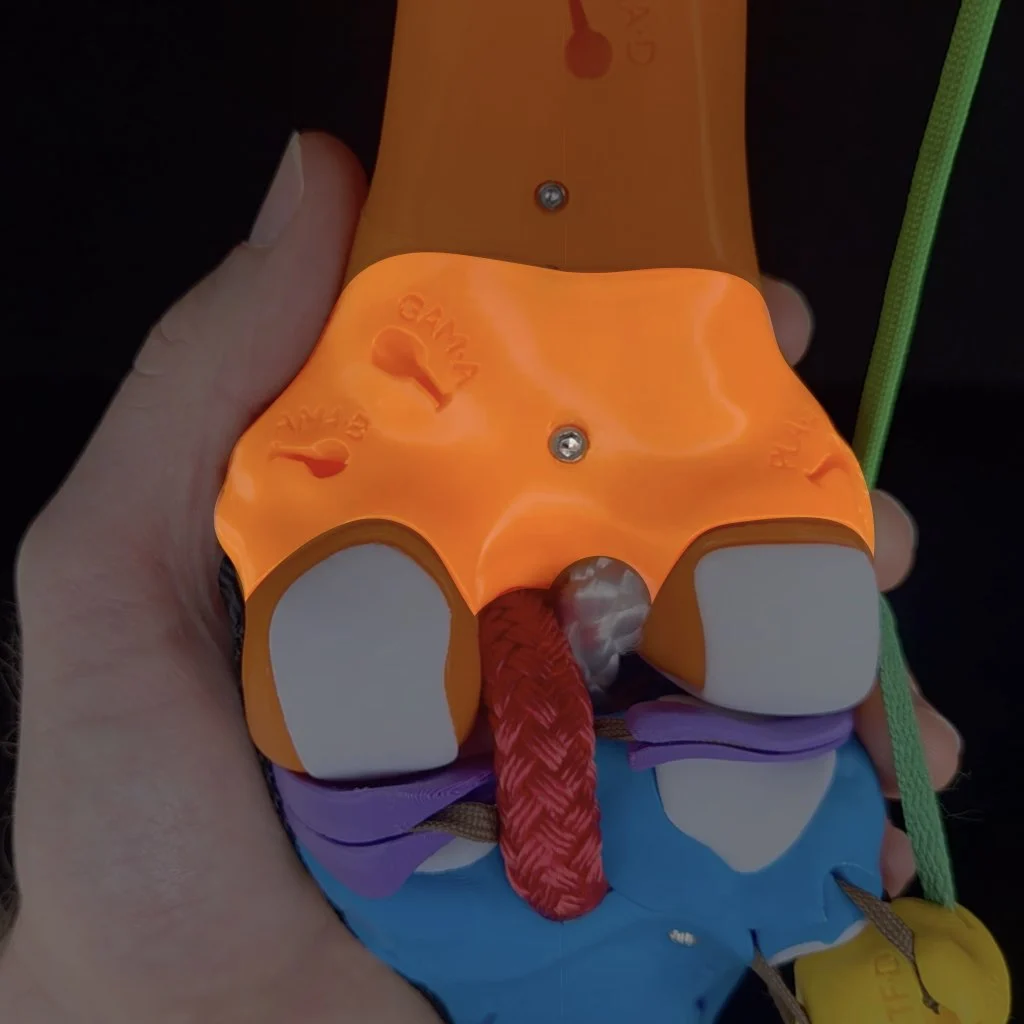
- A Human Knee Active Learning Kit (Basic or Full model). You do not need any of the muscles for this activity or the patella. If your knee kit has muscles attached, detach all the muscles and attach them to their designated spot on the parts plate(s). You can leave the patella to hang from the patellar ligament or you can remove the patella by detaching the patellar ligament from the tibia. Also be sure that your knee kit has the Iliotibial (IT) tract/band attached; this is one of the ligaments you will knock out. Once you've finished preparing your knee for this activity, it should look like one of the images below.
![]()
The knee kit with all of the muscles detached and with the patella either hanging loose by the patellar ligament (left) or with the patella removed (right). The black arrow in each photo indicates the IT band/tract.
While this activity can be done with the Mini Knee Kit Model, be aware that the IT tract is a significant stabilizer of the knee. Since the Mini model does not include an IT tract, your results will not include its contributions. If you're doing this activity without an IT tract, it's best to assume that any conclusions you draw are for a knee in which the IT tract is already damaged or without taking into account its contributions.
- The following items from Parts Plate A in your knee kit:
- Hex key (also called an Allen wrench)
- Ruler
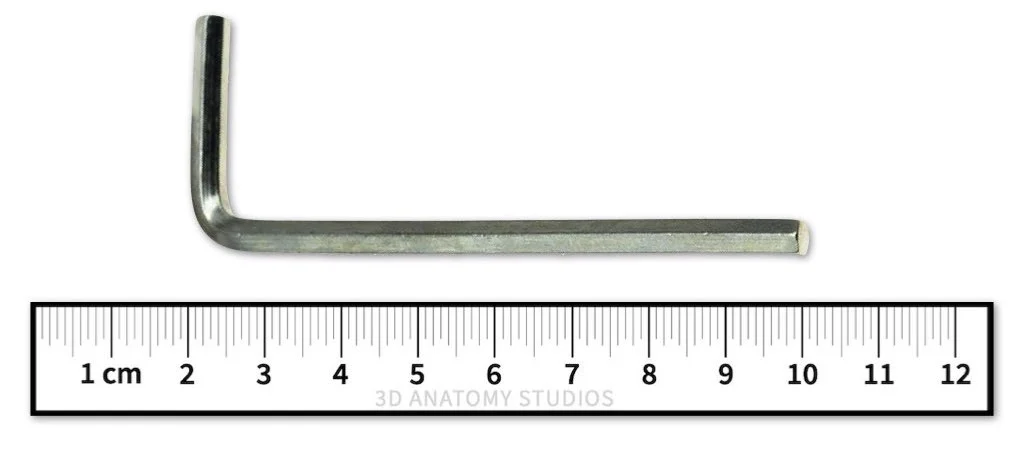
The hex key (top) and ruler (bottom) from your kit. The hex key in your kit may differ in color or shape from the image above.

The ruler and hex key should be attached to Parts Plate A in your kit. The ruler fits into grooved holder on the left side and the hex key fits into a holder in the bottom right corner. The hex key in your kit may differ in color or shape from the image above.
Normal vs abnormal motions of the knee
To understand the functions of the knee ligaments, how they get injured, and how their injury would cause abnormal/unstable knee motions, you first need to make sure you can recognize normal motions of the knee. So, you'll first practice simulating the normal motions of the knee that you'll repeat later as you remove each ligament to test for abnormal motion and instability.
The sections below will walk you through simulating anterior-posterior translation, longitudinal rotation, and varus-valgus rotation, each at near full extension of the knee and at 90 degrees of flexion. Practice each motion multiple times with all of the ligaments in place until you get a good feel for what is the normal range of motion. Once you start removing ligaments, you can always reattach the ligament to remind yourself of the normal motion. For this entire activity, you'll hold the femur still and move the tibia relative to a static femur.
Anterior-posterior translation
Normal range of motion
Simulate anterior-posterior (AP) translation of the tibia at near full extension of the knee and at 90º of flexion, using the video below as a guide; here "near full extension" means about 20º short of full extension (about 160º between the femur and tibia).
Video showing how to simulate anterior-posterior translation at near full extension and at 90º of flexion. Note that unlike the video, your knee kit won't have muscles and/or the patella attached. That's OK—these are not needed to simulate this motion.
With all of the ligaments intact, you should only be able to translate the tibia approximately 1 cm (10 mm) in total. You can use your ruler to verify this. You can also think of this as the tibia moving 5 mm anterior and 5 mm posterior relative to its neutral/average position (i.e., when the tibia is in the middle of its motion path).
Abnormal range of motion
You can recognize abnormal AP translation as movement of the tibia greater than 5 mm either in the anterior or posterior direction from its neutral position.
Longitudinal rotation
Normal range of motion
Next, simulate longitudinal rotation (i.e., rotation about its long-axis) of the tibia at near full extension of the knee and at 90º of flexion, using the video below as a guide.
Video showing how to simulate longitudinal rotation of the tibia at near full extension and at 90º of flexion. Note that unlike the video, your knee kit won't have muscles and/or the patella attached. That's OK—these are not needed to simulate this motion.
You don't need to worry about measuring the number of degrees the tibia can rotate in each direction. Rather, pay attention to the articular cartilage surfaces where the femur and tibia contact one another. Notice how during normal motion (and in a healthy knee) and when there is force pushing the bones at a joint together (joint under compression), there are is always articular cartilage on each side/bone at the point of contact.
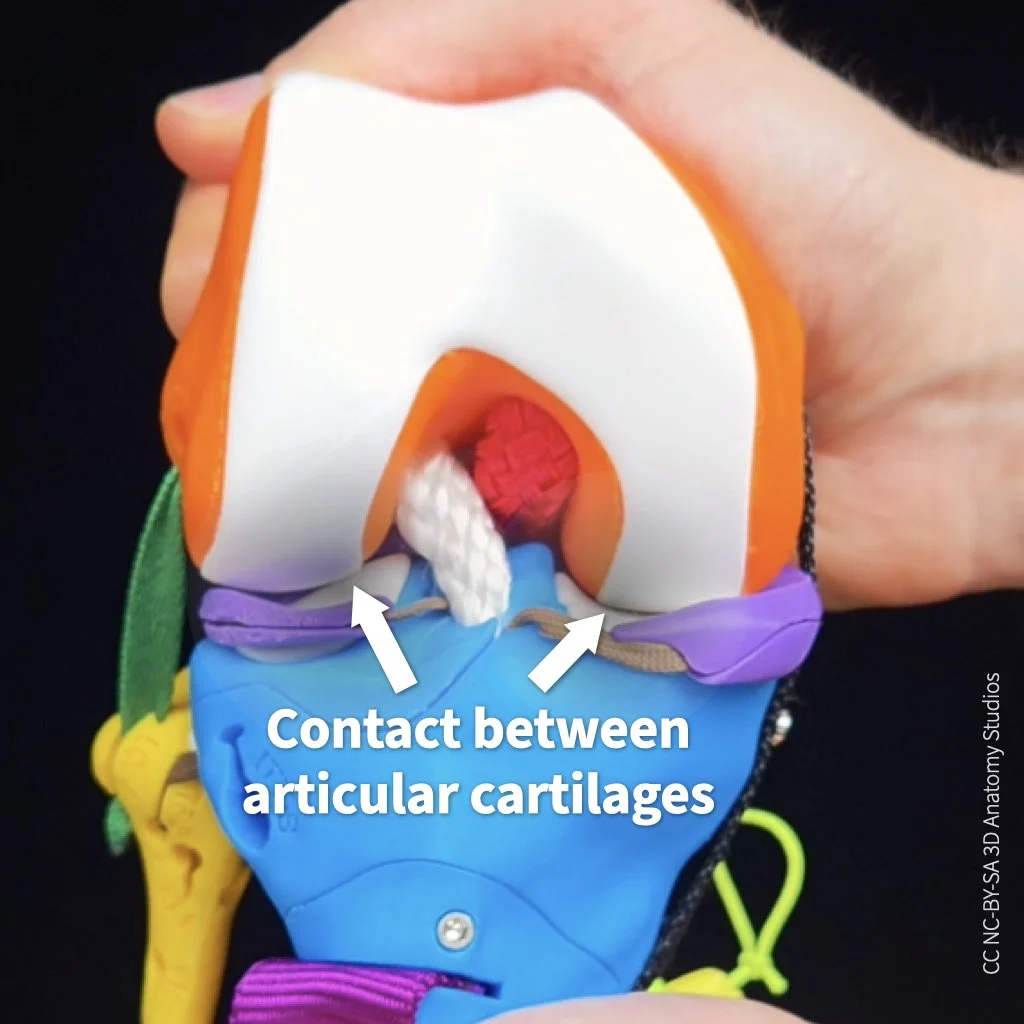
When a healthy joint is under compression and during normal motion, there is always articular cartilages on opposing sides of the joint at the point of contact.
You do not want bone-on-cartilage or bone-on-bone contact at a joint (that's what happens with osteoarthritis—not good!). Rather, you want continuous cartilage contact for smooth (and pain-free) motion.
Abnormal range of motion
You can recognize abnormal longitudinal rotation when the tibia rotates so far relative to the femur that there is no longer any articular cartilage at the point of contact on one or both bones.
Varus-valgus rotation
Normal range of motion
Lastly, simulate varus-valgus rotation of the tibia at near full extension of the knee and at 90º of flexion, using the video below as a guide.
Video showing how to simulate varus-valgus rotation at near full extension and at 90º of flexion. Note that unlike the video, your knee kit won't have muscles and/or the patella attached. That's OK—these are not needed to simulate this motion.
As you simulate this rotation, take a close look at where the femur and tibia are contacting one another inside the joint. During varus rotation, a gap forms between the lateral condyles of the femur and tibia. During valgus rotation, a very small gap opens up between the medial condyles (hardly visible). This gap formation is called lift off.
Video showing lift off between the lateral femoral condyle and lateral tibial condyle during varus-valgus rotation. The knee is flexed at 90º, the view is the from the anterior, and the patella has been pulled down to show the condyles.
During varus rotation, a normal lift off between the lateral condyles is about 2 mm at near full extension and about 10 mm at 90º of flexion. During valgus rotation, the amount of lift off between the medial condyles is less than 1 mm.
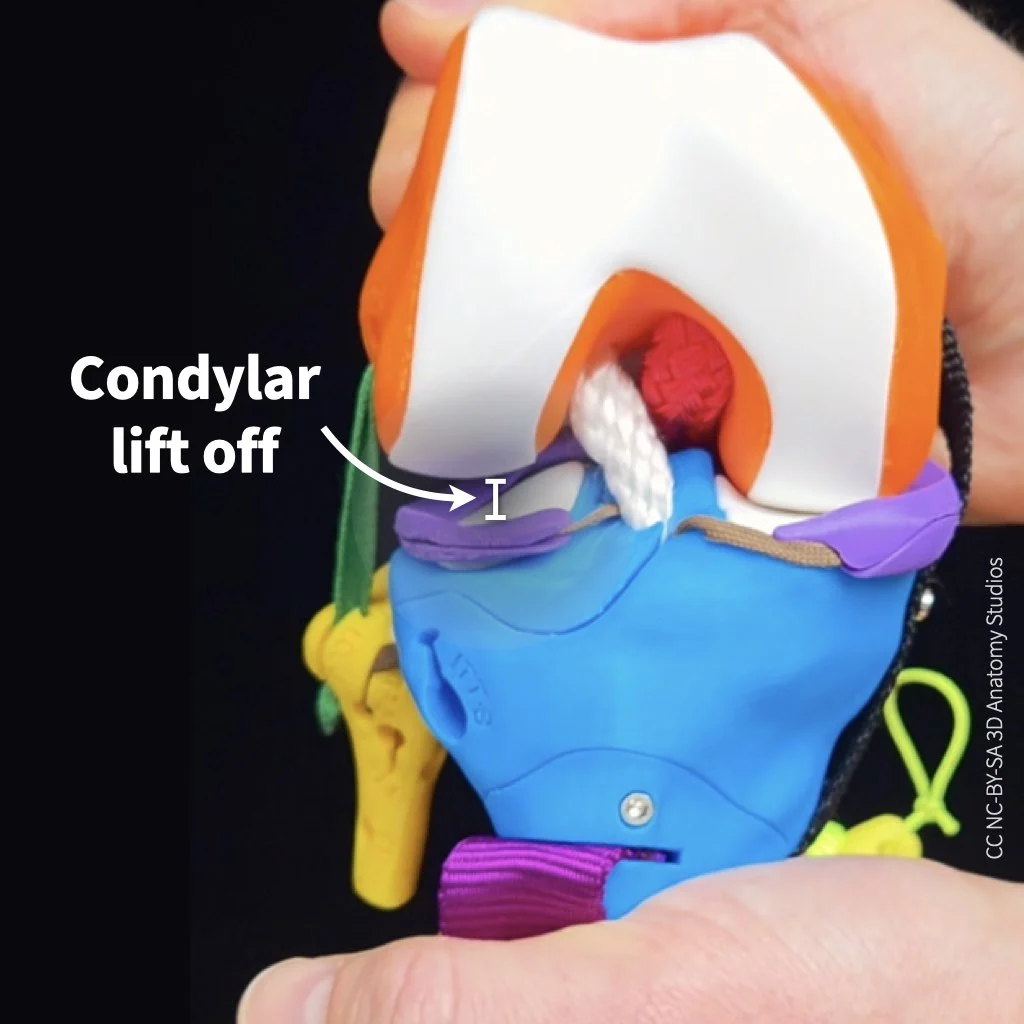
An example of normal maximum lift off. In this case, between the lateral femoral condyle and lateral tibial condyle during varus-valgus rotation at 90º of knee flexion.
Abnormal range of motion
You can recognize abnormal motion during varus or valgus rotation as a greater than normal lift off between the lateral or medial condyles, respectively.
Simulating ligament injuries through a knockout experiment
Now you're ready to knock out some ligaments. On page 2 of your activity worksheet you'll find a table. There's a row for various motion tests of the knee and a column for each of the major ligaments of the knee plus two ligaments combined (MCL+ACL). For this experiment, you'll remove (knock out) each ligament or combination of ligaments listed at the top of each column and then test the motion shown in each row, checking whether the motion is normal or abnormal.
If you simulate abnormal motion (motion outside the normal range of motion) with the removal of a ligament, that means:
- The ligament functions to limit excess motion in that direction,
- The abnormal motion you are simulating is the same motion that can injure that ligament,
- and if the ligament is injured, the abnormal motion you are simulating could cause pain or instability in the knee.
For example, if you remove a ligament and the tibia is now able to rotate about its long axis laterally beyond its normal range, you could conclude that:
- The ligament you removed functions to limit lateral longitudinal rotation,
- Extreme lateral longitudinal rotation can injure that ligament,
- and once that ligament is injured, there could be pain and/or instability with lateral longitudinal rotation.
For this activity, an abnormal motion test for flexion-extension (e.g., beyond the normal range of extension or hyperextension of the knee) is not included just to keep the activity simpler.
How to knock out your knee's ligaments
To knock out your knee kit's collateral and cruciate ligaments, follow the general steps shown in the video or listed out below.
Video showing how to remove the femur access door, unclip the ACL, and replace the femur access door to perform a knockout motion experiment.
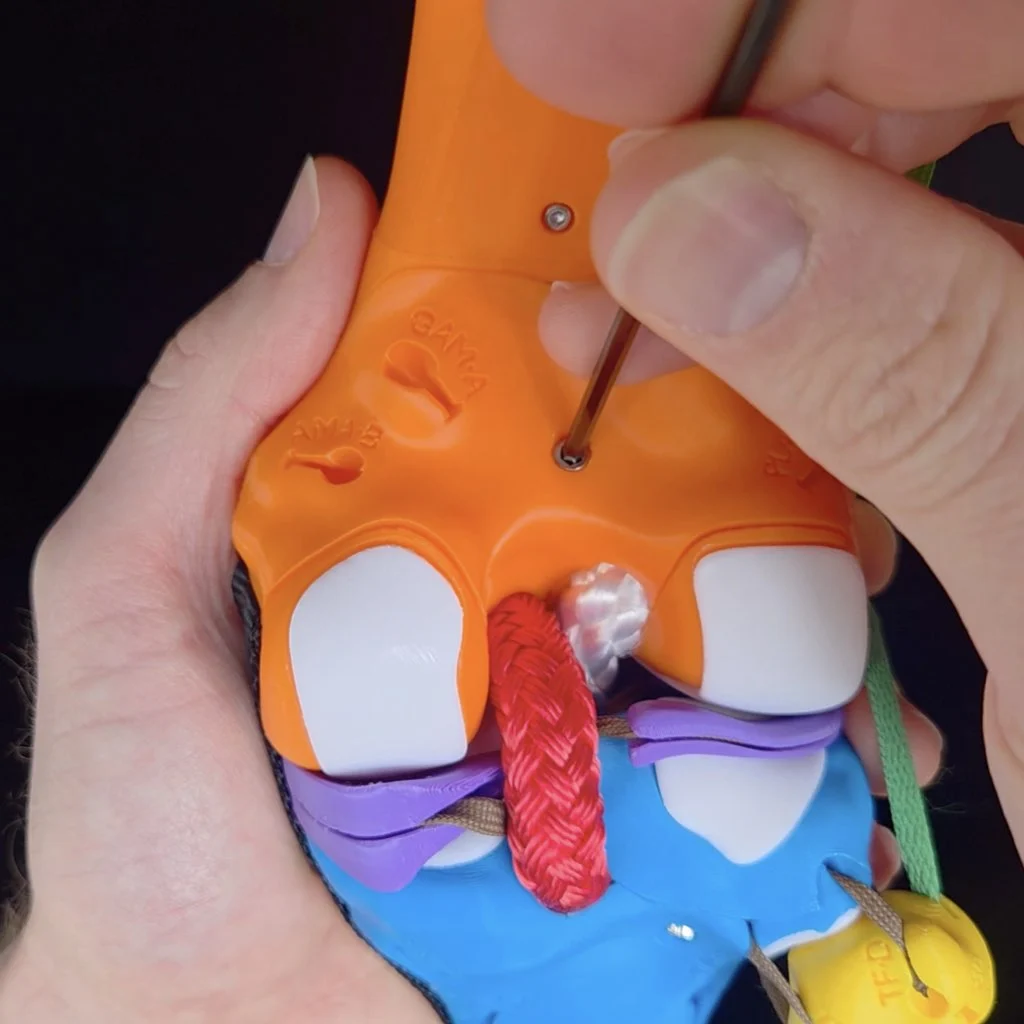
- Locate the access door on the posterior aspect of the femur.

- Use the Allen wrench to remove the screw from the access door. Place the screw in a place where it won't roll off the table or get lost.

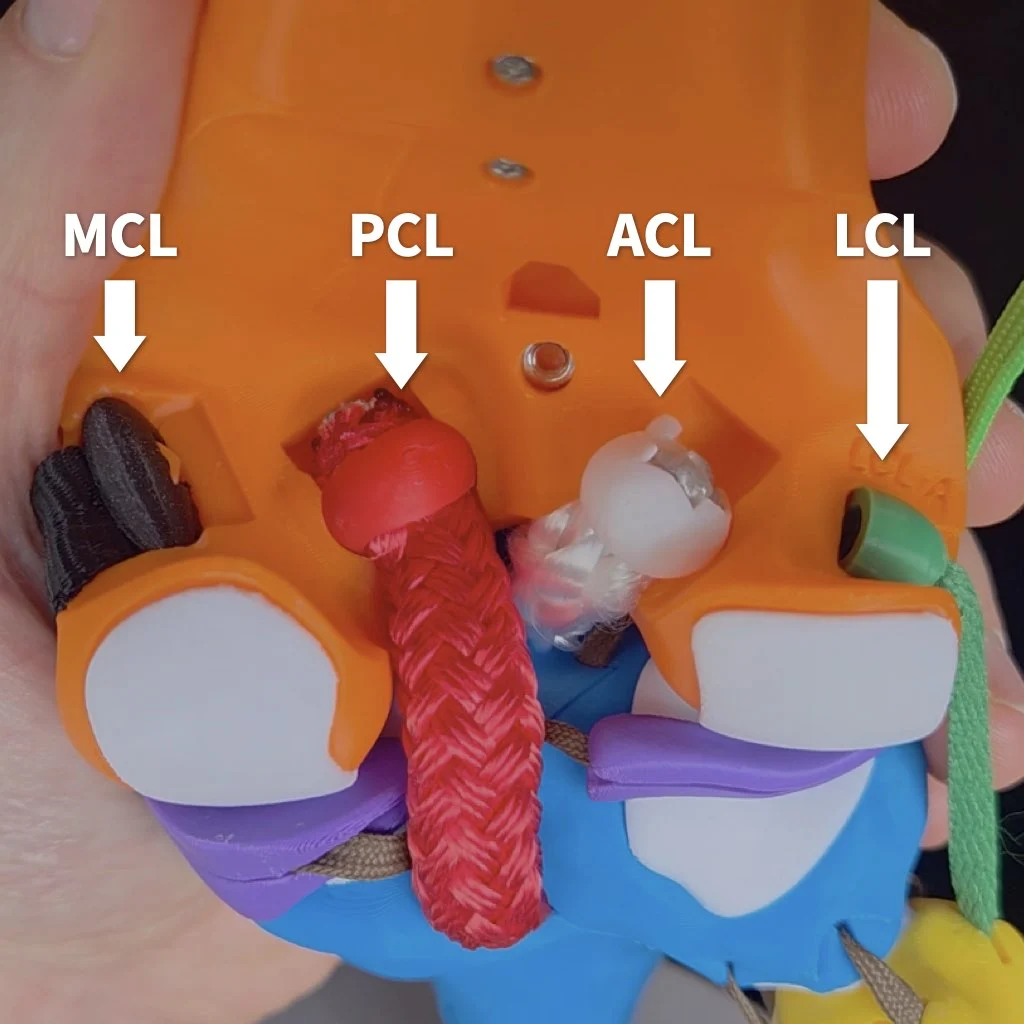
Inside, from medial to lateral, you'll see the anchoring clips for the: MCL, PCL, ACL, and LCL.

- To knock out a particular ligament, remove its clip from the socket in the femur. Note, that it's not necessarily to completely remove the ligaments from your kit, detaching them from the femur is sufficient. Tips on how to remove each particular ligament more easily will be mentioned when you get to that ligament in the guide.

- Replace the femur access door.

- To secure the door for your experiment, simply hold the access door in place with one hand while you simulate motions with your other hand. This activity goes much faster if you don't have to screw on and off the door each time.

Knocking out the MCL
Start by knocking out the medial collateral ligament (MCL). It's easiest to remove the clip for the MCL when the knee flexed to at least 90º (extending the knee tightens the MCL, making it more difficult to unclip).
To detach the MCL, first flex the knee to around 90º to slack the collateral ligaments.
Anterior-posterior translation
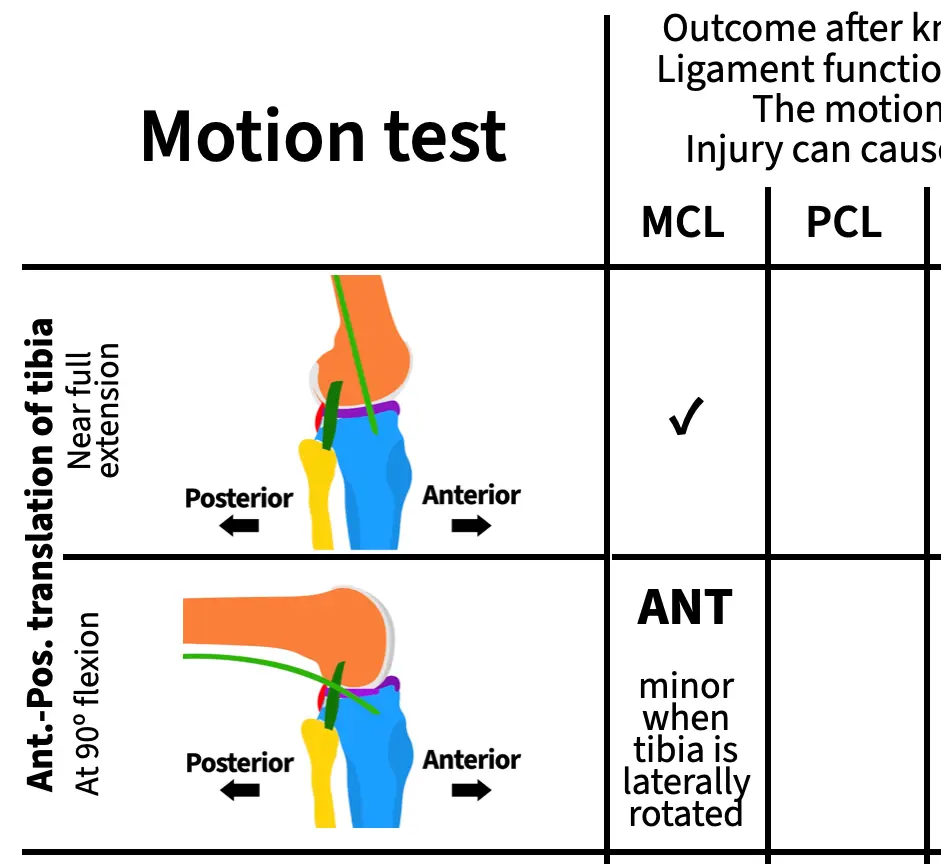
With your MCL knocked out, simulate anterior-posterior translation of the tibia at near full extension and write one of the following results in the corresponding cell of the table on page 2 of your activity worksheet. Then repeat with the knee flexed to 90º and once you're done, check your work by opening the "Assess" box below.
- ANT: The tibia translates anteriorly by more than 5 mm
- POS: The tibia translates posteriorly by more than 5 mm
- ✓: The tibia translates the normal amount along the AP translation axis
ASSESS
At both angles and with the tibia in a neutral long-axis position, the range of AP translation is normal. However, if you flex the knee to 90º and laterally rotate the tibia at the same time, you can observe excess anterior translation. For this activity, you don't need to test all possible combinations of motions for each test. So it's fine to put "✓" in both boxes. But if you want, you can write "ANT minor when the tibia is laterally rotated" for AP translation at 90º.
Remember that for each result, you can draw conclusions about the ligament's function and, if you observe abnormal motion, the motion that would injure that ligament and cause pain or instability. For example, you can draw the following conclusions about the MCL from this experiment:
- The MCL does not function on its own to limit anterior translation of the tibia when the knee is near full extension,
- the MCL functions to limit anterior translation of the tibia when the tibia is laterally rotated and the knee is flexed,
- anterior translation and lateral rotation of the tibia when the knee is flexed can damage the MCL,
- and if your MCL were damaged, you could experience pain or instability if your tibia moves anteriorly while laterally rotated during flexion.
Knockout experiments are powerful!
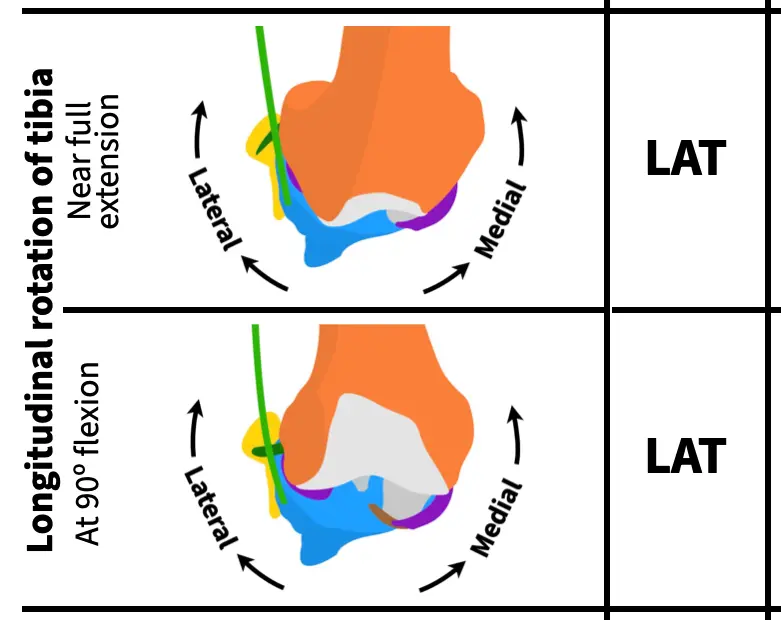
Longitudinal rotation
Next, rotate the tibia about its long axis at near full extension and with the knee flexed to 90º, writing one of the following results in the corresponding cells on page 2 of your activity worksheet. Once you've finished, check your work.
- LAT: Lateral rotation of the tibia causes condylar disarticulation (no cartilage at one or both points of contact)
- MED: Medial rotation of the tibia causes condylar disarticulation
- ✓: There is always cartilage on both bones at the point of contact
ASSESS
Knocking out the MCL causes excess (abnormal) lateral rotation of the tibia both near full extension and at 90º of flexion. So, you should have "LAT" in both rows for longitudinal rotation.
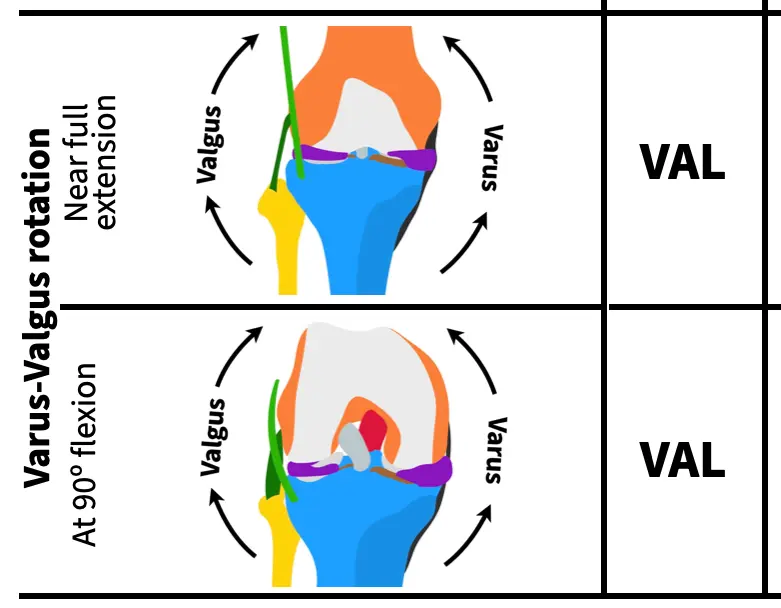
Varus-valgus rotation
Lastly, rotate the tibia along the varus-valgus axis at near full extension and with the knee flexed to 90º, writing one of the following results in the corresponding cells on page 2 of your activity worksheet. Once you've finished, check your work.
- VAL: Valgus rotation causes lift off between the medial condyles of more than 1 mm
- VAR: Varus rotation causes lift off between the lateral condyles of more than 2 mm at near full extension or more than 10 mm at 90º of flexion
- ✓: Normal amount of lift off
ASSESS
Knocking out the MCL causes excess (abnormal) valgus rotation of the tibia both near full extension and at 90º of flexion. So, you should have "VAL" in both rows for varus-valgus rotation.
As you can see the MCL pulls a lot of weight in stabilizing the knee! By working through this ligament first with opportunities to check your work along the way, you hopefully have a good idea of how to simulate the same motions and recognize abnormal motions for the remaining ligaments. Note, that just because the MCL has many different functions doesn't mean that the other ligaments will too. For some ligaments, you'll observe just a single abnormal motion in completing your table, for others you'll find more than one.
Knocking out the PCL
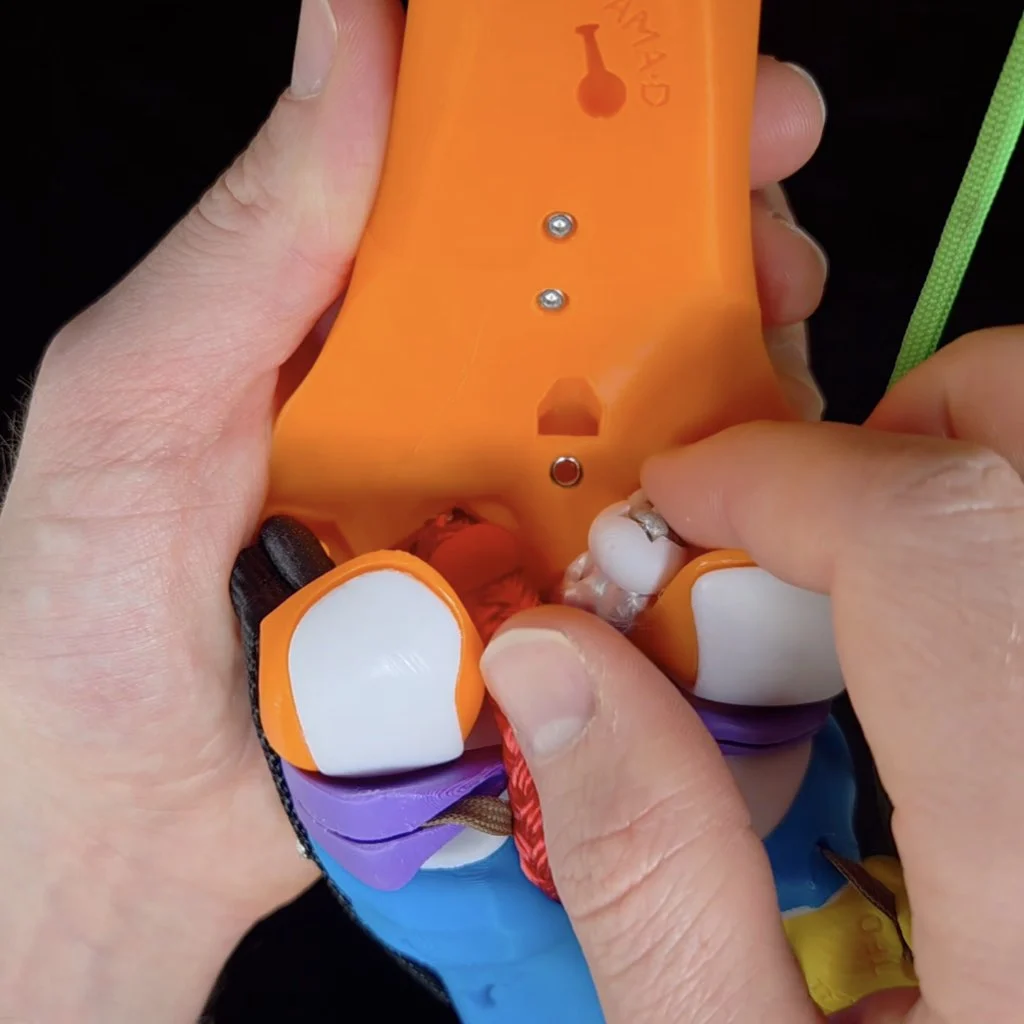
Next, reattach the MCL and knock out the posterior cruciate ligament (PCL). It may be easier to remove the PCL by pushing the clip out from the anterior (front) of the knee.
It may be easier to detach the PCL by first flexing the knee and then pushing the clip out of its socket from the front (anterior) of the knee.
With your PCL knocked out, simulate all the motions to complete the next column.
You'll use the same abbreviations for each motion test as for the MCL. Here are those abbreviations again for easier reference:
Anterior-posterior translation
- ANT: The tibia translates anteriorly by more than 5 mm
- POS: The tibia translates posteriorly by more than 5 mm
- ✓: The tibia translates the normal amount along the AP translation axis
Longitudinal rotation
- LAT: Lateral rotation of the tibia causes condylar disarticulation (no cartilage at one or both points of contact)
- MED: Medial rotation of the tibia causes condylar disarticulation
- ✓: There is always cartilage on both bones at the point of contact
Varus-valgus rotation
- VAL: Valgus rotation causes lift off between the medial condyles of more than 1 mm
- VAR: Varus rotation causes lift off between the lateral condyles of more than 2 mm at near full extension or more than 10 mm at 90º of flexion
- ✓: Normal amount of lift off
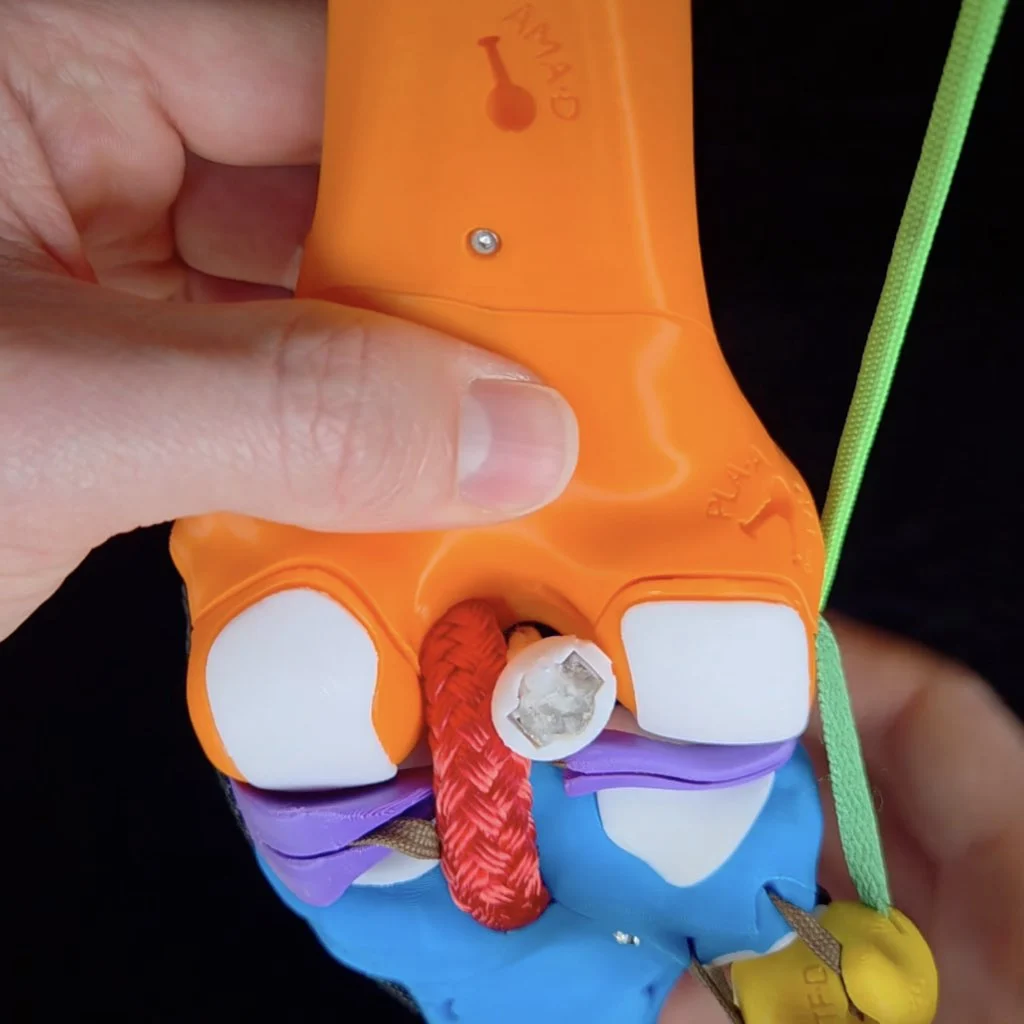
Knocking out the ACL
Next, reattach the PCL and knock out the anterior cruciate ligament (ACL) as shown in the video at the top of this page. Finding the excess motions that result from an ACL knock out is a bit trickier than for the other ligaments because of an interaction with the menisci. Do the anterior-posterior translation test closer to near full extension (about 180º rather than 160º) and with a bit more force than for the other ligaments.
With your ACL knocked out, simulate all the motions to complete the next column.
Knocking out the LCL
Next, reattach the ACL and knock out the lateral cruciate ligament (LCL). Like the MCL, it's easiest to remove the clip for the LCL when the knee flexed to at least 90º (extending the knee also tightens the LCL, making it more difficult to unclip).
Like for the MCL, first flex the knee to around 90º to slack the collateral ligaments to remove the LCL.
With your LCL knocked out, simulate all the motions to complete the next column.
Knocking out the IT tract/band
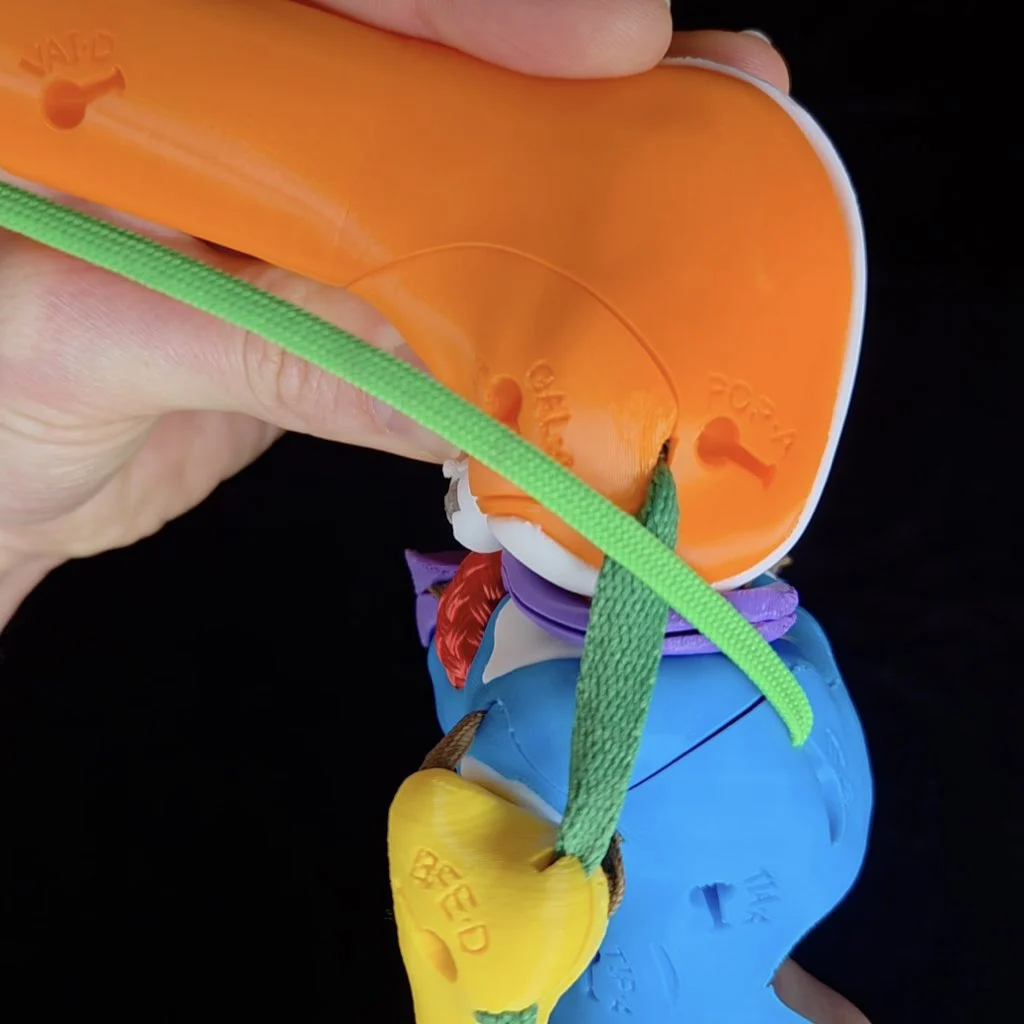
Next, reattach the LCL and knock out the iliotibial (IT) tract/band. To detach the IT tract, simply unhook it from its attachment on the cross-section plate.
Video showing how to detach the IT band from the superior cross-section plate.
With your IT band knocked out, simulate all the motions to complete the next column.
Knocking out the MCL and ACL
For your last knockout test, you'll knock out two ligaments at the same time. Reattach the IT tract and knock out both the MCL and the ACL.
With your MCL and ACL band knocked out, simulate all the motions to complete the next column. Make a note if any of the excess motions that you observe are greater than when the MCL or ACL is knocked out on its own—indicate this in your table by writing "greater" along with the direction of excess motion.
Reattaching all of the ligaments and the femur access door
Once you've finished running all of your simulations, reattach all of the ligaments and the femur access door using the screw and Allen wrench to secure it into place.
Connecting knee ligament functions to knee injuries
Take a look at the table you completed table of knee ligament knockout experiments and outcomes from page 2 of the activity worksheet. You now have a fairly complete picture of how the ligaments of the knee limit particular motions, the motions that would injure them, and how those injuries would destabilize the knee. You should now be able to answer the questions below related to the likelihood of various types of knee injuries and how they can occur. For some questions, referring to your completed table will be sufficient. For others, it will be helpful to have your knee kit handy for simulations and testing out ideas.
Answer the questions 1-8 below, writing your answers on pages 3-6 of your worksheet.
- Are there ligaments that have the same function(s) as other ligaments? If yes, why do you think this is (from the perspective of knee evolution and/or selection for increased performance of the knee)? If no, why not?
- Based on your answer to the previous question, would you expect most knee injuries to affect a single ligament or more than one ligament? Why or why not?
- A common knee injury is a blow to the side of the knee (e.g., from a side tackle in sports). Which ligament or ligaments would be injured by a blow to the lateral side of the knee? Why?
- The MCL is one of the most commonly injured ligaments in the knee, if not the most commonly injured (Andrews et al. 2017). Why do you think this is?
- When the ACL is injured, the MCL is often injured too (Willinger et al., 2021; Cristiani et al., 2024). Why do you think this is?
- When the MCL and ACL are injured together, the medial meniscus is also often injured too. For this reason, these three structures are known as the "unhappy triad" or the "terrible triad." One reason for this is because the medial meniscus is connected to the MCL directly by a ligament (this ligament is not represented in your knee kit). Using your knee kit, can you provide an additional reason why an injury of the MCL and the ACL would often also injure the medial meniscus?
- Another ligament commonly injured with the ACL is the IT tract (Mansour et al., 2014). Why do you think this is and what would be the nature of the injury to cause the IT tract to be injured in addition to the ACL?
- Two commonly cited strategies for decreasing the chances of an ACL injury are to land with your knees bent (i.e., more flexed) and with your knees aligned over your toes. Based on your simulations and what you now know about the functions of the knee ligaments, why are these effective strategies?
References cited
The following articles/books are references cited in this activity:
- Andrews, K., Lu, A., Mckean, L., & Ebraheim, N. (2017). Medial collateral ligament injuries. Journal of orthopaedics, 14(4), 550-554. DOI: 10.1016/j.jor.2017.07.017.
- Cristiani, R., van de Bunt, F., Kvist, J., & Stålman, A. (2024). High prevalence of associated injuries in anterior cruciate ligament tears: a detailed magnetic resonance imaging analysis of 254 patients. Skeletal Radiology, 53(11), 2417-2427. DOI: 10.1007/s00256-024-04665-9.
- Mansour, R., Yoong, P., McKean, D., & Teh, J. L. (2014). The iliotibial band in acute knee trauma: patterns of injury on MR imaging. Skeletal radiology, 43(10), 1369-1375. DOI: 10.1007/s00256-014-1918-2.
- Willinger, L., Balendra, G., Pai, V., Lee, J., Mitchell, A., Jones, M., & Williams, A. (2022). High incidence of superficial and deep medial collateral ligament injuries in ‘isolated’ anterior cruciate ligament ruptures: a long overlooked injury. Knee Surgery, Sports Traumatology, Arthroscopy, 30(1), 167-175. DOI: 10.1007/s00167-021-06514-x.
Any 3D renderings or animations in this activity were created using Blender.
All anatomical data used to make the kit and activities are from:
- National Library of Medicine. (1995–). The Visible Human Project [Digital Data Set]. Bethesda, MD: National Institutes of Health.https://www.nlm.nih.gov/research/visible/visible_human.html.
Activity as a Station
Station setup
To set up this activity as a station, it's easiest if you have six Human Knee Active Learning Kits (Basic or Full) each with a different ligament or ligament combination knocked out (MCL, PCL, ACL, LCL, IT tract, and MCL+ACL). If you set up the IT band knockout by just disconnecting it from the superior cross-section plate (i.e., leaving it connected to the tibia), that kit can also double as a "normal" kit for the students to compare to the various knockouts; all they have to do is reattach the IT band to the superior cross-section plate.
By having one kit per knock out, students can perform the activity faster (since they do not have to attach and detach the ligaments for each experiment). In addition, you can space out each kit as a separate "sub-station" so that up to six students or groups can do the activity at once (i.e., each student or group is using one kit at a time and all kits are being used simultaneously). If you only want to use a single kit for this activity, it's better to have students work through the full self-guided activity since they'll need detailed instructions on how to attach and detach each ligament.
In addition to the knee kits, you'll need:
- The printed station instructions for this activity.
- A printed station worksheet for each student or group (students can also access a digital PDF of worksheet via a QR code on the station instructions).
- The ruler from each kit (stored on Parts Plate A) so that students can measure anterior-posterior translation.
Station instructions
PDF instructions for the station
Station worksheet
Use this worksheet to complete this activity as a station
Educator Guide
Activity at a glance
Preventing lost screws. For this activity, if students are unscrewing and removing the femur access door themselves to knockout the ligaments, we recommend that you remove the femur door access screw prior to the start of the activity and keep it somewhere secure so you can reattach it after the students finish. This prevents students from losing the screw during the activity. The students don't need to screw the door back into place each time they knock out a ligament—they can simply hold the door in place with one hand while simulating the motions with the other. If you do happen to lose the femur access door screw, you can use one of the screws for the cross-section bracket, stored on Parts Plate A; they're the same size (M3x16 mm) and the bracket will stay connected pretty well to the cross-section plate without any screws.
| Time to complete | Approximately 2-2.5 hours |
| Age level | Advanced high school, College, or Professional school |
| Bloom's level(s) |
|
| Learning objective |
After completing this activity, students will be able to infer (BL4 - Analyze) knee ligament function using a knockout experiment (BL3 - Apply) and motion simulations (BL5 - Evaluate) and use these results to explain (BL5 - Evaluate) patterns of knee ligament injury and recommended strategies for knee injury avoidance. |
| Assessment |
|
| Materials needed | See Materials needed |
|
Systems/Tissue types |
|
| Core concepts |
|
| Competencies |
|
| Activity ID | HSKN3 |
About the kit, viewing answer key, purchasing kits, and more
Why was this kit developed?
The Human Knee Active Learning Kit is a life-size and fully functional reproduction of a real knee designed by 3D Anatomy Studios to engage learners in a deeper understanding of knee structure and function through hands-on activities.
Who made this kit?
The Human Knee Active Learning Kit was designed by 3D Anatomy Studios founder Aaron Olsen, PhD. Aaron is a professional anatomist and designer who has published several peer-reviewed articles on the form, function, and evolution of vertebrates and has taught comparative vertebrate anatomy at the University of Chicago and human gross anatomy at the University of Chicago's Pritzker School of Medicine and Brown University's Warren Alpert Medical School. The kit was designed in the open-source 3D modeling program Blender using public domain data from the NIH Visible Human Project. Every kit is made by hand at the 3D Anatomy Studios workshop in Portland, Oregon.
When was this kit made?
Initial development of the Human Knee Active Learning Kit began in late 2024. Prototypes were exhibited at the Society for Integrative and Comparative Biology annual meetings in January 2025 and January 2026 and the first commercially available version of the kit was completed in May 2026.
Where was this kit made?
The design process for the Human Knee Active Learning Kit began in Pawtucket, Rhode Island (where 3D Anatomy Studios was located prior 2026) and completed in Portland, Oregon (where 3D Anatomy Studios moved in January 2026). As far as manufacturing, although we source the component parts (screws, 3D printer filament, ropes, straps, etc.) from various suppliers, we do all of the remaining manufacturing work (3D printing, cord cutting and preparation, paper part printing and lamination, assembly, etc.) ourselves at our workshop in Portland, Oregon.
Pawtucket, Rhode Island was once heavily populated by the Pokanoket and Nipmuc tribal nations as well as the Narragansett, Niantic, and Manissean who are the ancestral habitants of the land we now call Rhode Island. Portland, Oregon was once heavily populated by the Multnomah, Wasco, Cowlitz, Kathlamet, Clackamas, Chinook, Tualatin, Kalapuya, Molalla, and numerous indigenous peoples who, for millennia, made their homes along the river basin we now call the Columbia River. We acknowledge the Indigenous peoples who have inhabited and continue to inhabit these lands on which we live and work and we honor with gratitude their historical and cultural relationship to the land.
Where did the anatomical data come from?
The anatomical data used to build the kit were sourced exclusively from the Visible Human Female of the NIH Visible Human Project. These data were first released into the public domain in 1995. Because these data are in the public domain, they can be used for any purpose, including commercial use. Hard tissue data (i.e., bones) were segmented from CT scans and soft tissue data (i.e., muscles, tendons, ligaments, cartilage, etc.) were segmented from cryosection image stacks. All segmentation was performed using the open-source software 3D slicer. Meshes were exported from 3D Slicer and mesh face counts were reduced using the open-source software MeshLab, before importing meshes into Blender.
How is the kit licensed? Can I copy the kit?
3D Anatomy Studios asserts copyright over the Human Knee Active Learning Kit, covering all aspects of the kit design, including packaging, that represent creative expression, beginning with its initial design in 2025. This grants 3D Anatomy Studios exclusive rights to reproduce, distribute, display, or adapt the kit. If you'd like to request permission to reproduce, distribute, display, or adapt the Human Knee Active Learning Kit, please email us at contact@3danatomystudios.com. Requests that are non-commercial may be granted at no cost; commercial requests may require a licensing fee. Please note that while 3D Anatomy Studios asserts copyright over the kit itself, the activity guides for the kit are released with a CC NC-BY-SA license.
How can I use the kit?
The Human Knee Active Learning Kit is designed for hands-on, interactive learning in multiple contexts:
- Students in human anatomy or biomechanics courses can use the kit in a lab setting either as a station (set up by an educator) or on their own for self-guided learning by following any of the available activity guides.
- Educators teaching human anatomy or biomechanics can use the kit in a lecture or lab setting to demonstrate knee form and function, muscle coordination, and joint biomechanics, using the available activity guides as a reference, to help prepare a demonstration, or to help set up a station.
- Clinicians working with patients who have knee injuries can use the kit with patients to clearly explain how the knee works, how the patient's knee was injured, and the reasoning behind a particular course of treatment without needing to use complicated jargon, using the available activity guides as a reference and for assembly and disassembly instructions.
- Clinical educators in the fields of sports medicine and orthopedics can use the kit to demonstrate to students and trainees in the healthcare profession the complex mechanics of the knee and the effects of particular injuries through knockout experiments, using the available activity guides as a reference and for assembly and disassembly instructions.
- Physical therapists working specifically with high-performing athletes can use the kit to help athletes understand how to improve their performance and reduce the risk of injury, using the available activity guides as a reference and for assembly and disassembly instructions.
How are the activity guides structured?
Every activity guide for the kit follows the same structure:
- Activity Guide: A step-by-step guide through the activity with hints, self-assessments, and a worksheet. This can be used by students for self-guided learning or by educators and clinicians as a reference.
- Activity as a Station: Materials that educators can use to set up the activity as a station, such as in a lab setting, including an instruction sheet and a modified worksheet ideal for use as a station.
- Educator Guide: An overview of the activity for educators and answer key.
How do I view the answer keys?
The activity answer keys will only be visible to logged in users who have been given educator permissions and have purchased one or more Human Knee Active Learning Kits. Once you've been granted access, you can find the answer keys in the "Educator Guide" section of each activity. If you’ve purchased one or more kits, you should have received an email to access your Educator account. If you need us to resend this email or have any other issues accessing your account, please email us at contact@3danatomystudios.com.
Can I share and/or edit the activity guides?
All of the activity guides for the kit are released under a CC NC-BY-SA license. This allows you to share and edit this module as long as you (1) do not sell the module or module derivatives ("NC"), (2) attribute the author(s) of all the content, including preserving text and graphic attributions ("BY"), and (3) share the module under the same license ("SA").
How were these activity guides made?
These activity guides were created by professional anatomists and educators at 3D Anatomy Studios using the open-source wiki software Bookstack. You can see the author of each activity by seeing who it was created by (on the main page of the activity). The guides are all hosted online at the domain guides.3das.us, which is maintained by 3D Anatomy Studios.
Was AI (artificial intelligence) used to make these guides?
No. None of the content on this site (text, images, videos, etc.) was generated by AI.
How can I purchase kits?
To purchase Human Knee Active Learning Kits, please send us an email to contact@3danatomystudios.com.