Activity Guide
A full guide to this activity that students can follow for self-guided learning or that you can use to prepare a demonstration or set up a lab station
- Activity worksheet (Self-guided)
- Introduction
- Materials needed
- Clamping your knee kit
- Simulating muscle co-contraction
- References cited
Activity worksheet (Self-guided)
Use the worksheet below for the self-guided activity. If you are setting this activity up as a station, use this worksheet instead.
Introduction
Have you ever seen videos of early generations of humanoid, walking robots? Designed by expert engineers, with thousands of dollars worth of tech and an equal investment of time in designing and troubleshooting, these robots nevertheless found the simple task of walking a sometimes insurmountable challenge.
A video compilation of robots falling down at the DARPA robotics challenge from a 2015 article by Erico Guizzo and Evan Ackerman.
The field of humanoid robotics has made enormous progress in the time since these videos were recorded. But these early generation robots demonstrate the extreme difficulty of mimicking the seemingly simple achievements of animal motor systems, including those of humans. A key requirement for a motor system to function properly is that all the "motors" (muscles, in the case of our body) work together in coordinated way. In this activity, you'll simulate different muscles of the knee joint contracting together in different patterns of coordination to find out how this coordination produces smooth, controlled motions and can even help protect joints from injury.
Materials needed
For this activity you’ll need:
- The worksheet for this activity (either opened in a PDF viewer on a desktop/tablet computer or printed out).

- A Human Knee Active Learning Kit (Basic or Full model). You do not need any of the muscles for this activity or the patella. If your knee kit has muscles attached, detach all the muscles and attach them to their designated spot on the parts plate(s). You will need the patella, however. Once you've removed all the muscles, leave the patella hanging from the patellar ligament; you'll be attaching manual muscle cords to hold it in place. Once you've finished preparing your knee for this activity, it should look like the image below.
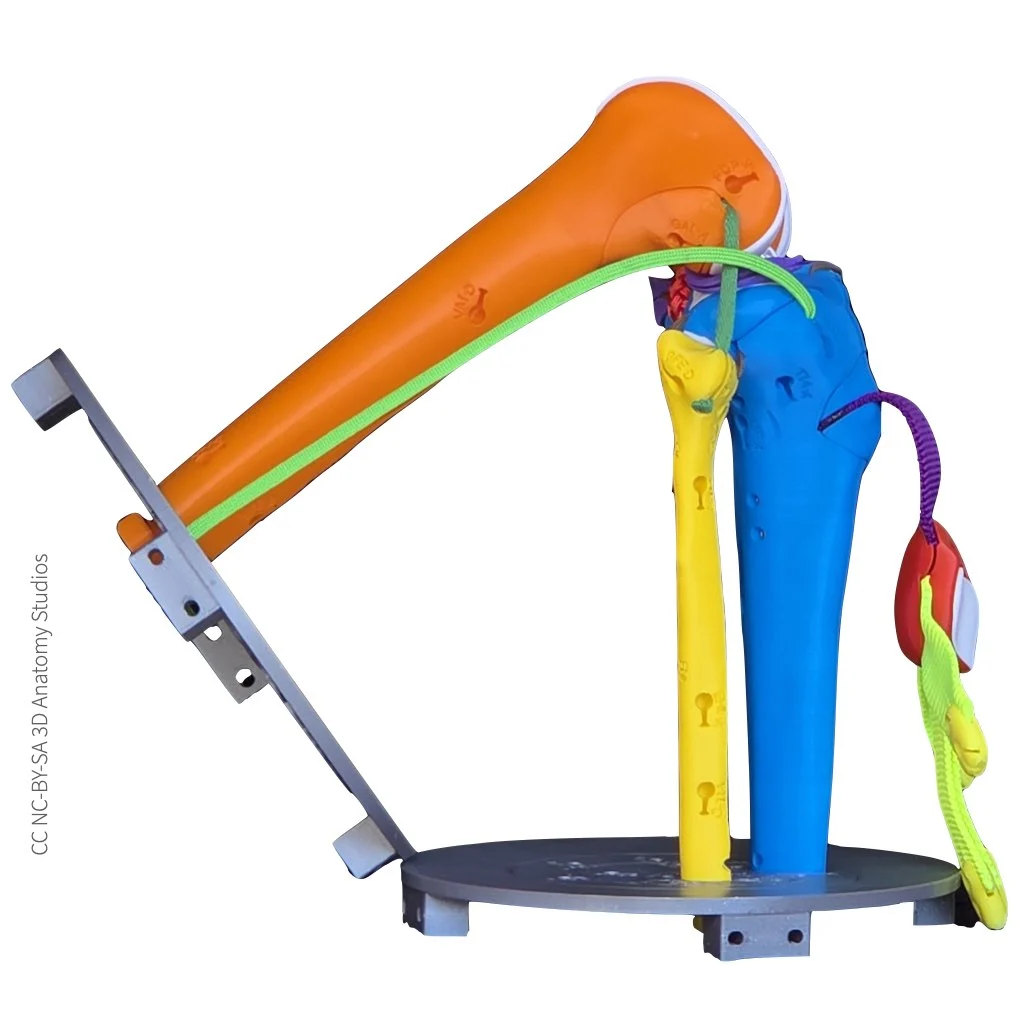
The knee kit shown from a lateral view with all of the muscles removed and the patella left hanging by the patellar ligament.
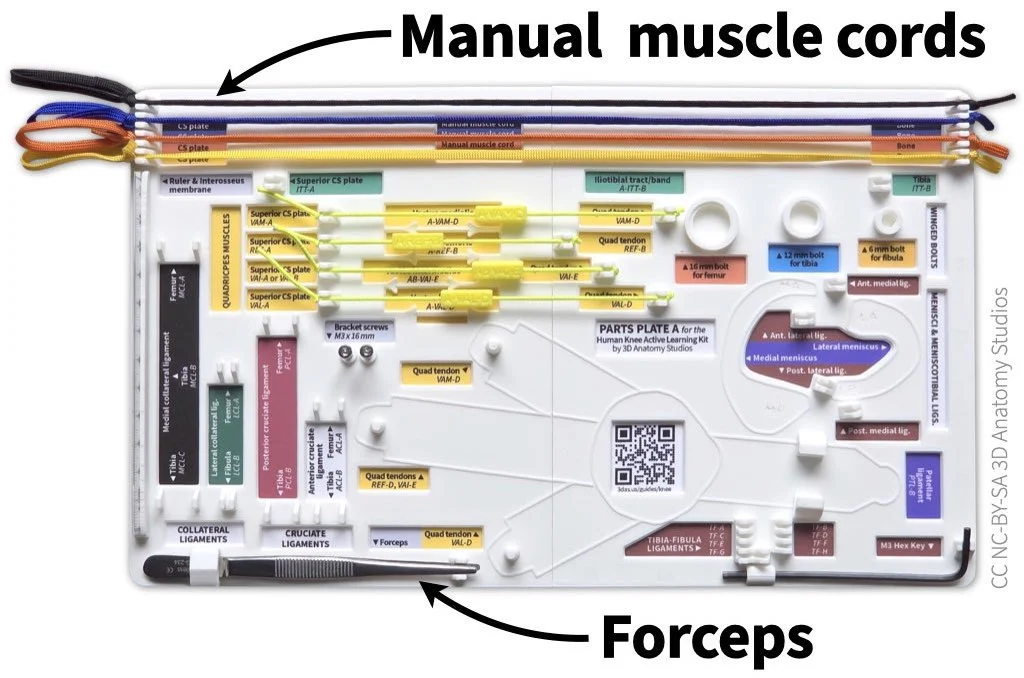
- The following items from Parts Plate A in your knee kit:
- All four Manual muscle cords
- Forceps

The manual muscle cords and forceps should be attached to Parts Plate A in your kit. The manual muscle cords attach to hooks at the top of the plate and the forceps fit into a holder in the bottom left corner.
- The cross-section plate bracket from your knee kit box.
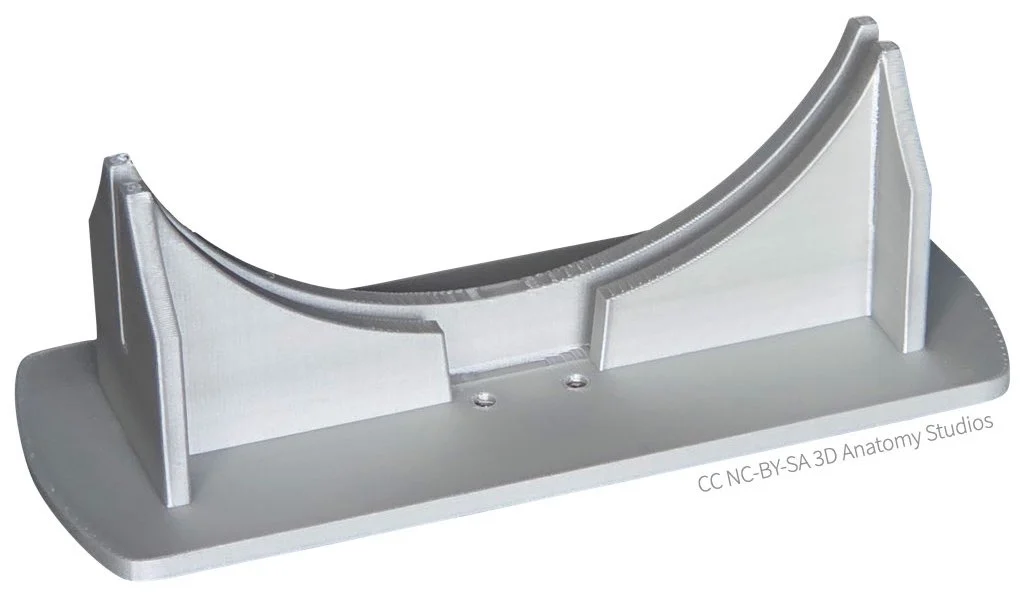
The cross-section plate bracket
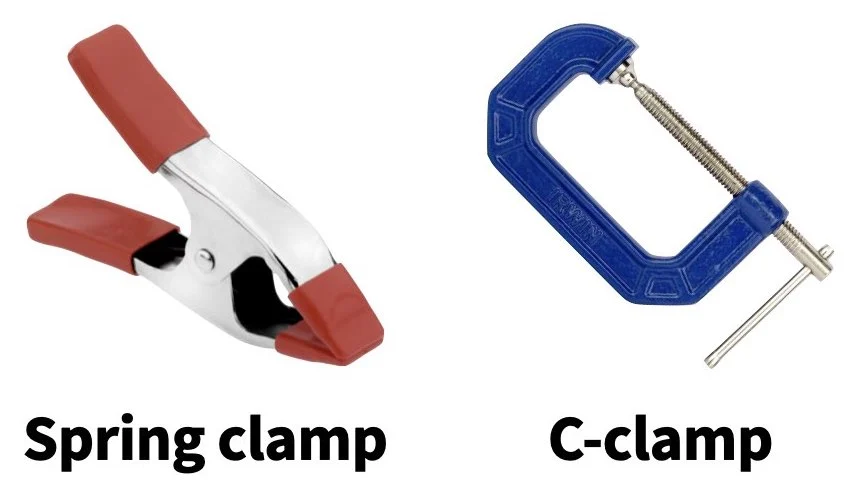
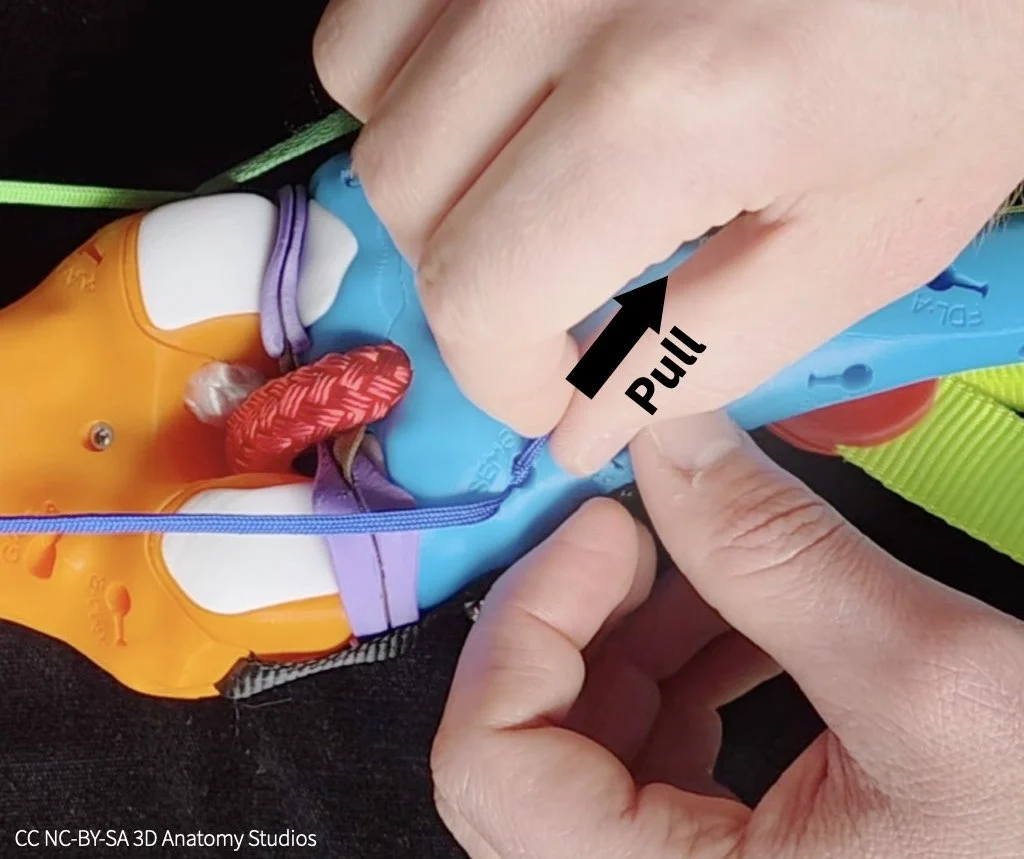
- Clamps to attach the cross-section bracket to your tabletop (not included in your kit). It's helpful to have two clamps per bracket to secure both sides of the bracket and keep it from twisting.

To attach the cross-section plate bracket to the edge of your tabletop, you can use clamps such as spring clamps (left) or c-clamps (right). The maximum clamping widths for the clamps shown above are 2 inches (for the spring clamp) and 3 inches (for the c-clamp). The size clamp will depend on the thickness and design of your tabletop.
- (Optional) Some material to place between the clamps and the tabletop to prevent damage from the clamps. A couple wooden shims stacked to make a thin rectangle are a cheap and effective solution (not included in your kit).

If you're using a c-clamp or some other clamp with metal contacts, you'll probably want to use some material between the clamp and the tabletop to not damage the surface. Wood shims work well for this.
Clamping your knee kit
To perform manual muscle simulations with your knee kit, it's easier to secure your kit to a surface like a tabletop. This will free up your hands to be able to attach and pull the manual muscle cords.
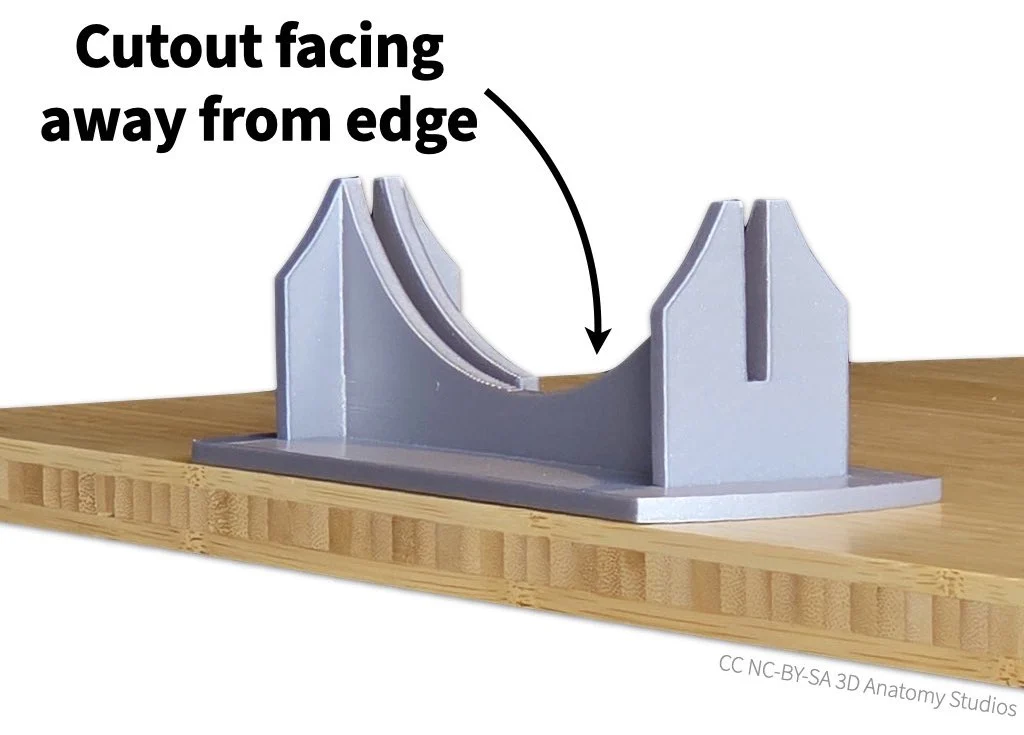
- Start by setting the bracket along an edge or at a corner of your tabletop. The slot cutout of the bracket should be facing away from the edge of the table, as shown in the image below.

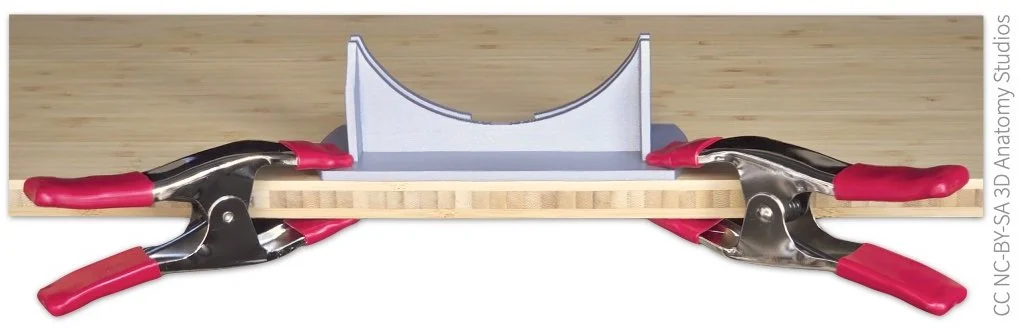
- Next, secure the bracket to the tabletop using the two clamps. Attach the clamps at opposite sides of the bracket to keep the bracket from twisting on the tabletop and angle them as much as possible so they don't block the motion of the knee. If you're using some material to protect the table surface, insert these between the clamp and the table.

- Slide the superior cross section plate (the one attached to the femur) into the bracket, oriented so that the knee is hanging out over the side of the table (the foot of the cross section plate should slide into the corresponding slot on the bracket).

Simulating muscle co-contraction
Now that the femur of your knee kit is fixed in place, you're ready to start simulating various patterns of muscle contraction to see these affect the knee joint and the motion of the tibia.
An extensor driving motion on its own
Attaching a manual muscle cord to a clip
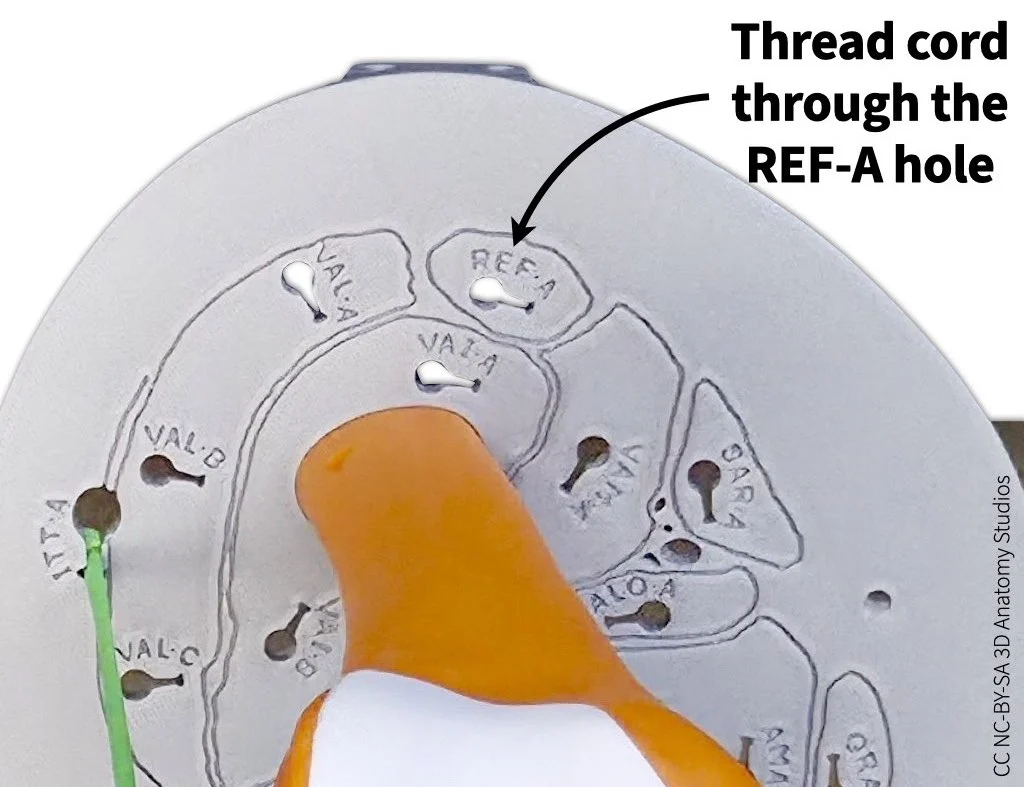
You'll start by simulating the contraction of a single muscle on its own to see what happens when muscles don't co-contract (also called co-activate) with other muscles, using the rectus femoris muscle as an example. This muscle is one of the four quadriceps muscles (rectus femoris, vastus lateralis, vastus medialis, and vastus intermedius), which are knee extensor muscles (they extend the knee). To attach the rectus femoris manual muscle cord, follow the steps shown in the video or listed out below.
Video showing how to attach a manual muscle cord through the cross-section plate to one of the quadriceps tendons. In this video, the manual muscle cord represents the rectus femoris muscle.
- Thread a manual muscle cord (the end with a simple knot, not the looped end) through the attachment hole/site for rectus femoris in the superior cross-section plate (labeled REF-A). The manual muscle cords come in four colors, choose whichever you would like. You can choose yellow to match the color for the anterior compartment muscles.

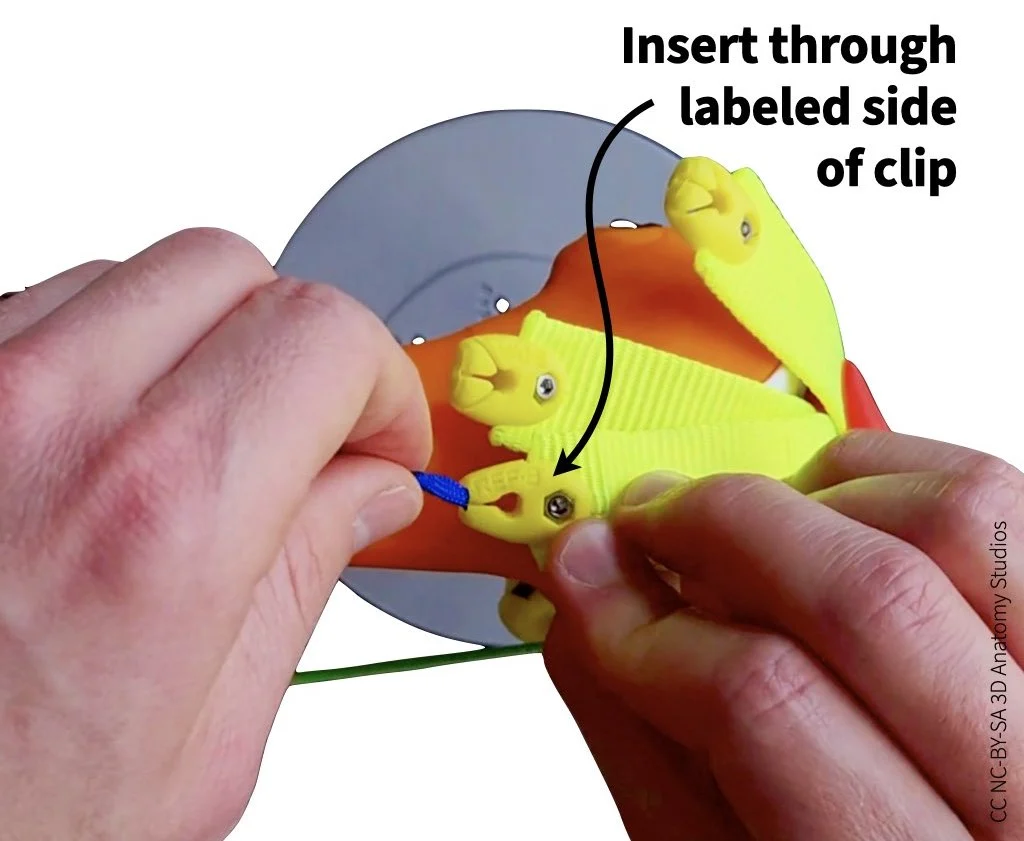
- Continue pulling the cord through the cross-section plate until it reaches the rectus femoris tendon clip (labeled REF-B). Insert the end of the cord through the hole in the clip, ensuring that you insert the cord through the labeled side (i.e., you should see "REF-B" as you're inserting the cord).

- To secure cord in the clip, guide the cord into the slot of the clip and pull until the knot locks into place.


Simulating muscle contraction
To simulate the contraction and shortening of the rectus femoris, pull on the looped end of the cord. Simulate shortening of the rectus femoris a few times. Get a feel for the range of flexion and extension you can achieve and how well you can control the motion.
Video showing how to simulate muscle contraction using a manual muscle cord.
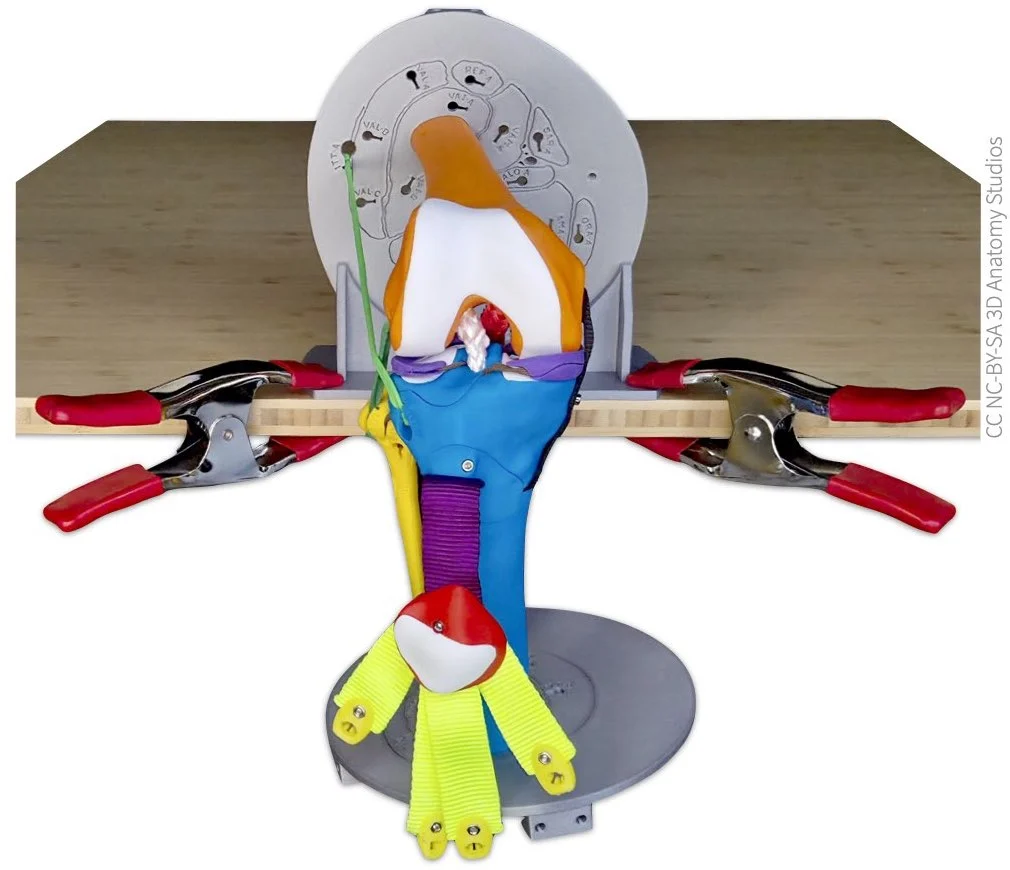
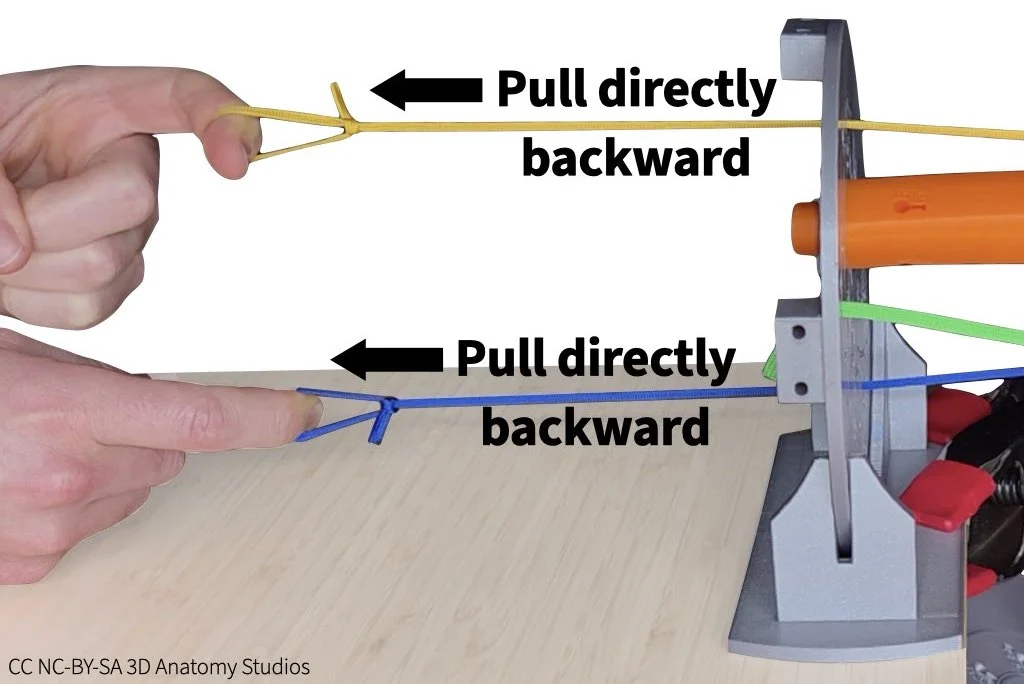
Whenever you're pulling manual muscle cords through the cross-section plate, pull directly backward (not upward). If you pull upward, the cord will pull up on the cross-section plate, possibly lifting it out of the bracket (see image below).
What's the problem with using a single muscle to move a bone? Write your answer on page 1 of the activity worksheet.
A flexor and extensor driving motion
In the previous simulation, your rectus femoris acted as an agonist (a muscle whose contraction moves a part of the body). However, you should have noticed a problem with controlling the motion using just one muscle. What you need to fix this problem is a second muscle that acts in opposition to the agonist: an antagonist; together, these form an agonist-antagonist pair. When an agonist and antagonist muscle co-contract, they either both stay the same length (isometric contraction) or one muscle shortens while the other one lengthens (concentric contraction and eccentric contraction, respectively).
The primary muscles acting in opposition to the quadriceps (extensors) are the hamstrings: the semimembranosus, semitendinosus, and the biceps femoris. The hamstring muscles are knee flexors (they flex the knee). Attach a second manual muscle cord to your knee kit representing the semimembranosus, using the instructions below.
Attaching a manual muscle cord to a bone
To attach a manual muscle cord to a bone, follow the steps shown in the video or listed out below.
Video showing how to attach a manual muscle cord through the cross-section plate to a muscle attachment site on a bone. In this video, the manual muscle cord represents the semimembranosus muscle.
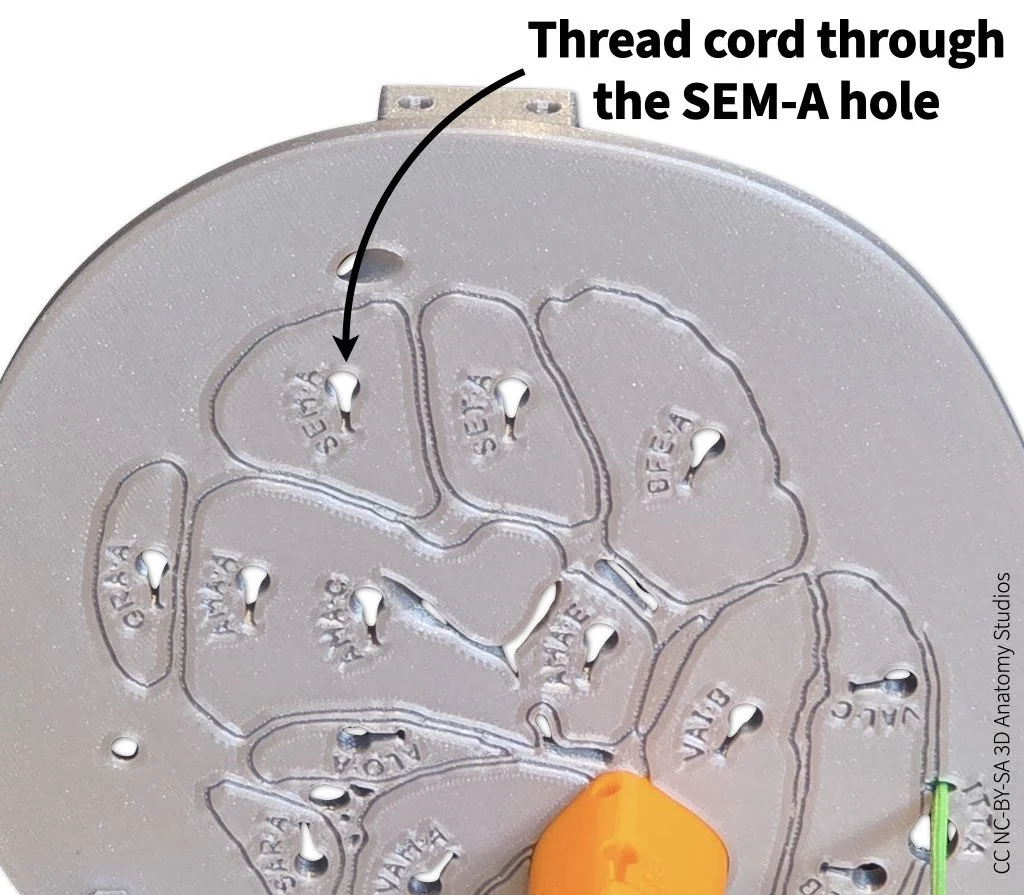
- Just as you did for the rectus femoris, thread a manual muscle cord (the end with a simple knot, not the looped end) through the superior cross-section plate but this time pull it through the attachment hole/site for semimembranosus (labeled SEM-A).

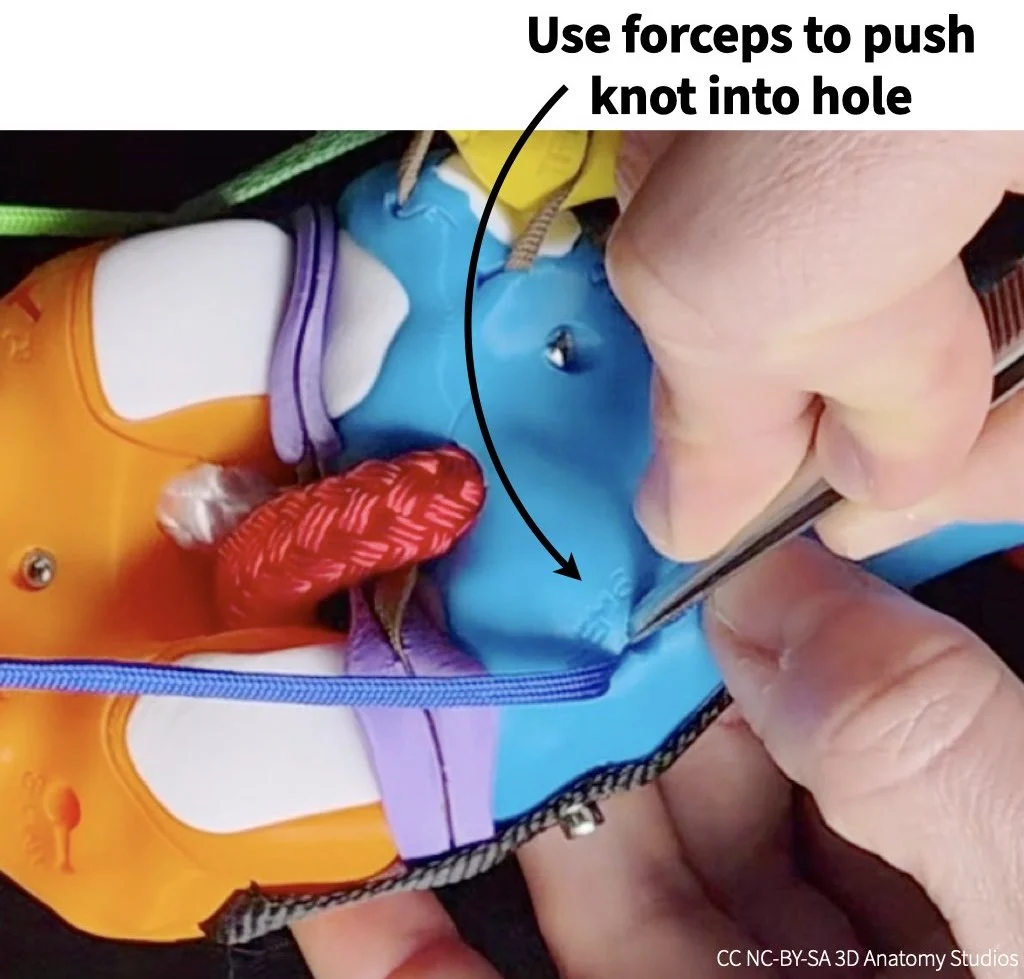
- Continue pulling the cord through until it reaches the attachment hole/site for the semimembranosus on the posterior aspect of the tibia, just inferior to the tibia's medial condyle (labeled SEM-B). Use forceps to push the knot into the attachment hole. The knot should be pushed fully below the surface of the bone, into the hole.

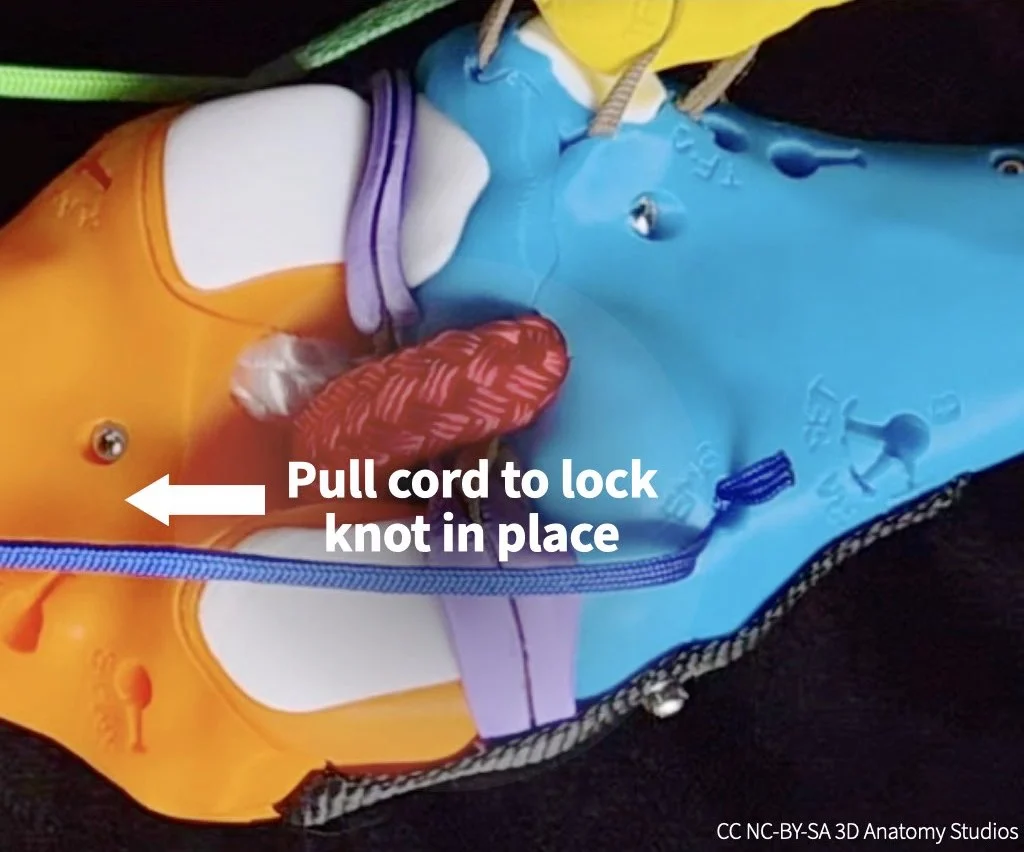
- Pull the cord into the hole slot until the knot is caught by the hook inside the hole and the cord is secured (you might feel the knot "click" into place). If the knot pulls out of the hole when you do this, you might need to hold the knot inside the hole with the forceps while pulling on the cord to keep it in place.

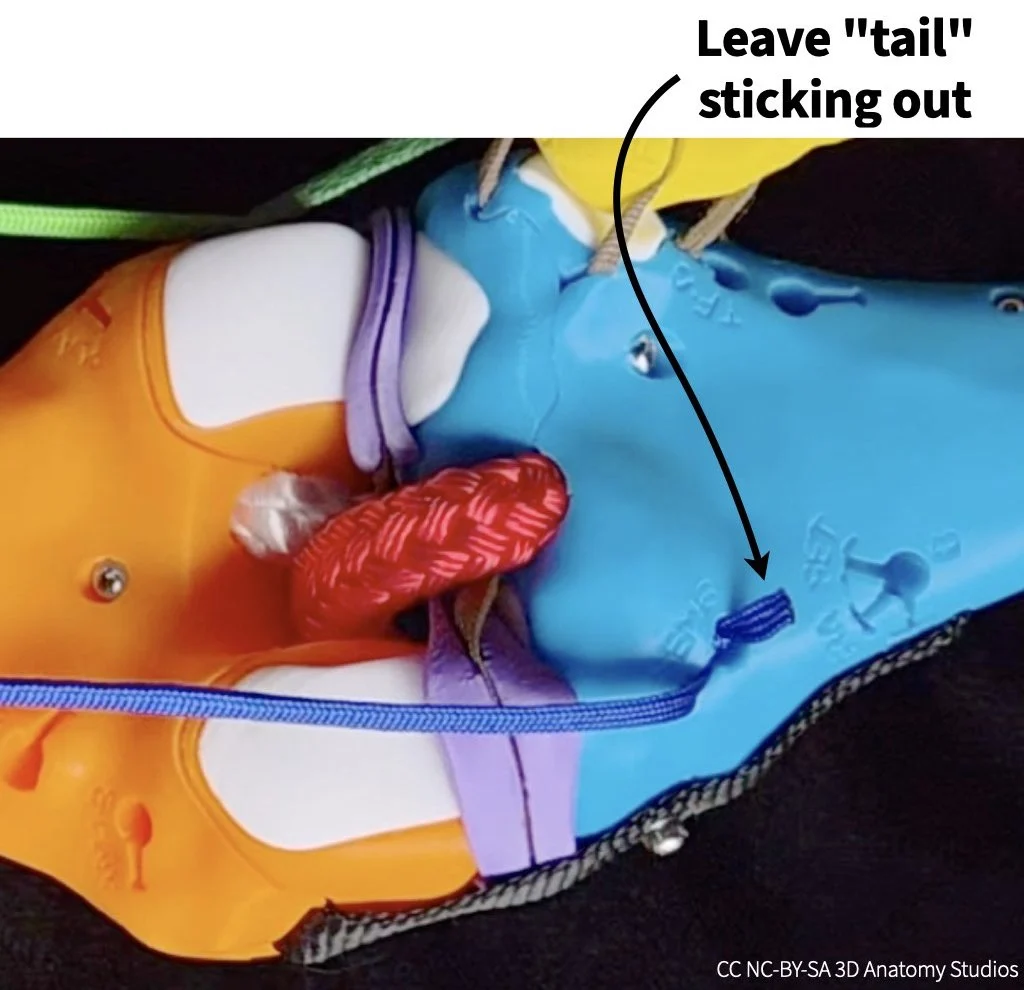
- Leave the cord's "tail" (the bit of cord after the knot) sticking out of the hole; this will make it easier to detach the cord later.

Whenever you're attaching a muscle to your knee kit, be sure that the two attachment sites have the same 3-letter muscle code, indicating they belong to the same muscle. For example, when you attached the rectus femoris from/through the cross-section plate to the rectus femoris tendon, both of these sites had the 3-letter code "REF," indicating that both are rectus femoris attachment sites. The sites will have different letters after the three letters (e.g., REF-A, REF-B, etc.); these letters indicate different sites for the same muscle. If you attach a muscle to sites with two different 3-letter codes, you're creating a muscle that doesn't exist. Is that fun? Yes, of course. But it's not within the scope of this activity.
Simulating muscle contraction
Now that you have both manual muscle cords attached, simulate co-contraction of the rectus femoris and semimembranosus to rotate the knee through flexion and extension as shown in the video below.
Video showing how to simulate co-contraction of two muscles using the manual muscle cords. In this video, the yellow (upper) muscle cord represents the rectus femoris and the blue (lower) muscle cord represents the semimembranosus.
Based on your simulation, why do you think at least two muscles are needed to drive smooth, controlled motion? And why is muscle coordination (regulating the timing and force of muscles relative to other muscles) important when co-contracting multiple muscles (i.e., why can't you just contract all muscles with equal tension at the same time)? Write your answers on page 1 of the activity worksheet; check the hint below if you need some help.
HINT
In considering the importance of muscle coordination, pay attention to the relative timing and force you're using with your hands as you pull the two muscle cords to simulate flexion and extension.
Detaching a manual muscle cord
For the next simulation, you'll need to detach the rectus femoris and semimembranosus from your knee. To detach the muscle cords, follow the steps shown in the video or listed out below.
Video showing how to detach manual muscles cords from a quadriceps tendon clip (first half) and from a bone surface attachment site (second half).
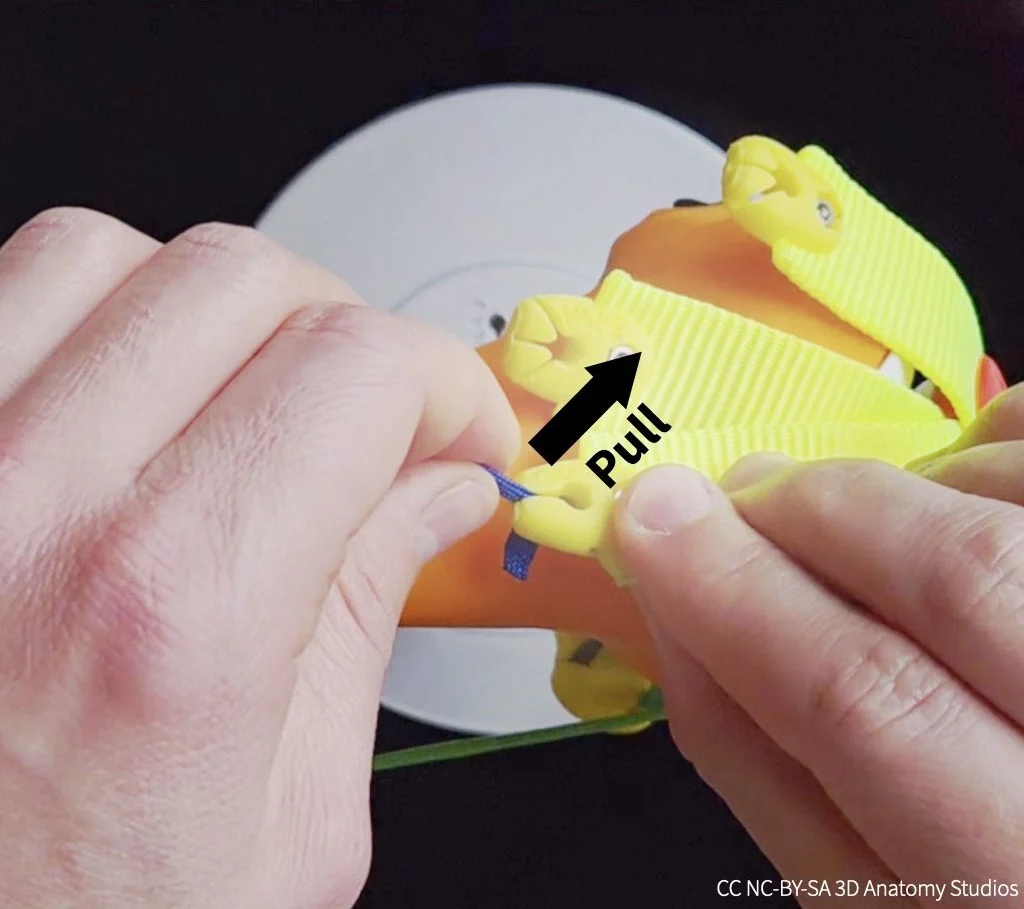
- To detach the rectus femoris from its tendon, first pull the cord up and out of the clip slot. The knot will then be unlocked from the clip so you can detach the cord from the clip and pull it out through the cross-section plate.

- To detach the semimembranosus from the tibia, pull the tail of the cord so that the knot unlocks from the internal hook and slides out of the hole. If the tail is inside the hole or if you have trouble, you can use the forceps to grab the cord inside the hole to pull it out.

Two extensors driving motion
A co-contracting muscle pair doesn't have to consist of an extensor and flexor (i.e., muscles on opposite sides of a joint). Motion and stability at a joint can benefit from the co-contraction of multiple muscles on the same "side" of a joint. To figure out why, use your knee kit to simulate the following patterns of muscle contraction, using two additional quadriceps muscles as an example:
- Simulate the vastus lateralis contracting on its own to extend the knee. Attach the vastus lateralis by threading it through any of its attachment sites on the cross-section plate (labeled VAL-A, VAL-B, or VAL-C) and clipping it into the vastus lateralis tendon (labeled VAL-D).
- Simulate the vastus lateralis and vastus medialis co-contracting to extend the knee. Add the vastus medialis by threading it through its attachment site on the cross-section plate (labeled VAM-A) and clipping it into the vastus medialis tendon (labeled VAM-D).
Note, that in a real knee, the muscles and tendinous sheath surrounding the patella (not all of which is represented in your knee kit) all have some passive tension that holds the patella in place as long as there aren't any high forces acting on it; the patella wouldn't just flop forward or over to the side as it does in your knee kit. What you want to pay attention to is what happens to the knee (including the patella) when you are actively pulling the manual muscle cords and their resulting lines of action; that is properly represented in your model.
Based on your simulations, what's the problem with only contracting the vastus lateralis? Why is it beneficial (for knee function and stability) to co-contract the vastus lateralis and medialis and how could this relate to patellar tracking disorders (the deviation of the patella from its proper groove during knee motion)? Do you think this pattern of two muscles on the same "side" of a joint co-contracting is a common one for joints, beyond just the knee joint? If yes, why? If no, why not? Write your answers on page 2 of the activity worksheet; check the hint below if you need some help.
HINT
The ligaments that hold joints together can be damaged by excessive torques that would move the joint in abnormal ways. Additionally, some joints allow for a wide range of motions/rotations (e.g., the shoulder), which means that the muscles can't rely as much on ligaments to guide motion along a particular axis.
Two flexors driving motion
In the previous simulation you observed the effect of contracting one versus two knee extensors. Next, you'll simulate the effect of contracting one versus two knee flexors.
Use your knee kit to simulate the following patterns of muscle contraction:
- Simulate the semimembranosus or semitendinosus contracting on its own (whichever you'd like). Attach the muscle by threading it through its attachment site on the cross-section plate (labeled SEM-A or SET-A) and hooking it into its attachment on the tibia (labeled SEM-B or SET-A).
- Simulate the semimembranosus/semitendinosus and biceps femoris co-contracting. Add the biceps femoris by threading it through its attachment site on the cross-section plate (labeled BFE-A) and clipping it into its attachment on the fibula (labeled BFE-D).
Based on your simulations, why might it be beneficial (for knee function and stability) to co-contract the semimembranosus/semitendinosus and biceps femoris? Write your answer on page 3 of the activity worksheet; check the hint below if you need some help.
HINT
When simulating both muscles co-contracting, pull both muscle cords tight to fully flex the knee and then alternate pulling tight on one muscle while releasing the other slightly.
Based on your dual-extensor/flexor simulations, do you think this pattern of two muscles on the same "side" of a joint co-contracting is a common one for joints (beyond just the knee joint)? If yes, why? If no, why not? Write your answer on page 3 of the activity worksheet; check the hint below if you need some help.
HINT
The ligaments that hold joints together can be damaged by excessive torques that would move the joint in abnormal ways. Additionally, some joints allow for a wide range of motions/rotations (e.g., the shoulder), which means that the muscles can't rely as much on ligaments to guide motion along a particular axis.
Agonist-antagonist muscles stabilizing a joint
In your "Flexor and extensor driving motion" simulation, you saw how an agonist-antagonist pair of muscles can co-contract to generate opposing forces on a bone at a joint and drive smooth, controlled motion. But these opposing forces also have the effect of stiffening a joint. The stiffness of a joint is a measure of how much force it takes to produce motion at that joint; the greater the stiffness, the harder it is to produce motion at a joint. Imagine an old, rusted hinge joint: the rust and corrosion of the joint create additional friction in the joint, making it harder to open and close the hinge.
Older people may complain about "stiff joints"; this results from stiffness within the joint itself—not a good thing! However, stiffness at joints that results from active agonist-antagonist muscle co-contraction is actually a good thing and necessary for proper joint function. This dynamic stiffness (i.e., it can be turned on and off) helps joints resist external forces that could otherwise cause injury, it helps produce the smooth, controlled motion that you simulated previously, and—at a high enough level of stiffness—it can immobilize a joint to prevent motion. In this way, agonist-antagonist muscle pairs stabilize joints. For this last set of simulations, you'll test how different combinations of co-contracting muscles can stiffen or even immobilize the knee joint.
Based on your previous simulations, which two muscles would you co-contract to stiffen or prevent flexion-extension rotation at the knee joint? Once you have an idea, test it out by simulating the co-contraction of these two muscles with your knee kit: while contracting (pulling) both muscles with one hand, push with your other hand on the tibia to see if it is prevented from flexing/extending. If not, try a different muscle pair. Once you find a pair that works, write the muscle names on page 4 of your worksheet.
Although you've managed to stiffen or prevent flexion-extension rotations, this isn't the only way in which knees can move. The tibia can also rotate about its long-axis.
Can the muscles you chose to stiffen/prevent flexion-extension rotation also stiffen/prevent tibial long-axis rotation? If not, add additional muscles to stiffen both of these rotations at the knee joint. Be sure to test it out with your kit. Once you find a combination that works, write the muscle names on page 4 of your worksheet.
In addition to rotating about its long axis, recall from the How many ways can you move your knee? activity that the tibia can also translate anteriorly and posteriorly. And recall from the What are the functions of the knee ligaments? activity that both excess anterior-posterior translations and excess long-axis rotations can damage the knee ligaments. Use this information to answer the following questions relating muscle strength and coordination to knee ligament injuries.
Can co-contraction of muscles help to prevent ACL and MCL injuries? If yes, why? If no, why not? Does If you need some help, check the hint below.
HINT
Recall from the What are the functions of the knee ligaments? activity which excess/abnormal motions of the knee can damage the ACL and MCL. Using your knee kit, pull on all the muscles you've attached to your knee kit to simulate co-contraction and try to move the knee along the same motion axes as the excess/abnormal motions. Do the muscles reduce or prevent those motions or not? Also, does your answer depend on the angle at which the knee is flexed/extended?
What stabilizes the knee joint: ligaments, muscles, or both? If you think both, which do you think should make a greater contribution in a healthy knee, ligaments or muscles, and why?
HINT
Surprising as it may seem, there are individuals who rupture their ACL and return not just to normal life but performing sports without reconstruction surgery (Thoma et al., 2020). These individuals are referred to as "copers" because they are able to cope without an ACL. This should tell you something about the potential roles of ligaments versus muscles in stabilizing the knee.
References cited
The following articles/books are references cited in this activity:
- Thoma, L. M., Grindem, H., Logerstedt, D., Axe, M., Engebretsen, L., Risberg, M. A., & Snyder-Mackler, L. (2019). Coper classification early after ACL rupture changes with progressive neuromuscular and strength training and is associated with two-year success: The Delaware-Oslo ACL Cohort Study. The American journal of sports medicine, 47(4), 807. DOI: 10.1177/0363546519825500.
Any 3D renderings or animations in this activity were created using Blender.
All anatomical data used to make the kit and activities are from:
- National Library of Medicine. (1995–). The Visible Human Project [Digital Data Set]. Bethesda, MD: National Institutes of Health.https://www.nlm.nih.gov/research/visible/visible_human.html.