Before you attach any muscles, be sure that you understand [the muscle color and labeling scheme used in your kit](https://guides.3das.us/link/134). This will help you easily identify each muscle, its attachment sites, and its corresponding compartment.
## Attaching a muscle to a quadriceps tendon clip The first muscle attachment type is a quadriceps tendon clip. Each of the four quadriceps muscles has a yellow tendon clip, one for each of the four quadriceps tendons (wide yellow straps). These clips have attachment sites for one or up to three cords (one site for rectus femoris and up to three sites for the vasti muscles). Each clip is labeled with the corresponding quadriceps [attachment site](https://guides.3das.us/link/134) (REF-B, VAI-E, VAL-D, VAM-D). If you're attaching a muscle to one of the quadriceps tendon clips, attach it first to the clip before [attaching it to the cross-section plate](#bkmrk-attaching-an-elastic) or [to the surface of a bone](#bkmrk-attaching-an-elastic-1). [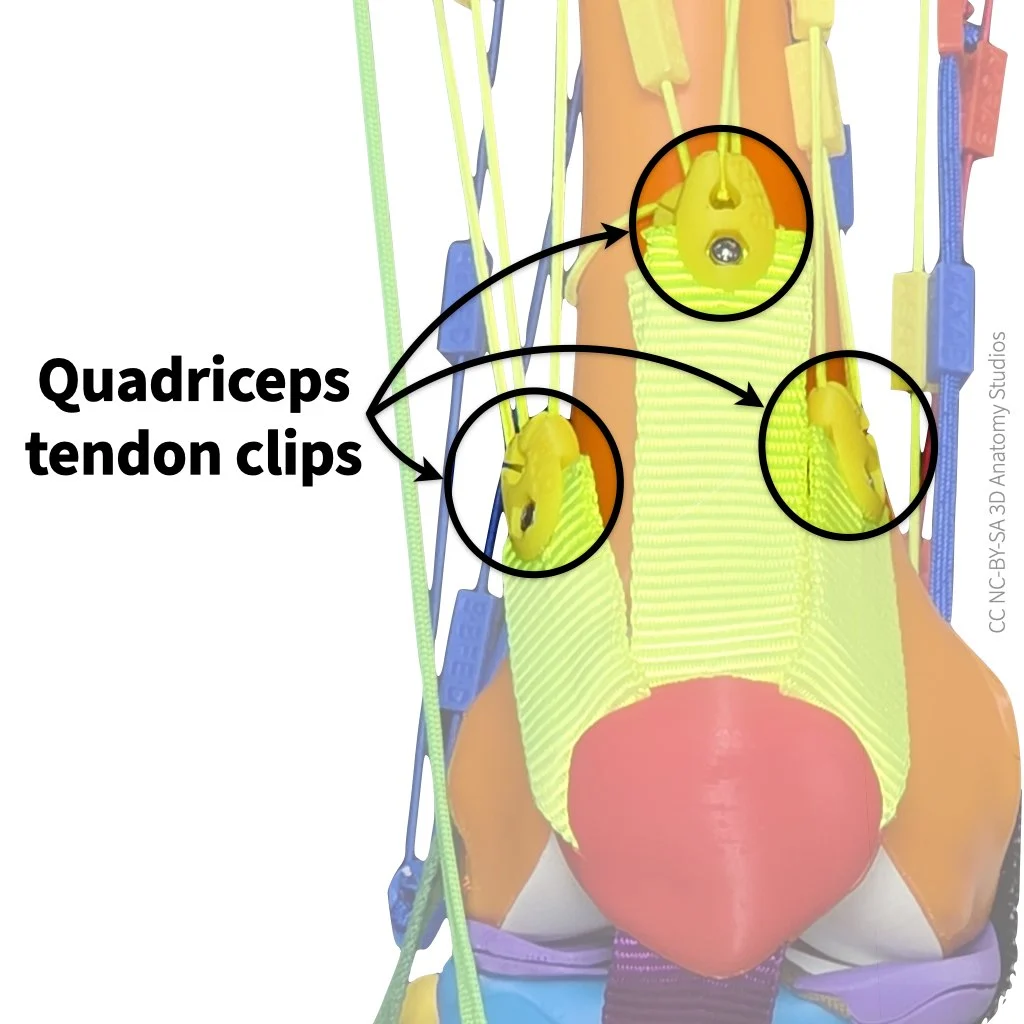](https://guides.3das.us/uploads/images/gallery/2026-04/knee-kit-photo-full-anterior-view-zoom-focus-on-quad-tendon-clips-w-arrows-and-labels-2.webp) The quadriceps tendon clips (the yellow plastic pieces indicated by circles) connect the quadriceps elastic muscle cords to the quadriceps tendons (yellow straps). One of the clips (for vastus intermedius) is mostly obscured in the photo above by another clip directly anterior to it (middle clip in the photo, for rectus femoris). To attach a muscle to a quadriceps tendon clip, insert the end of the cord with a shorter "tail" (cord after the knot) into the hole and pull the cord into the slot to lock the knot in place, as shown in the video below. When inserting the cord into the clip, be sure that you insert the cord through the labeled side first (you should see the clip label as you're inserting the cord). If one end of the cord has a longer "tail" than the other (the bit of cord after the knot), attach the end with the *shorter* tail to the clip. Video showing how to attach an elastic muscle to a quadriceps tendon clip. The first half of the video shows steps from a front view of the clip; the second half of the video shows the same steps from a side view of the clip. ## Attaching a muscle to a bone The second attachment type is the surface of a bone. These are the keyhole-shaped holes (with accompanying labels) that you see all over the surface of the bones of your kit. [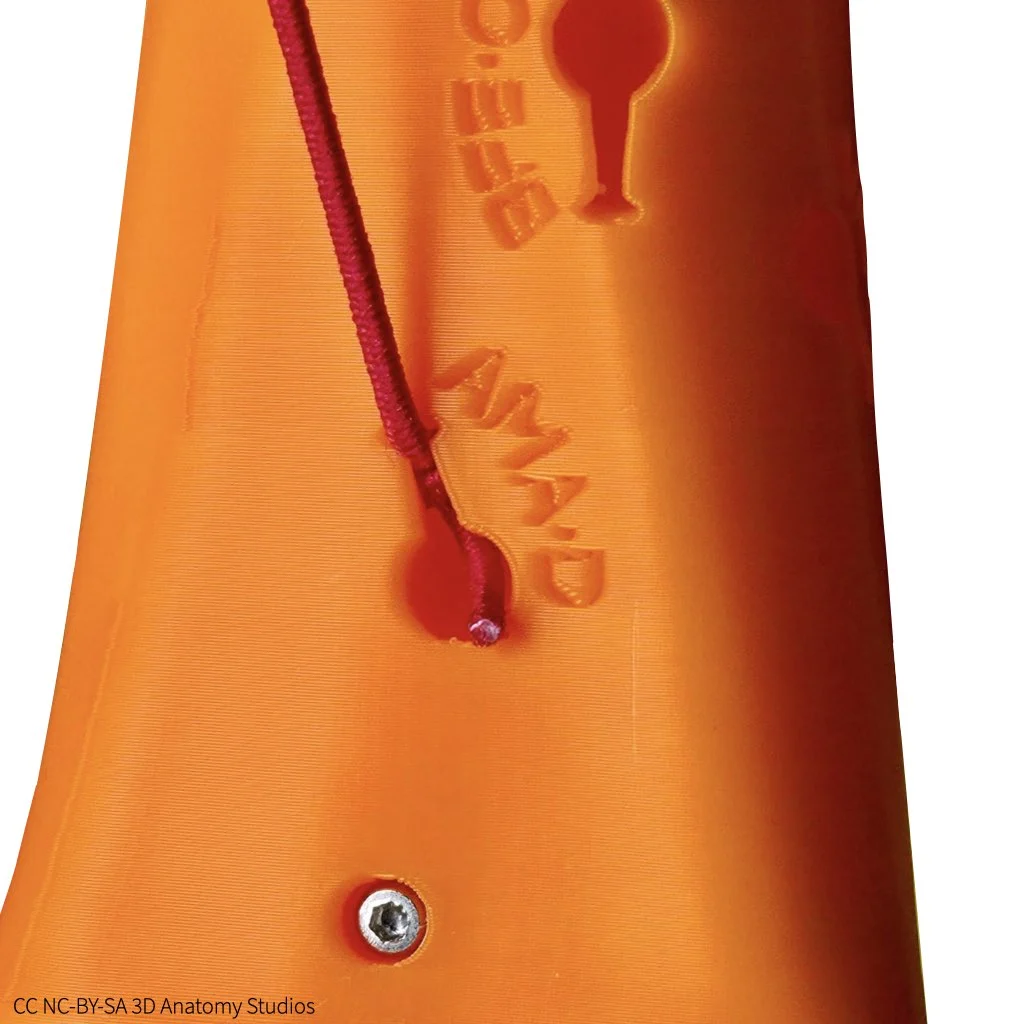](https://guides.3das.us/uploads/images/gallery/2026-04/knee-kit-photo-full-elastic-adductor-magnus-muscle-attached-to-bone-ama-d-on-white.webp) An example of an elastic muscle cord (red) attached to a bone (orange) and the attachment site label. In this example, the cord represents one of the action lines of the adductor magnus muscle ("AMA") and the attachment site is "AMA-D." Inside each of these keyholes is a hook that catches the knot of a cord and holds it in place as long as the cord is pulled within the normal action range of the corresponding muscle. This means that for all of the motion simulations you perform, the cords will stay attached even though they are simply hooked into place. If you're attaching a muscle between the surface of a bone and a cross-section plate, attach it first to the bone before [attaching it to the cross-section plate](#bkmrk-attaching-an-elastic). If you're attaching a muscle between the surface of a bone and a quadriceps clip, [attach it first to the quadriceps clip](#bkmrk-attaching-a-muscle-t) before attaching it to the bone. To attach an elastic cord to an attachment site on a bone's surface, push the knot's cord into the hole using forceps and then pull the cord through the slit of the keyhole to pull the knot into the internal hook, as shown in the video below. If one end of the cord has a longer "tail" than the other (the bit of cord after the knot), attach the end with the *shorter* tail to the bone. Video showing how to attach a muscle cord to an attachment site on the surface of a bone. ## Attaching a muscle to a cross-section plate The third and last attachment type is a cross-section plate (either the superior or inferior one). The cross-section plates have the same keyhole-shaped holes as the surface of the bones, each located within the indentation of the corresponding muscle. [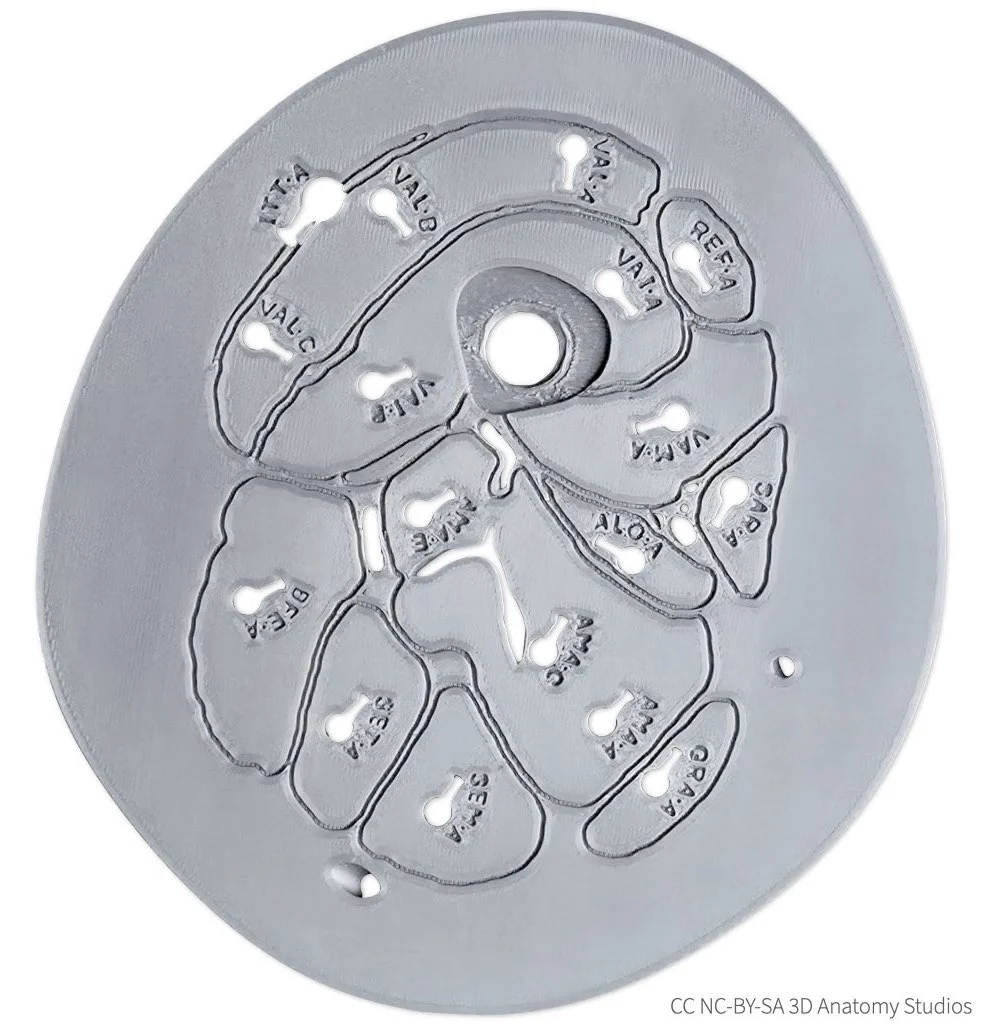](https://guides.3das.us/uploads/images/gallery/2026-04/knee-kit-photo-cross-section-plate-superior-plate-labeled-side-on-white-w-cc.webp) The superior cross-section plate from your kit, as seen from an inferior view (looking up from the knee). The keyhole-shaped holes and labels are muscle attachment sites. Attaching a muscle to a cross-section plate is easier than attaching it to the other two attachment types. For this reason, whenever you're attaching a muscle that connects to the cross-section plate, attach it to the plate last; that is, attach it [to a quadriceps tendon clip](#bkmrk-attaching-a-muscle-t) or [to the surface of bone](#bkmrk-attaching-an-elastic-1) and *then* attach it to the cross-section plate. To attach a muscle to a cross-section plate, thread the cord and knot through the hole and then slide the cord into the keyhole slit to secure the knot in place, as shown in the video below. If one end of the cord has a longer "tail" than the other (the bit of cord after the knot), attach the end with the *longer* tail to the cross-section plate. Video showing how to attach an elastic muscle to a cross-section plate. Insert the cord first through the labeled side and then pull the cord into the slit from the opposite side to secure the knot in place. # Attaching the manual muscle cords If you have a basic or full knee kit model, your kit comes with "manual muscle cords." These cords act like puppet strings, enabling you to simulate a shortening muscle by attaching the cord to a muscle attachment site and pulling on it. These cords are nonelastic (i.e., not stretchy) and thicker than the elastic muscle cords but they can attach to any of the sites where you can attach the elastic muscle cords. The manual muscle cords work best if you operate them through the [cross-section plates](https://guides.3das.us/link/135); for muscles that don't cross through the cross-section plate (e.g., popliteus), you can just attach one end directly to the muscle's origin or insertion. Video showing how to simulate muscle contraction using a manual muscle cord. You'll find the manual muscle cords along the top of parts plate A. They come in four different colors so that you can more easily tell them apart if you have all four attached. To attach a cord to a bone, you'll also need the forceps, located at the bottom left corner of parts plate A. [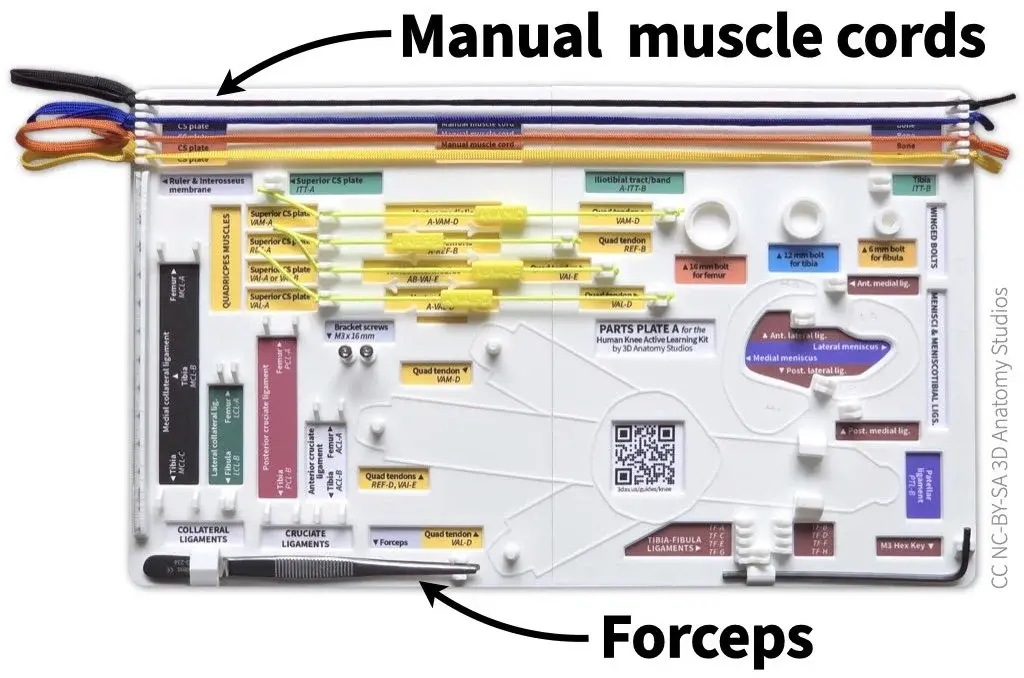](https://guides.3das.us/uploads/images/gallery/2026-04/knee-kit-photo-parts-plate-plate-a-with-some-items-and-arrows-indicating-forceps-and-manual-muscle-cords.webp) The manual muscle cords and forceps should be attached to parts plate A in your kit. The manual muscle cords attach to hooks at the top of the plate and the forceps fit into a holder in the bottom left corner.Whenever you're attaching a muscle to your knee kit, be sure that the two attachment sites have the same [3-letter muscle code](https://guides.3das.us/link/134#bkmrk-muscle-abbreviations), indicating they belong to the *same* muscle. If you're unfamiliar with the muscle abbreviation system used in your knee kit, you can review that [here](https://guides.3das.us/link/134). Of course, you can also *intentionally* attach a muscle to two sites with different muscle codes to simulate a muscle that does not exist.
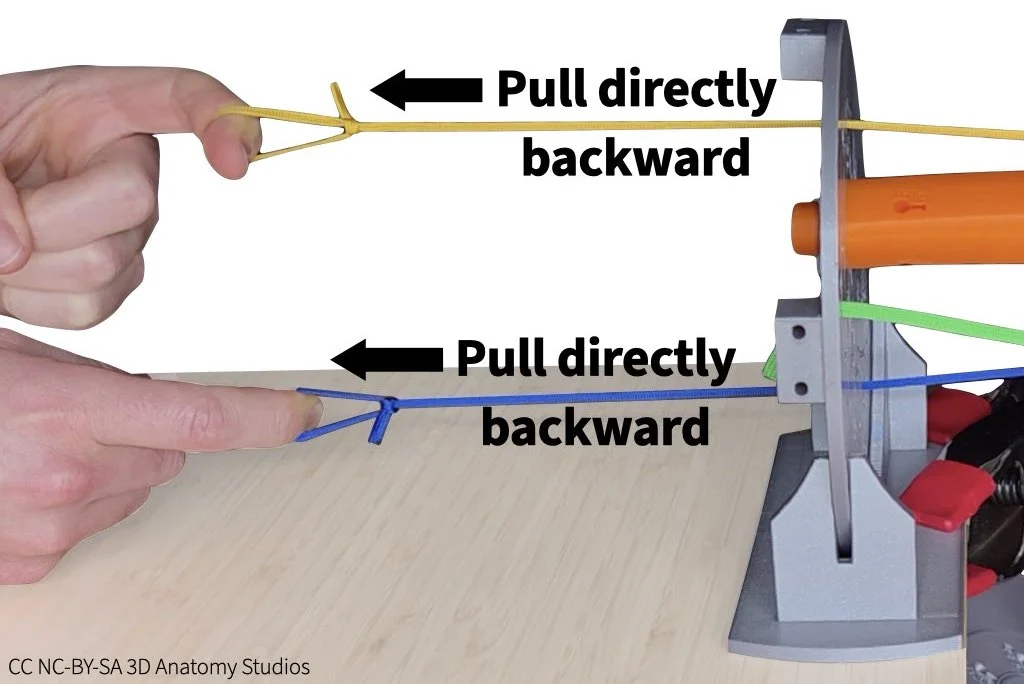
## Attaching a manual muscle cord to a clip To attach a manual muscle cord to one of the quadriceps tendon clips (i.e., simulating one of the quadriceps muscles), follow the steps shown in the video or listed out below. Video showing how to attach a manual muscle cord through the cross-section plate to one of the quadriceps tendons. In this video, the manual muscle cord represents the rectus femoris muscle. 1. Thread a manual muscle cord (the end with a simple knot, not the looped end) through one of the quadriceps attachment holes/sites in the superior cross-section plate (i.e., REF, VAI, VAL, or VAM). [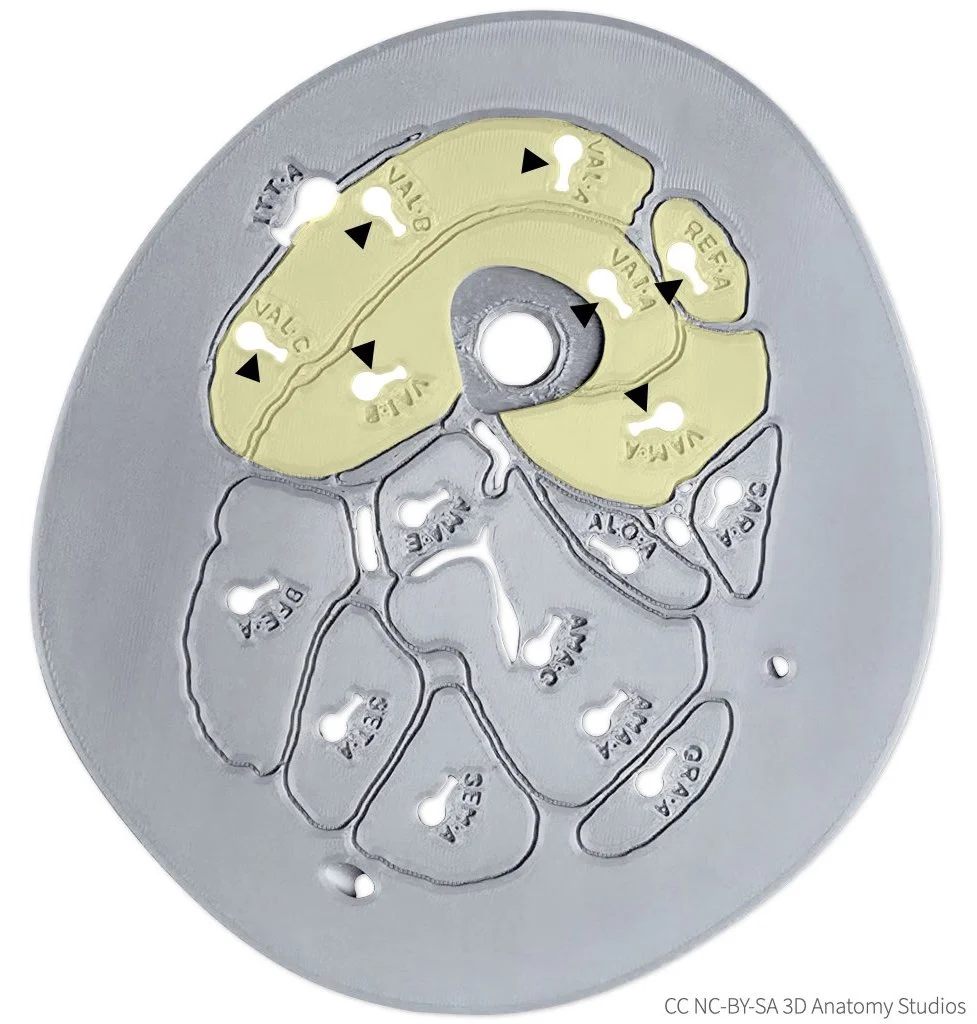](https://guides.3das.us/uploads/images/gallery/2026-04/knee-kit-photo-cross-section-plate-superior-plate-w-quadriceps-highlighted-w-yellow-and-arrowheads-2.webp) The superior cross-section plate, as viewed from the inferior side, with the quadriceps muscles highlighted in yellow and quadriceps muscle attachment sites indicated by black arrowheads. 2. Continue pulling the cord through the cross-section plate until it reaches whichever quadriceps tendon clip you want to attach it too (i.e., REF-B, VAI-E, VAL-D, or VAM-D). Insert the end of the cord through the hole in the clip, ensuring that you insert the cord through the labeled side (i.e., you should see the label as you're inserting the cord). [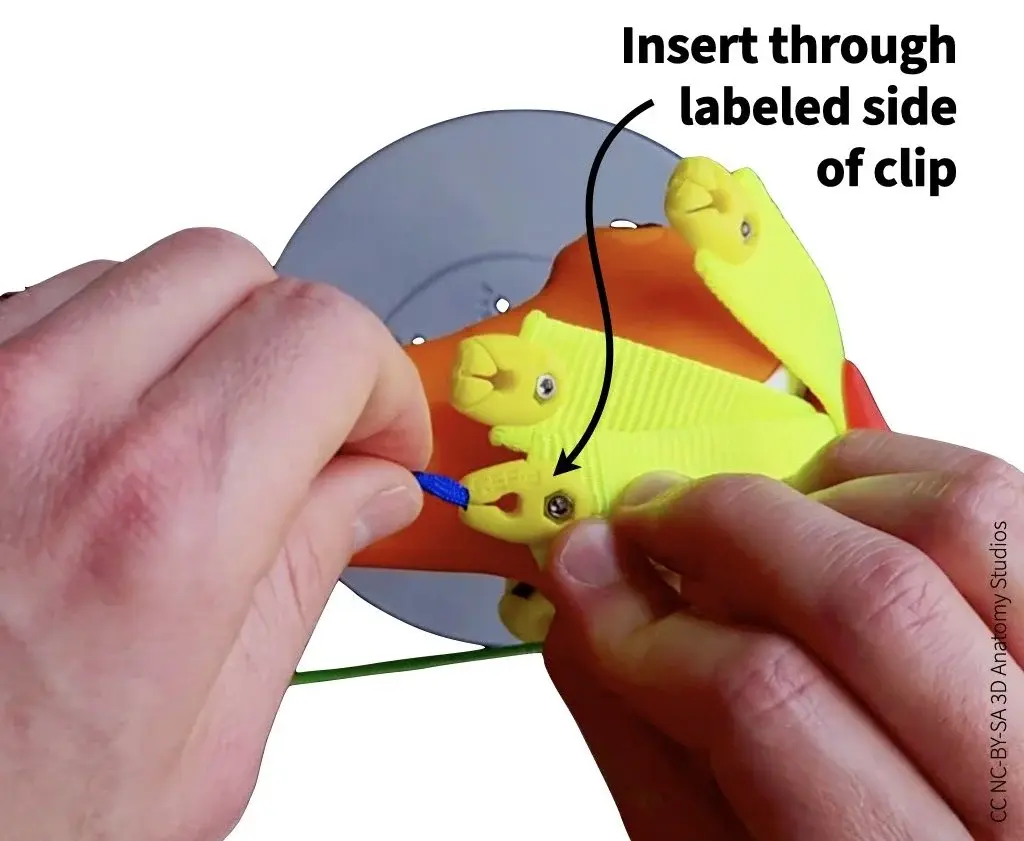](https://guides.3das.us/uploads/images/gallery/2026-04/knee-kit-photo-basic-inserting-rectus-femoris-manual-muscle-cord-into-quadriceps-tendon-clip-showing-which-side-of-clip-to-insert.webp) 3. To secure cord in the clip, guide the cord into the slot of the clip and pull until the knot locks into place. [](https://guides.3das.us/uploads/images/gallery/2026-04/knee-kit-photo-basic-rectus-femoris-manual-muscle-cord-being-pulled-into-quadriceps-tendon-clip-to-show-how-to-secure-cord.webp)Whenever you're pulling manual muscle cords through the cross-section plate, pull directly backward (not upward). If you pull upward, the cord will pull up on the cross-section plate, possibly lifting it out of the bracket (see image below).
[](https://guides.3das.us/uploads/images/gallery/2026-04/knee-kit-photo-basic-manual-muscle-simulation-of-flexor-and-extensor-with-arrows-and-text-indicating-to-pull-directly-backward.webp) ## Attaching a manual muscle cord to a bone To attach a manual muscle cord to a bone, follow the steps shown in the video or listed out below. Video showing how to attach a manual muscle cord through the cross-section plate to a muscle attachment site on a bone. In this video, the manual muscle cord represents the semimembranosus muscle. 1. Thread a manual muscle cord (the end with a simple knot, not the looped end) through an attachment hole/site in one of the cross-section plates for the muscle that you want to simulate. [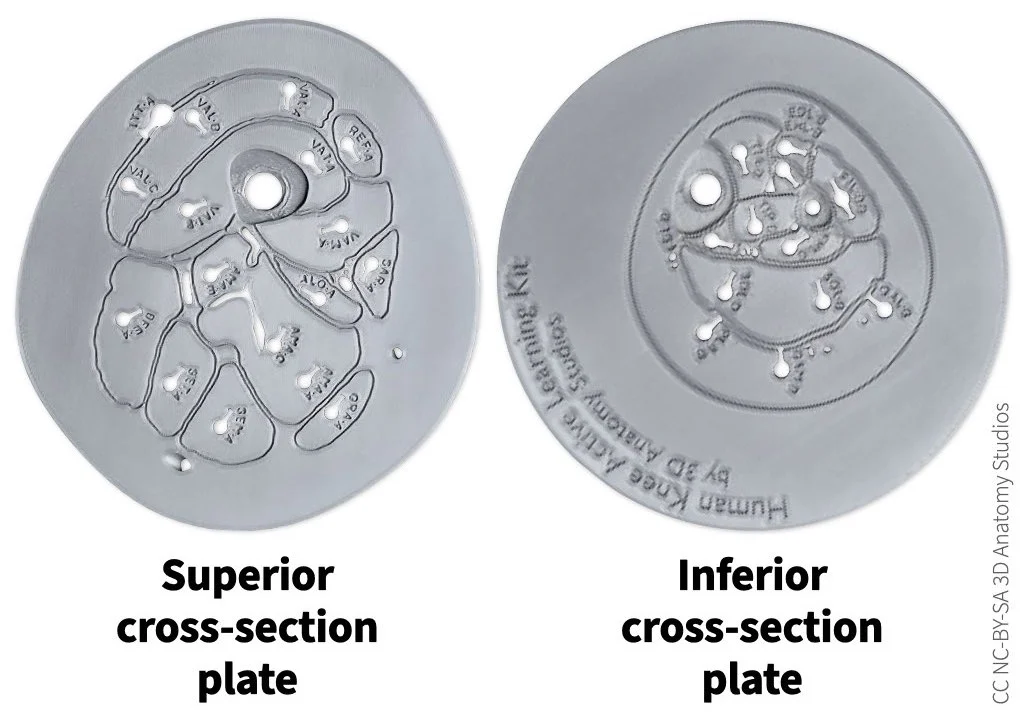](https://guides.3das.us/uploads/images/gallery/2026-04/knee-kit-photo-cross-section-plate-superior-and-inferior-plates-labeled-side-2.webp) 2. Continue pulling the cord through until it reaches the attachment hole/site where you want to attach the muscle. Use forceps to push the knot into the attachment hole. The knot should be pushed fully below the surface of the bone, into the hole. [](https://guides.3das.us/uploads/images/gallery/2026-04/knee-kit-photo-basic-forceps-pushing-semimembranosus-manual-muscle-cord-knot-into-attachment-hole-on-tibia.webp) 3. Pull the cord into the hole slot until the knot is caught by the hook inside the hole and the cord is secured (you might feel the knot "click" into place). If the knot pulls out of the hole when you do this, you might need to hold the knot inside the hole with the forceps while pulling on the cord to keep it in place. [](https://guides.3das.us/uploads/images/gallery/2026-04/knee-kit-photo-basic-pull-semimembranosus-manual-muscle-cord-to-lock-knot-into-attachment-hole.webp) 4. To make it easier to detach the cord later, leave the cord's "tail" (the bit of cord after the knot) sticking out of the hole. [](https://guides.3das.us/uploads/images/gallery/2026-04/knee-kit-photo-basic-semimembranosus-manual-muscle-cord-insertion-into-tibia-with-tail-sticking-out-and-labeled.webp) # Kit disassembly # Detaching the manual muscle cords Detach the manual muscle cords by following the steps shown in the video or listed out below. Video showing how to detach manual muscles cords from a quadriceps tendon clip (first half) and from a bone surface attachment site (second half). You might find the forceps helpful; you can find them at the bottom left corner of Parts Plate A. [](https://guides.3das.us/uploads/images/gallery/2026-04/knee-kit-photo-parts-plate-plate-a-with-some-items-and-arrows-indicating-forceps-and-manual-muscle-cords.webp) ## Detaching a manual muscle cord from a clip To detach a manual muscle cord from one of the quadriceps tendon clips, first pull the cord up and out of the clip slot. The knot will then be unlocked from the clip so you can detach the cord from the clip and pull it out through the [cross-section plate](https://guides.3das.us/link/135). [](https://guides.3das.us/uploads/images/gallery/2026-04/knee-kit-photo-basic-pulling-rectus-femoris-manual-muscle-cord-to-remove-from-quadriceps-tendon-clip.webp) ## Detaching a manual muscle cord from a bone To detach a manual muscle cord from a bone, pull the tail of the cord using your fingers or the forceps so that the knot unlocks from the internal hook and slides out of the hole. If the tail is inside the hole or if you have trouble, you can use the forceps to grab the cord from inside the hole to pull it out. [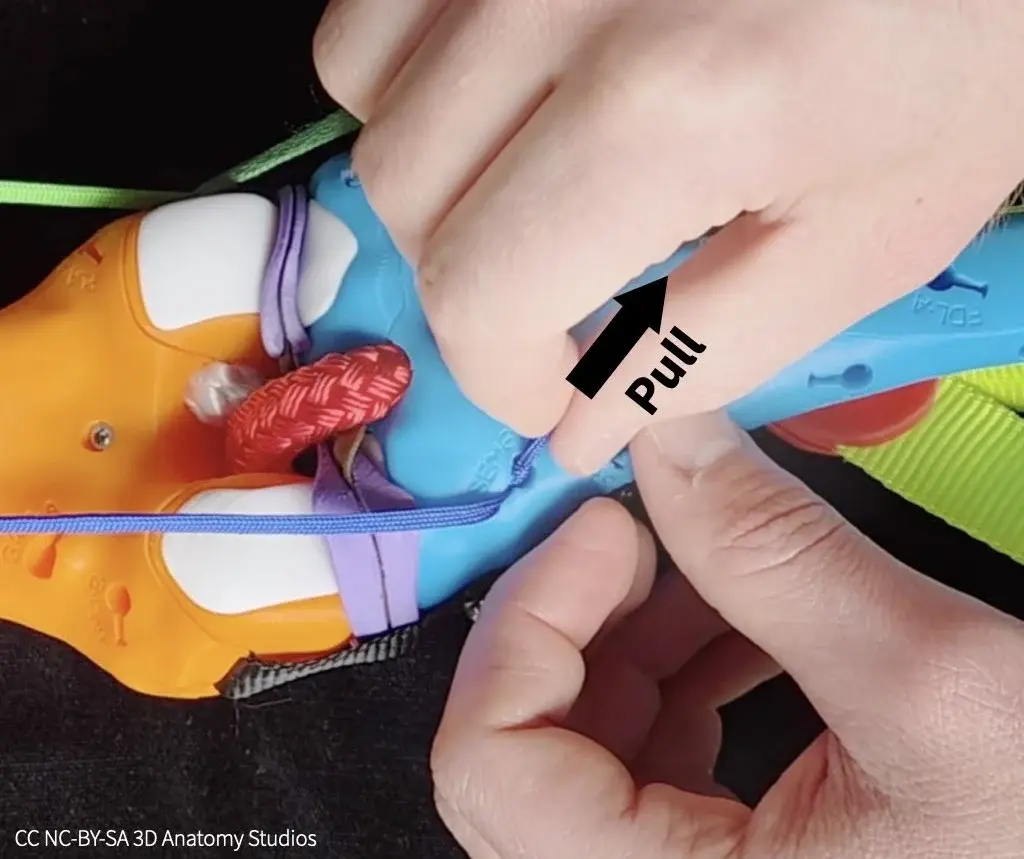](https://guides.3das.us/uploads/images/gallery/2026-04/knee-kit-photo-basic-pulling-tail-of-semimembranosus-manual-muscle-cord-to-remove-from-tibia-insertion-point.webp) # Detaching the elastic muscle cords To detach the muscles from your knee kit, you just need to know how to detach the cord ends from one of the three possible attachment site types: a quadriceps tendon clip, an attachment site/hole on the surface of a bone, and an attachment site/hole in a [cross-section plate](https://guides.3das.us/link/135). The instructions below are the same whether the muscle end you're attaching is of the [thinner, elastic cord type or the thicker, inelastic cord type](https://guides.3das.us/link/134#bkmrk-inelastic-part-of-mu). ## Materials needed To detach most of the muscles, you'll need the forceps, located at the bottom left corner of parts plate A. [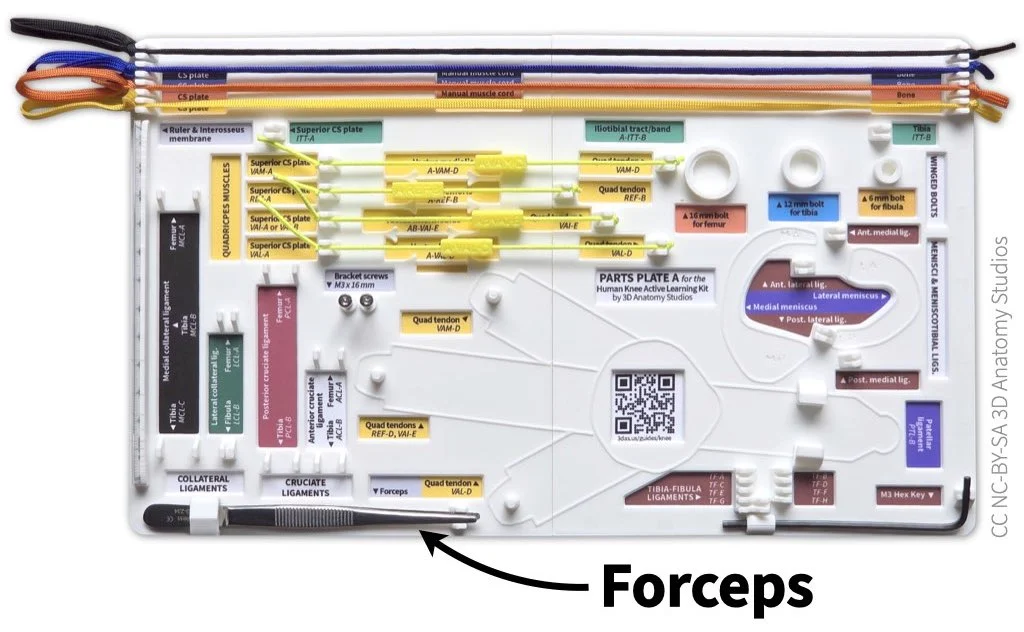](https://guides.3das.us/uploads/images/gallery/2026-04/knee-kit-photo-parts-plate-plate-a-with-some-items-and-arrows-indicating-forceps.webp) The forceps should be attached to the bottom left corner of parts plate A in your kit.Before you detach any muscles, be sure that you understand [the muscle color and labeling scheme used in your kit](https://guides.3das.us/link/134). This will help you easily identify each muscle and its corresponding compartment to know where to "dock" the muscle on the parts plates.
## Detaching a muscle from a quadriceps tendon clip The quadriceps tendon clips are the yellow plastic clips at the ends of each of the quadriceps tendons (wide yellow straps). [](https://guides.3das.us/uploads/images/gallery/2026-04/knee-kit-photo-full-anterior-view-zoom-focus-on-quad-tendon-clips-w-arrows-and-labels-2.webp) The quadriceps tendon clips (the yellow plastic pieces indicated by circles) connect the quadriceps elastic muscle cords to the quadriceps tendons (yellow straps). If you're detaching a muscle from a quadriceps clip that is also attached to a cross-section plate, [detach it from the cross-section plate](#bkmrk-detaching-muscle-plate) first. To detach a muscle from a quadriceps clip, pull the cord out of the slit to unlock the knot and then up, as shown in the video below. Video showing how to detach an elastic muscle from a quadriceps tendon clip. ## Detaching a muscle from a bone The second attachment type is the surface of a bone. These are the keyhole-shaped holes (with accompanying labels) that you see all over the surface of the bones of your kit. [](https://guides.3das.us/uploads/images/gallery/2026-04/knee-kit-photo-full-elastic-adductor-magnus-muscle-attached-to-bone-ama-d-on-white.webp) An example of an elastic muscle cord (adductor magnus, "AMA", red) attached to a bone (orange) and the attachment site label ("AMA-D"). Inside each of these keyholes is a hook that catches the knot of a cord. So when you detach a muscle, you're essentially unhooking it. If you're detaching a muscle from a bone that is also attached to a cross-section plate, [detach it from the cross-section plate](#bkmrk-detaching-muscle-plate) first. To detach an elastic cord from a bone surface attachment, pull the cord with your hand out of the keyhole slit to unhook the knot and then continue pulling the knot and cord out of the hole, as shown in the video below. Video showing how to detach an elastic muscle from the surface of a bone using your hands. If for some reason you're having trouble detaching the cord in this way, you can also use the forceps. Pull on the tail of the cord (the bit of cord after the knot) to unhook the knot and then pull the knot and cord out of the hole, as shown in the video below. Video showing how to detach an elastic muscle from the surface of a bone using forceps. ## Detaching a muscle from a cross-section plate The third and last attachment type is a cross-section plate (either the superior or inferior one). The cross-section plates have the same keyhole-shaped holes as the surface of the bones, each located within the indentation of the corresponding muscle. [](https://guides.3das.us/uploads/images/gallery/2026-04/knee-kit-photo-cross-section-plate-superior-plate-labeled-side-on-white-w-cc.webp) The superior cross-section plate from your kit, as seen from an inferior view (looking up from the knee). The keyhole-shaped holes and labels are muscle attachment sites. Detaching a muscle from a cross-section plate is easier than detaching it from the other two attachment types. For this reason, whenever you're detaching a muscle, detach it from the cross-section plate first. To detach a muscle from a cross-section plate, pull the tail of the cord up on the external (unlabeled) side of the plate to unhook the knot and then thread the cord through the hole, as shown in the video below. Video showing how to detach an elastic muscle from a cross-section plate. Unhook the knot first from the external (unlabeled) side of the plate and then thread the cord out through the hole. ## Attaching a muscle to the parts plate Once you've detached a muscle, you can "dock" it on one of the parts plates. The parts plates that come with your kit (one if you have a basic knee model, three if you have a full knee model), have a designated storage spot for every muscle in your kit, grouped and color-coded by compartment. This will help you keep all of the muscles organized if you remove them from your kit and more easily find a particular muscle when you want to reattach it.| #### Muscle groups by parts plate | |
|---|---|
| ##### Parts plate A | Four quadriceps muscles (the muscles included in both the basic and full knee kit models) |
| ##### Parts plate B | All remaining muscles of the thigh |
| ##### Parts plate C | All muscles of the leg |