Activity Guide
A full guide to this activity that students can follow for self-guided learning or that you can use to prepare a demonstration or set up a lab station
- Activity Worksheet (Self-guided)
- Introduction
- Materials needed
- What are motion axes?
- How many motion axes does your own knee have?
- What are the motion axes of the knee?
- References cited
Activity Worksheet (Self-guided)
Use the worksheet below for the self-guided activity. If you are setting this activity up as a station, use this worksheet instead.
Introduction
Many joints in your body move in complex ways and your knee is one of those joints. In this activity, you’ll figure out all the ways your knee can move and learn how to describe this motion using motion axes. Using motion axes will allow you to break down these motions into simpler components, describe them, quantify the motion, compare motions within or across joints, etc. Additionally, you won’t be able to fully understand the function of your knee’s ligaments and the motions that can injure them without understanding motion axes.
Materials needed
For this activity you’ll need:
- The worksheet for this activity (either opened in a PDF viewer on a desktop/tablet computer or printed out).

- A Human Knee Active Learning Kit (Mini, Basic, or Full model).
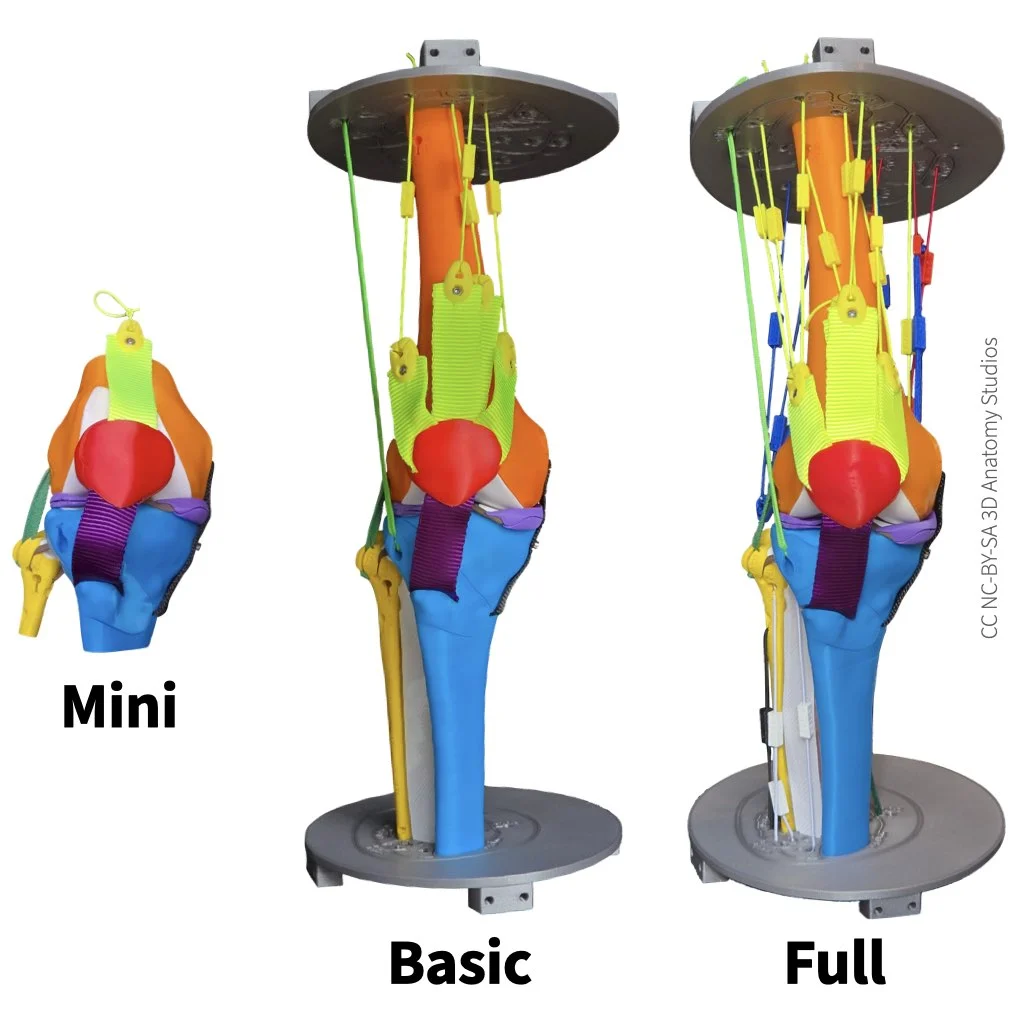
For this activity, you can use either the Mini (left), Basic (middle), or Full (right) model of the Human Knee Active Learning Kit.
If your knee kit doesn’t look like one of the kits in the image above, follow these instructions for assembling or disassembling your kit.
What are motion axes?
What is an axis of rotation (rotational motion axis)?
Before figuring out how your knees move, you'll first need to understand the concept of motion axes. Motion axes can be used to describe any two objects moving relative to one another. Imagine for example, two objects commonly seen moving relative to one another: a cat and a mouse.
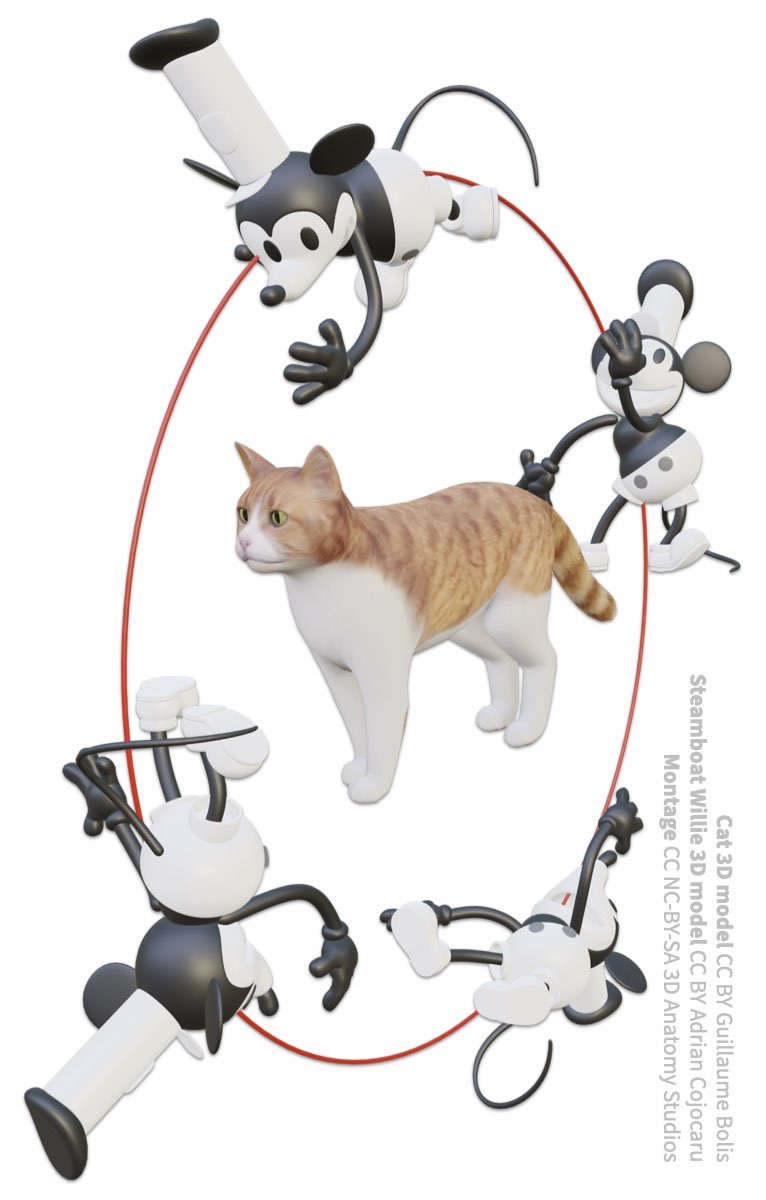
A mouse moving around a cat along a circular path (indicated in red).
If the mouse is moving a circle around the cat, you could say that the mouse is rotating around the cat (you could also describe the mouse as orbiting around the cat like a planet around a sun, but with a circular orbit). Below is the same motion in video form.
Video of mouse rotating 360 degrees around a cat. The circular path taken by the mouse is shown as a red circle.
Now, take your hand, hold it up to the image or video of the rotating mouse and curl your fingers to follow the mouse's path of motion (for this activity, it doesn't matter which hand you use or which direction you curl your fingers, as long as they follow the path).
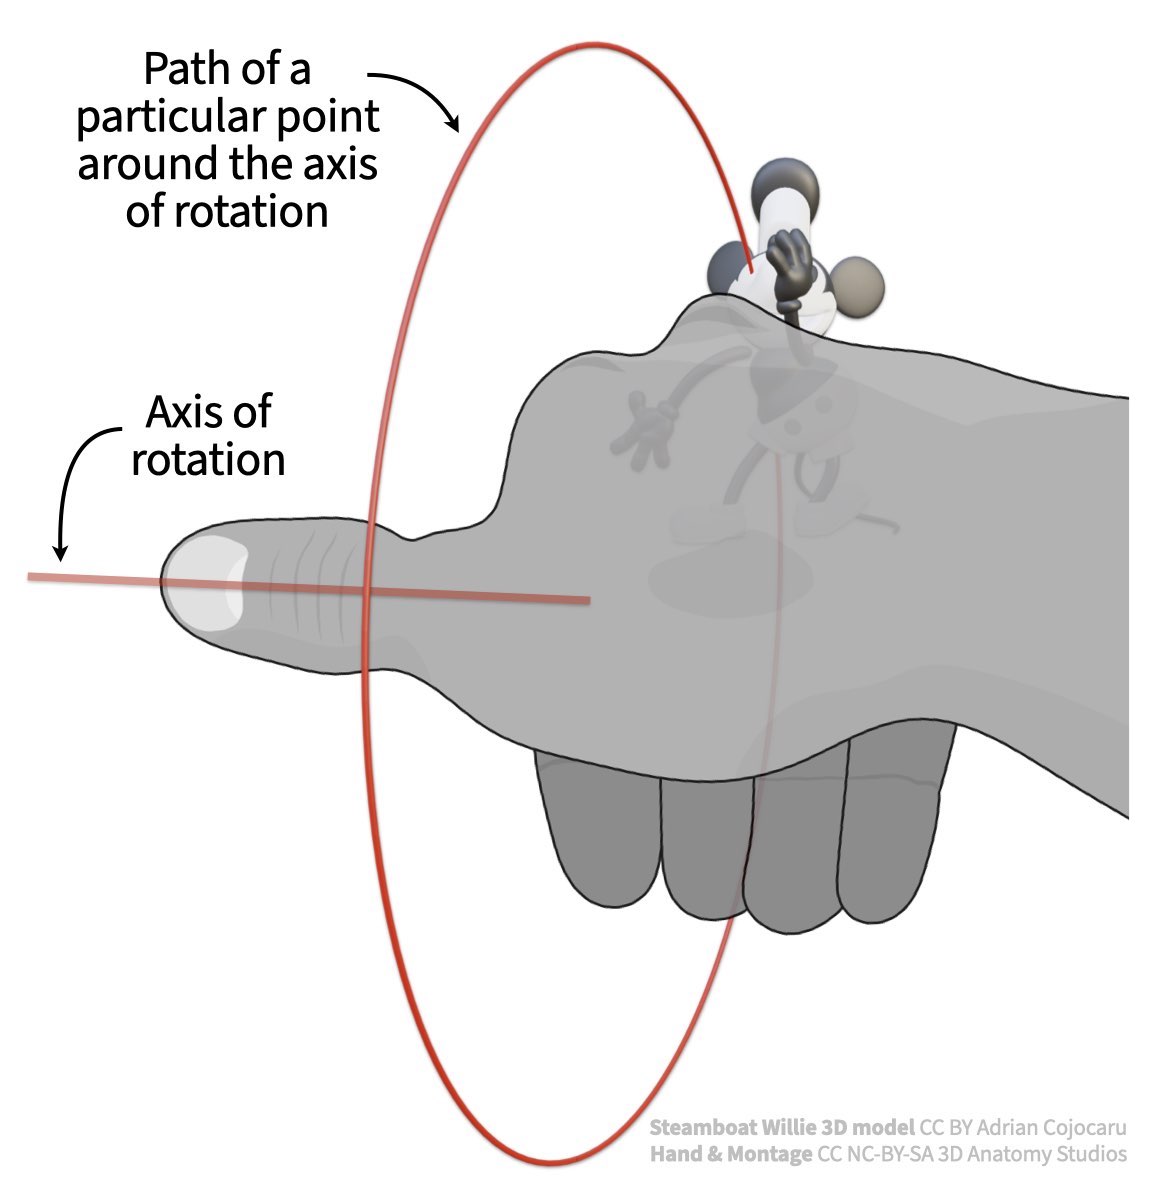
Curl the fingers of your hand to follow the mouse's path and your thumb will indicate the location and orientation of the mouse's axis of rotation.
With your fingers following the mouse's path, your thumb is now showing you the mouse's axis of rotation relative to the cat. For a circular path, the axis of rotation is a 3D vector that is oriented 90 degrees relative to the circular path (perpendicular or orthogonal) and passes through its center. This is the "central axis" around which the mouse is spinning/rotating.
Using your hand to find the mouse's axis of rotation (straight line) relative to the cat.
Identifying the axis of rotation for circular or spinning motions is powerful because once you know the position and orientation of the axis of rotation, you know everything you need to know about the rotational movement.
How to describe 3D rotations in 2D
If two 3D objects are rotating relative to one another in 3D, it's challenging to describe that motion in a 2D form. One way is to project the 3D axis of rotation as a 2D line on images of the object from multiple views. For example, the figure below shows the motion of the mouse around the stationary cat in 2D.
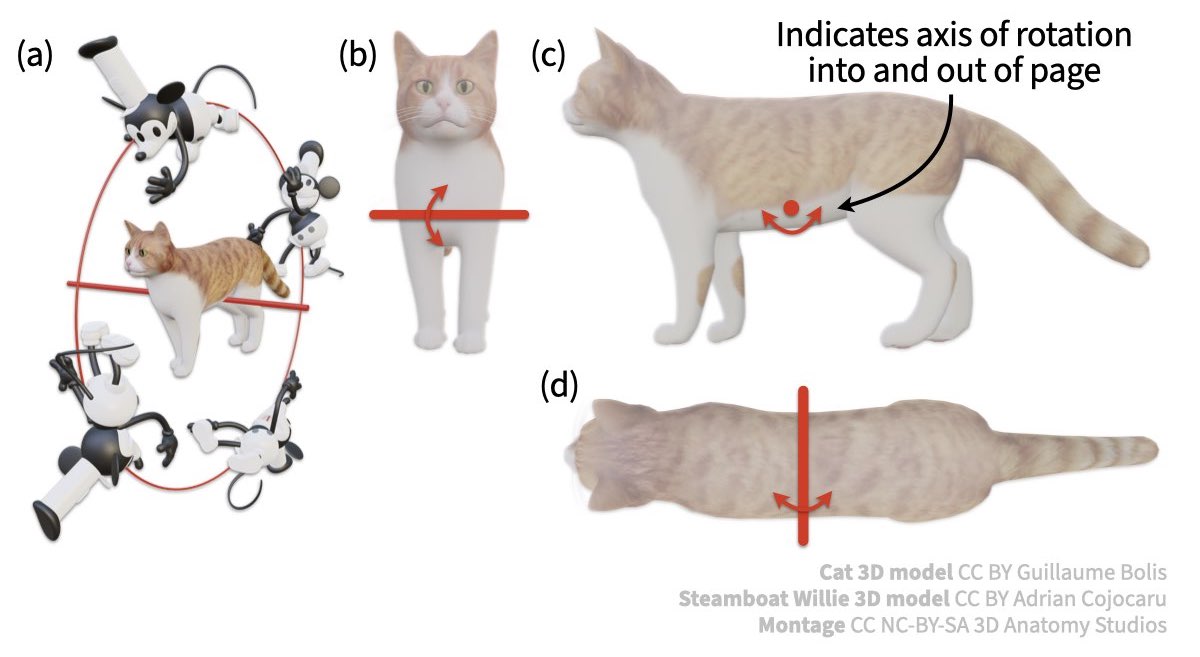
The 3D rotation of one object relative to another (a) can be represented in 2D by projecting the axis onto images of the stationary object from multiple perspectives (b-d). If the axis is oriented directly into and out of the page, it can be represented by a dot (c).
In the example above, the mouse is rotating around the cat about an axis of rotation aligned with the cat's body axes (a.k.a. anatomical axes). But in anatomy, axes of rotation may not necessarily be aligned with the major body axes. For example, below the mouse is rotating about an axis of rotation that is not aligned with any of the cat's body axes.
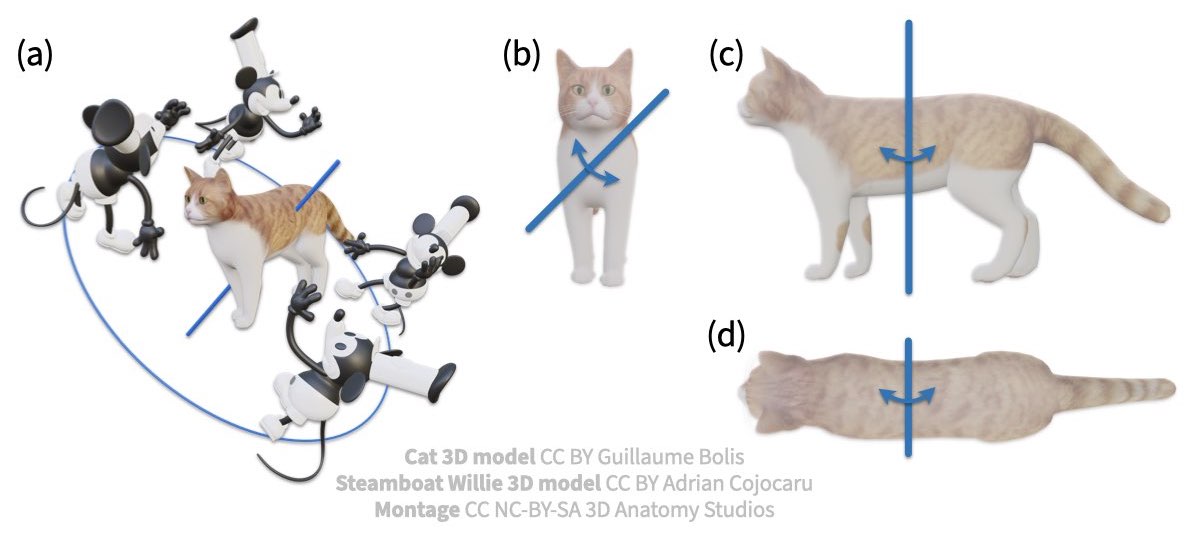
Example of mouse rotating relative to a cat about an axis of rotation not aligned with any body axis.
To test your understanding, draw the axis of rotation for the mouse's motion path shown below on page 1 of your worksheet. Once you've finished, check your work below.
Draw this axis of rotation in 2D on your worksheet.
ASSESS
The axis of rotation you drew in for (a) should look like the axes shown in (b-d) of the figure below.
What is an axis of translation (translational motion axis)?
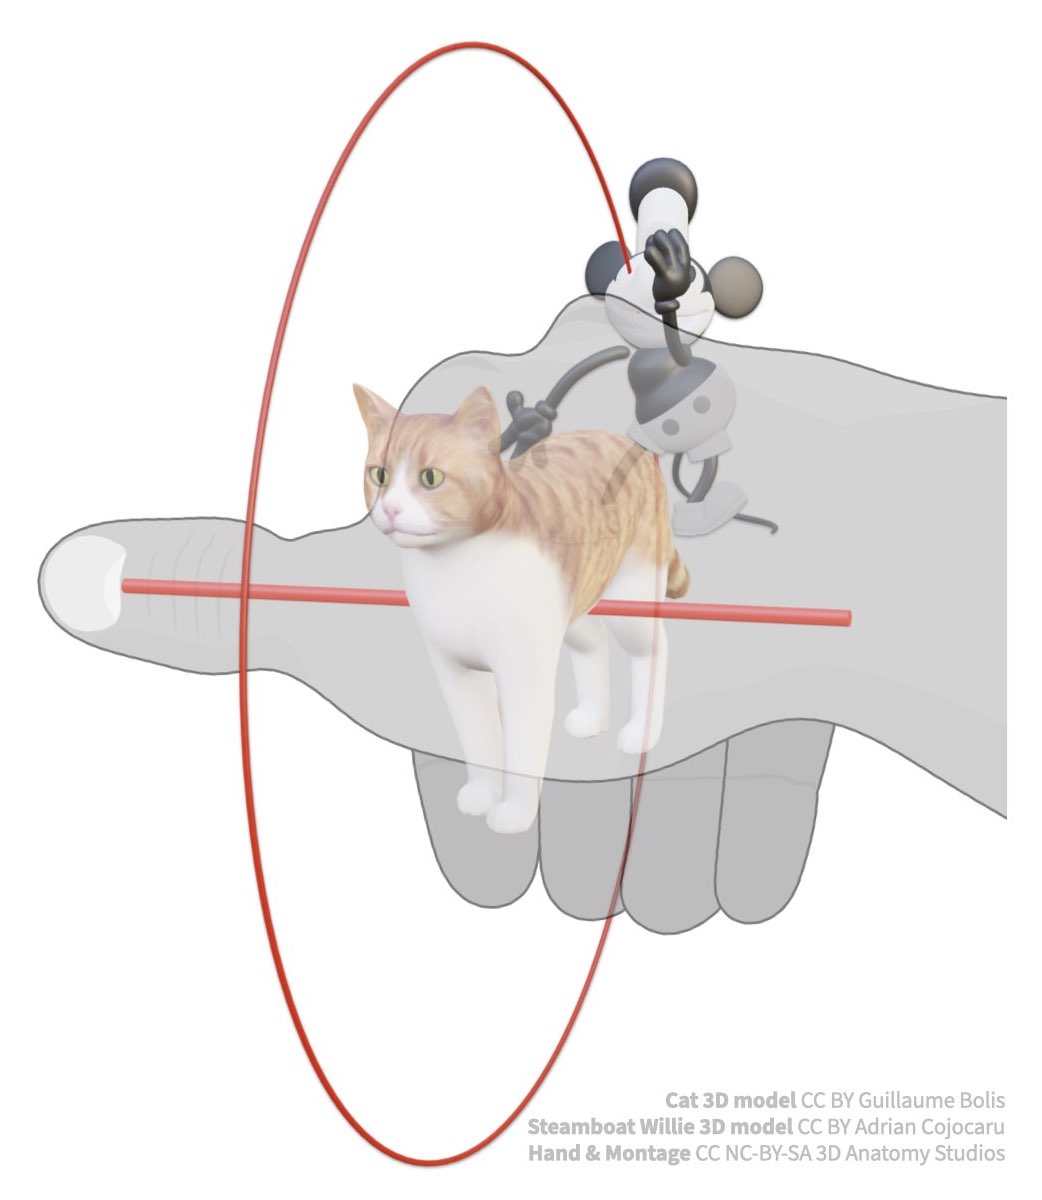
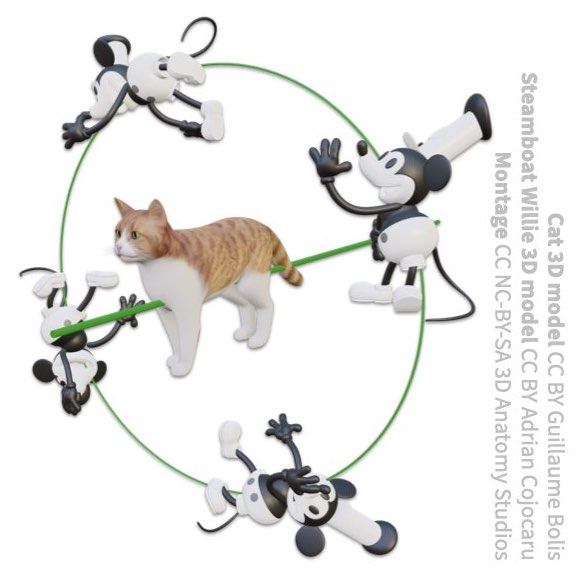
Just as there are axes for rotation, there are also axes for translation (moving from one place to another without any rotational component). Using again our cat and mouse, see how the mouse is moving relative to the cat in the image below.

A mouse translating along a path in front of a cat with the mouse's axis of translation indicated by the red arrow.
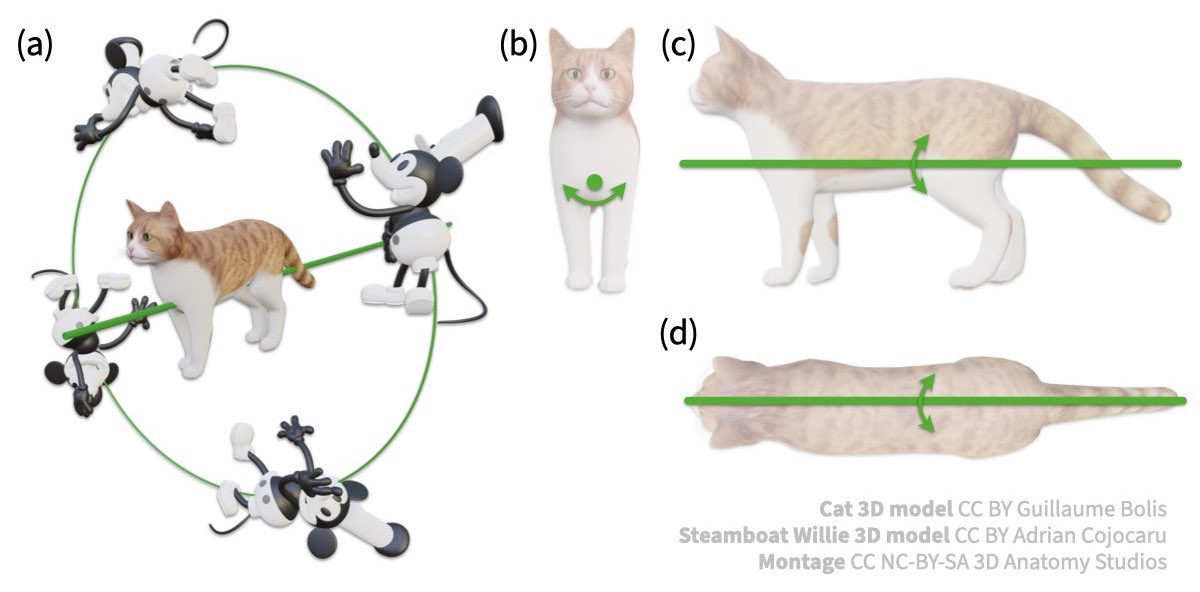
The mouse is no longer rotating but simply translating; another way to think of this is moving while facing the same direction the whole time. The mouse's axis of translation is a vector parallel to (aligned with) the mouse's direction of movement. And just as for rotational axes, 3D translational axes can be represented in 2D by projecting the axis onto multiple views.
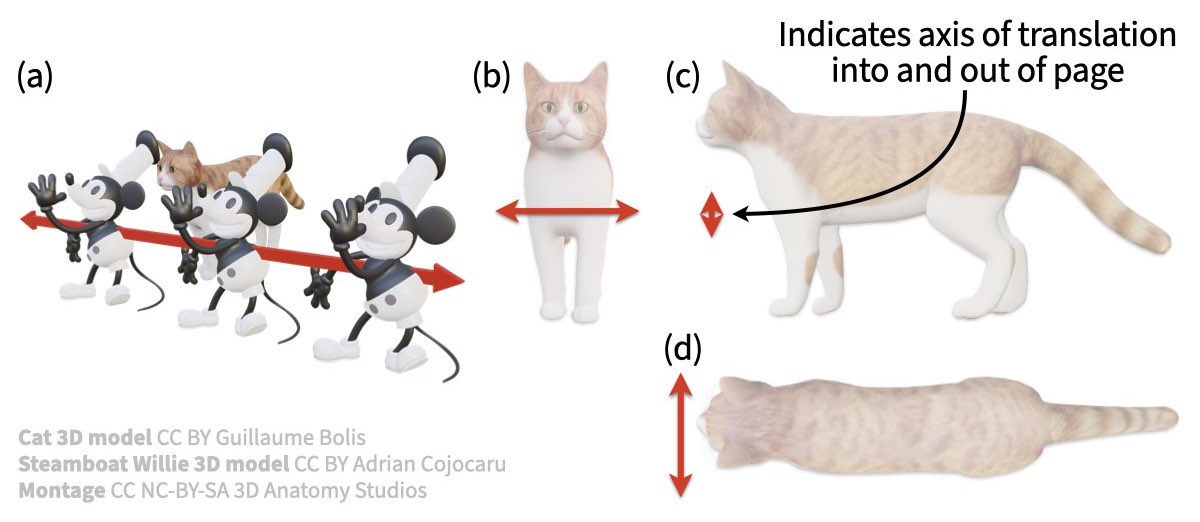
The 3D translation of one object relative to another (a) can be represented in 2D by projecting the axis onto images of the stationary object from multiple perspectives (b-d). If the axis is oriented directly into and out of the page, it can be represented by a line with the two arrowheads touching (c).
Unlike an axis of rotation, the position of an axis of translation doesn't really matter that much. You can position the translation axis to line up with any part of the moving object (e.g., the mouse's head, hand, torso, etc.) since any point on the object are moving in the same way. What matters is the orientation of the translation axis.
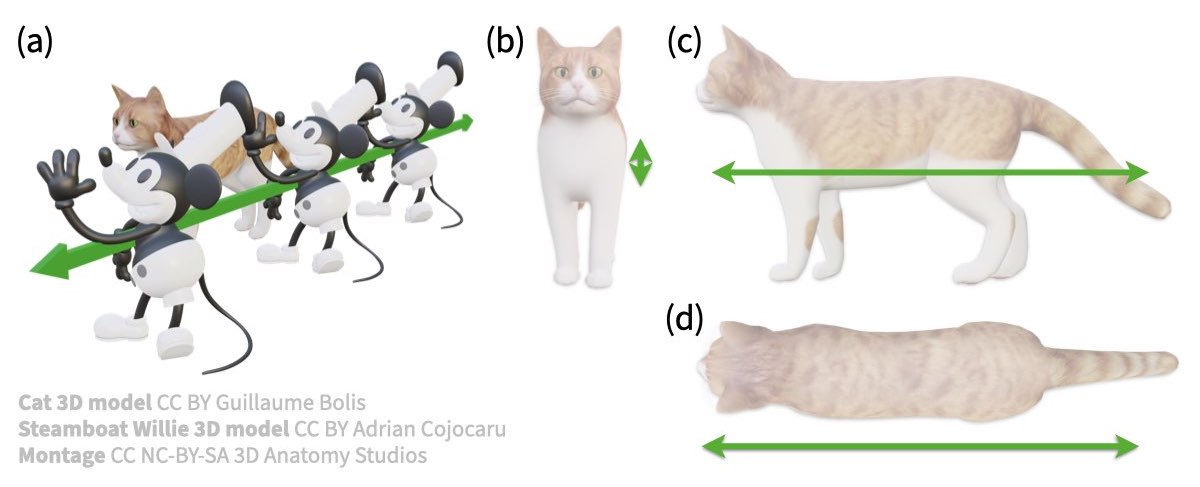
And as for the axes of rotation, the axis of translation doesn't necessarily have to be aligned with any body axes. The example below shows the mouse moving along an axis of translation not aligned with a body axis.
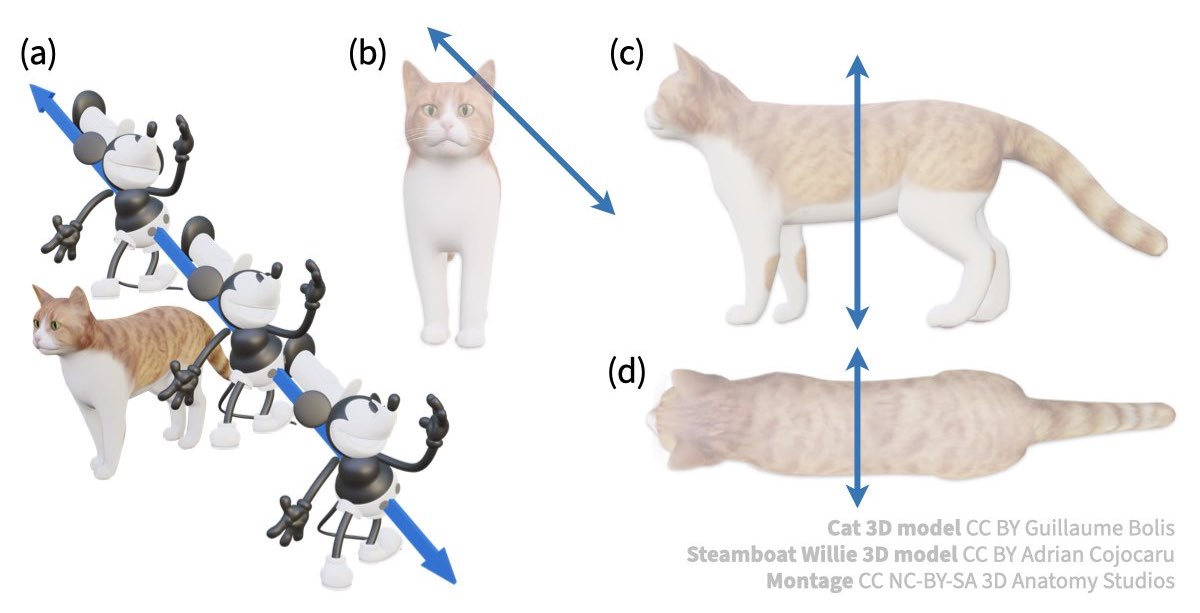
Example of mouse translating relative to a cat about an axis of translation not aligned with any body axis.
To test your understanding, draw the axis of translation for the mouse's motion path shown below on page 1 of your worksheet. Once you've finished, check your work below.

ASSESS
The axis of translation you drew in for (a) should look like the axes shown in (b-d) of the figure below.
Summing it all up
To sum up, here are the major points regarding motion axes:
- Motion axes can describe the motion of any object relative to another object
- Axes of rotation describe motion along a circular path; axes of translation describe motion without any rotation
- To identify an axis of rotation, follow the motion with your fingers and your thumb will indicate the axis
- For axes of rotation the position and orientation matter; for axes of translation only the orientation matters
- Axes of rotation and translation may not necessarily align with the major body axes of either object
- Motion axes can be depicted in 2D by projecting the axis onto multiple views
How many motion axes does your own knee have?
Now that you understand motion axes, use your own knees (if you are able) to guess how many motion axes your knee has. To test out various motions, try moving your knees by standing with two feet on the ground and by sitting on a chair with your foot suspended (not touching the ground). Be aware that motion along some axes may be much smaller or subtle than motion along other axes.
Once you have a guess, write that number on page 1 of your worksheet. After you've written in your guess, check your work below.
ASSESS
How easy did you find it to guess the number of motion axes using your own knees as a reference? You may be surprised to learn that the knee has four axes of motion.
If you guessed less than four, do not be discouraged. Two of the axes of motion are nearly impossible for you to see without an external force moving your knee or because the motion is too subtle to see without directly observing the bones. In fact, if you guessed greater than two you should probably have your knee checked out because the motions along two of the motion axes should really not be that obvious!
What are the motion axes of the knee?
It's challenging to observe all the ways the knee can move from observing your own knee. Only being able to view the surface anatomy obscures some of the motions while other motions are very subtle. Your knee kit reproduces all of the motions of a normal knee with magnitudes comparable to a healthy knee and allows you to observe directly how the bones are moving, without needing X-ray vision. You'll use your knee kit to diagram each of the knee's four axes of motion.
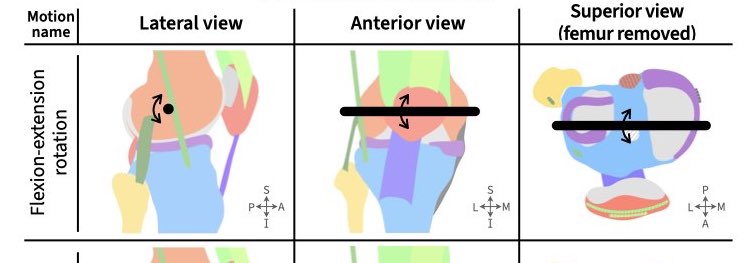
On page 2 of your worksheet, you'll find a table. The three columns contain diagrams of the knee from three views: lateral, anterior, and superior. The four rows correspond to each of the four motion axes of the knee. For each of the 12 diagrams, you'll draw a projection of the corresponding axis of rotation or translation. For all of your motion simulations, you'll keep the femur stationary and move the tibia and fibula relative to the femur.
It would be perfectly equivalent to describe the knee motion axes by keeping the tibia and fibula stationary and moving the femur. Since you're simply describing the motion of one object relative to another other, it doesn't matter which is fixed versus moving. But in describing multiple motion axes it's simpler to choose one bone as the stationary object for all the axes.
Flexion-extension rotation
The most obvious axis of knee motion (the one with the greatest magnitude of motion) is flexion-extension rotation. This is one motion that you likely identified with your own knee. Flexion decreases the angle between the posterior leg and posterior thigh while extension increases this angle (recall that in anatomy, "thigh" refers to the part of the lower limb between the hip and knee and "leg" refers to the part of the lower limb between the knee and ankle).
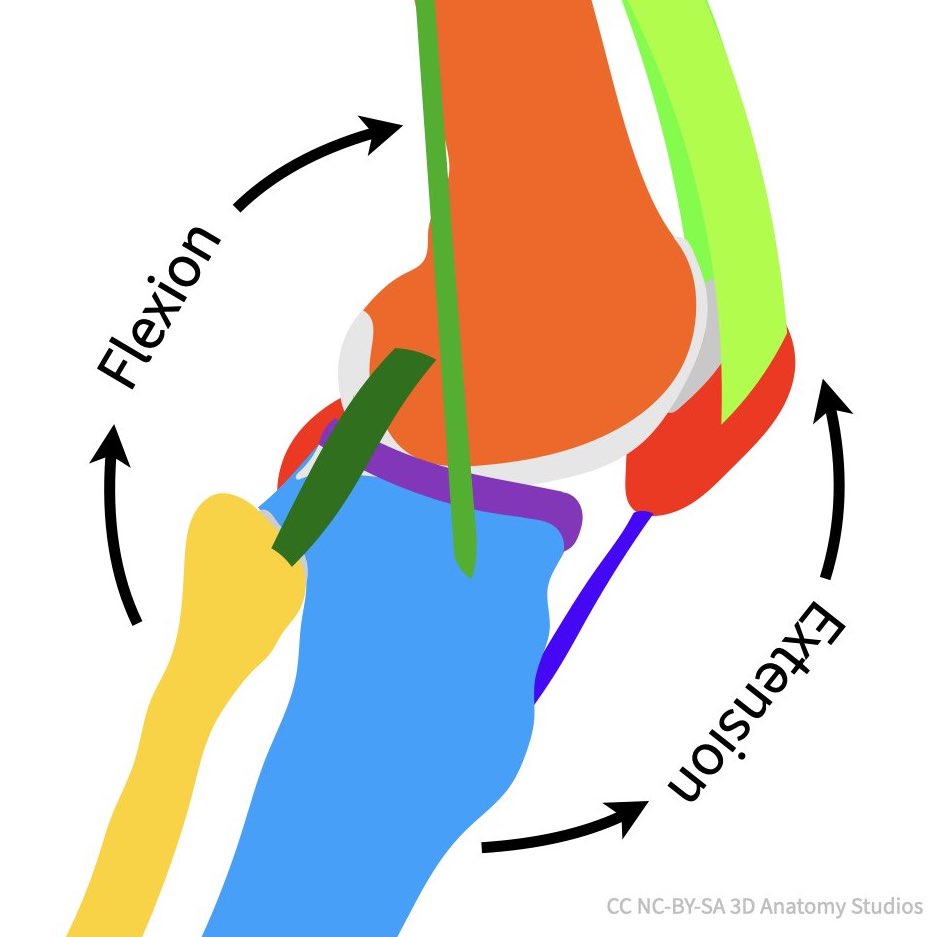
A diagram of the knee in lateral view with arrows showing the direction of flexion versus extension.
Simulate flexion-extension rotation using your knee kit, using the video below as a guide and draw the axes of rotation on each of the three diagrams in the top row of your worksheet. Your knee kit is capable of rotating the full normal range of flexion and extension though if you have both cross section plates attached (not applicable if your knee kit is a Mini model), the plates will prevent full flexion by 10-20 degrees. Once you think you have it correct, check your answers below.
ASSESS
The axes of rotation you drew should look similar to the image below, roughly parallel to the mediolateral body axis. You should have positioned the axis of rotation somewhere near the middle of the femoral condyles (don't worry about the precise position for this activity). That is, the tibia's flexion-extension axis of rotation does not actually pass through the tibia at all.
Longitudinal rotation
The next motion axis of the knee is not as obvious as flexion and extension but it is possible to see with your own knee. Start by sitting in a chair with your knee flexed at 90 degrees and your foot suspended off of the floor. Next, rotate your foot outward keeping your foot straight and not rotating your ankle (keep your ankle and foot "frozen"). You should see your foot rotate by about 30 degrees. Use the video below to help you.
Video showing longitudinal rotation of the tibia from an anterosuperior view of a right knee. Note how the tibial tuberosity and anterior border of the tibia rotate laterally; you should be able to feel these rotate on your own leg.
This is longitudinal rotation of the tibia (or long-axis rotation because the tibia is spinning about its "long axis"). Most people are completely unaware that their knee is capable of this motion but your knee is moving along this motion axis all the time, especially when standing and changing direction while walking or standing up. Rotation of the tibia that brings the toes closer to the midline is medial rotation whereas the opposite is lateral rotation.
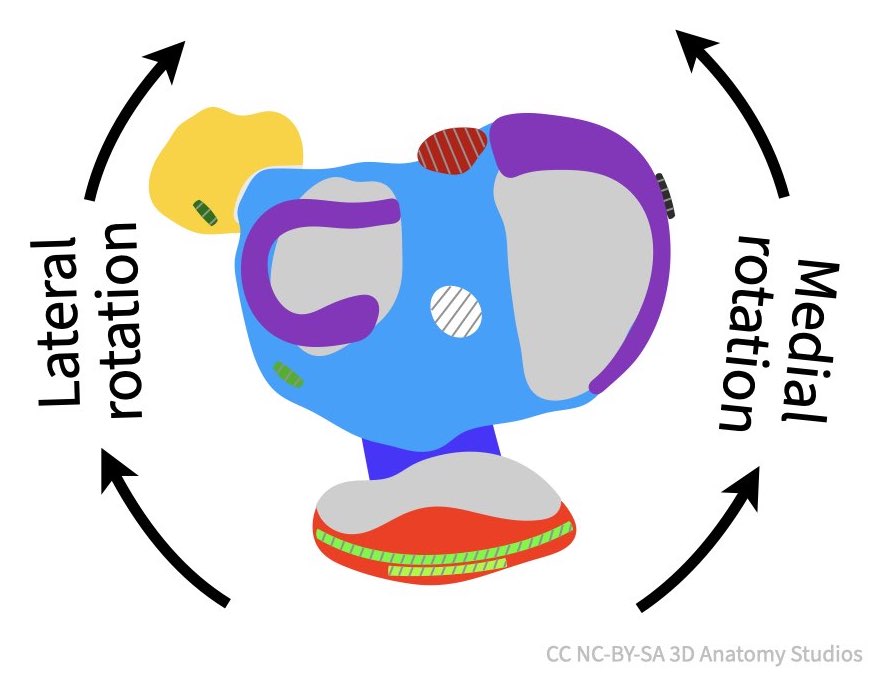
A diagram of the knee from a superior view (femur removed) with arrows showing the direction of medial versus lateral rotation.
Simulate longitudinal rotation with your knee kit using the video below to help you and then draw the axes of rotation on each of the three diagrams in the second row of your worksheet.
Varus-valgus rotation
These last two motion axes are not obvious from observing your own knee moving. They are smaller in magnitude and therefore more subtle (except in the case of injuries to particular knee ligaments). The first is varus-valgus rotation. Varus rotation decreases the angle between the medial aspects of the femur and tibia whereas valgus rotation decreases the angle between the lateral aspects of the femur and tibia.
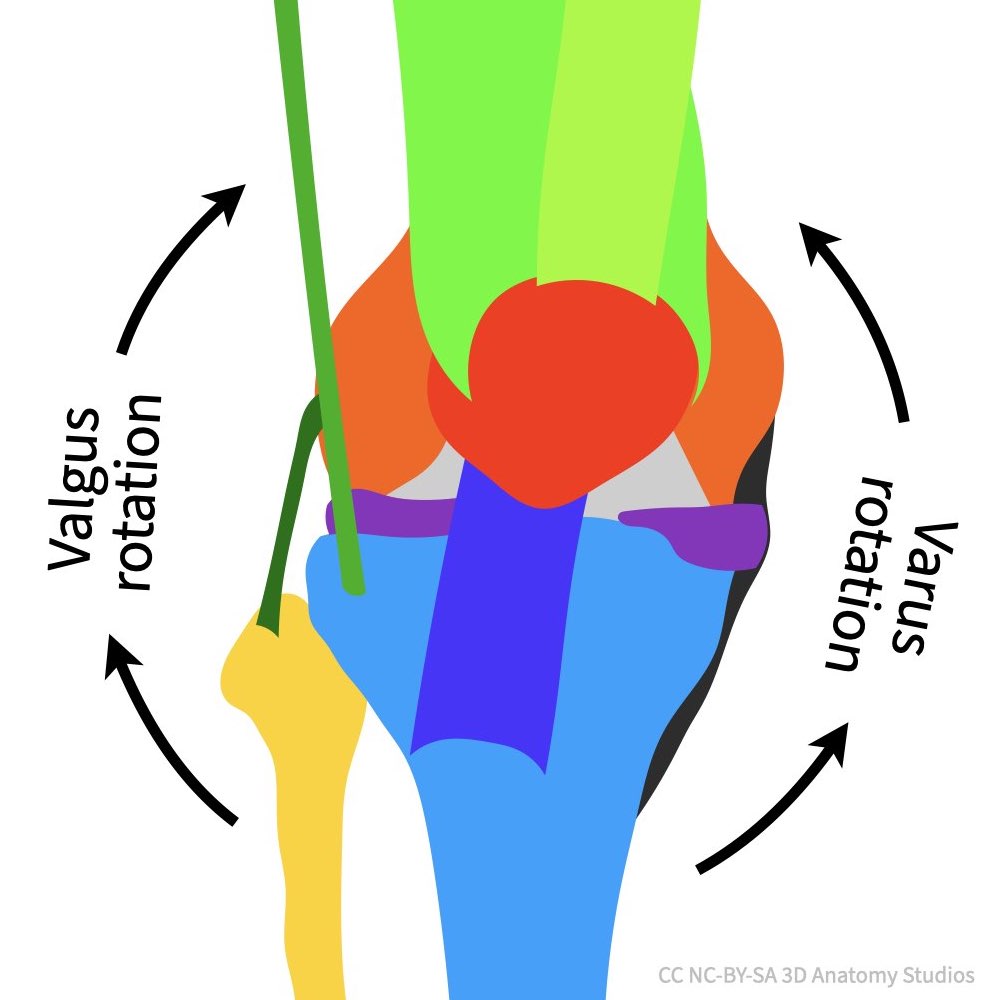
A diagram of the knee from an anterior view with arrows showing the direction of varus versus valgus rotation.
One way to remember valgus versus varus is that varus rotation increases the space between the left and right knees ("bow-legged") as if to accommodate the letter "R" (since "varus" has an "R") whereas valgus rotation decreases the space between the knees ("knock-kneed") as if squeezing the vertical line of the letter "L" (since "valgus" as an "L").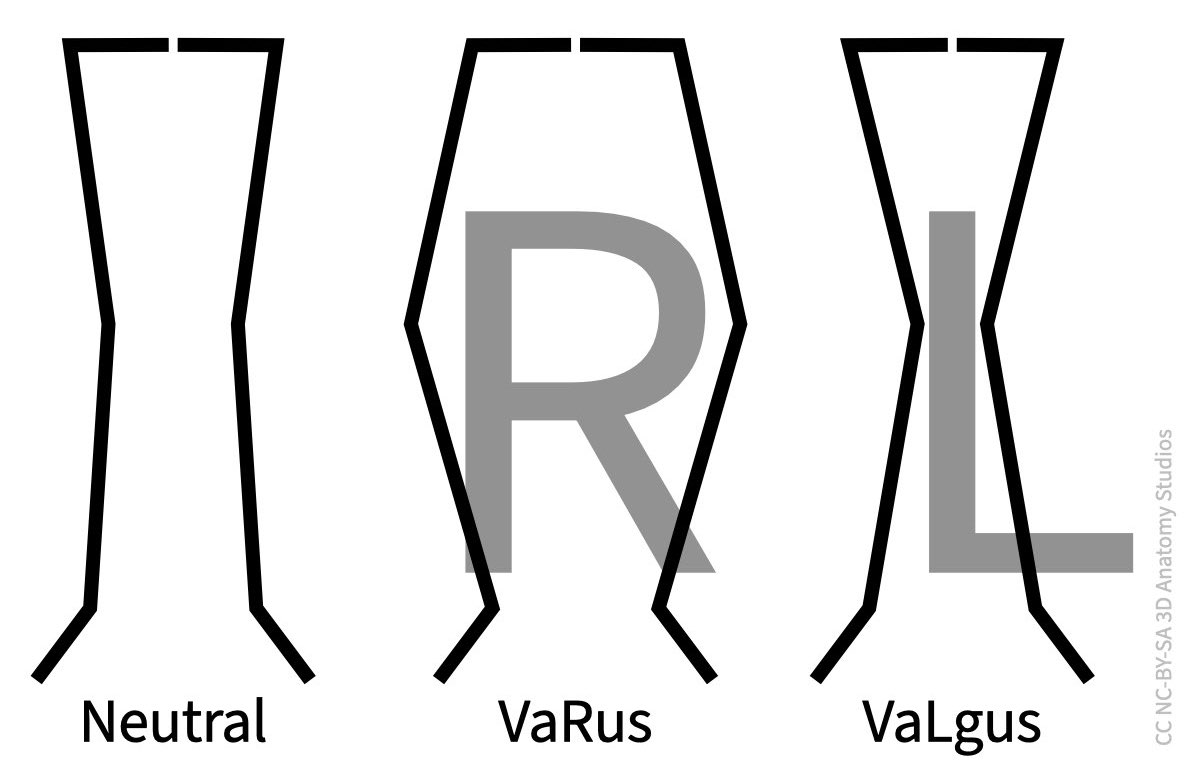
A helpful way to remember the difference between varus and valgus. Note that the differences in angle at the knee are not flexion-extension but varus-valus rotation. The angle is exaggerated for clarity.
Simulate varus-valgus rotation with your knee kit using the video below to help you and then draw the axes of rotation on each of the three diagrams in the third row of your worksheet.
Anterior-posterior translation
The last motion axis of the knee is anterior-posterior translation. Like varus-valgus rotation, the magnitude of this motion is small (but present) in healthy knees but can become large for particular knee ligament injuries.
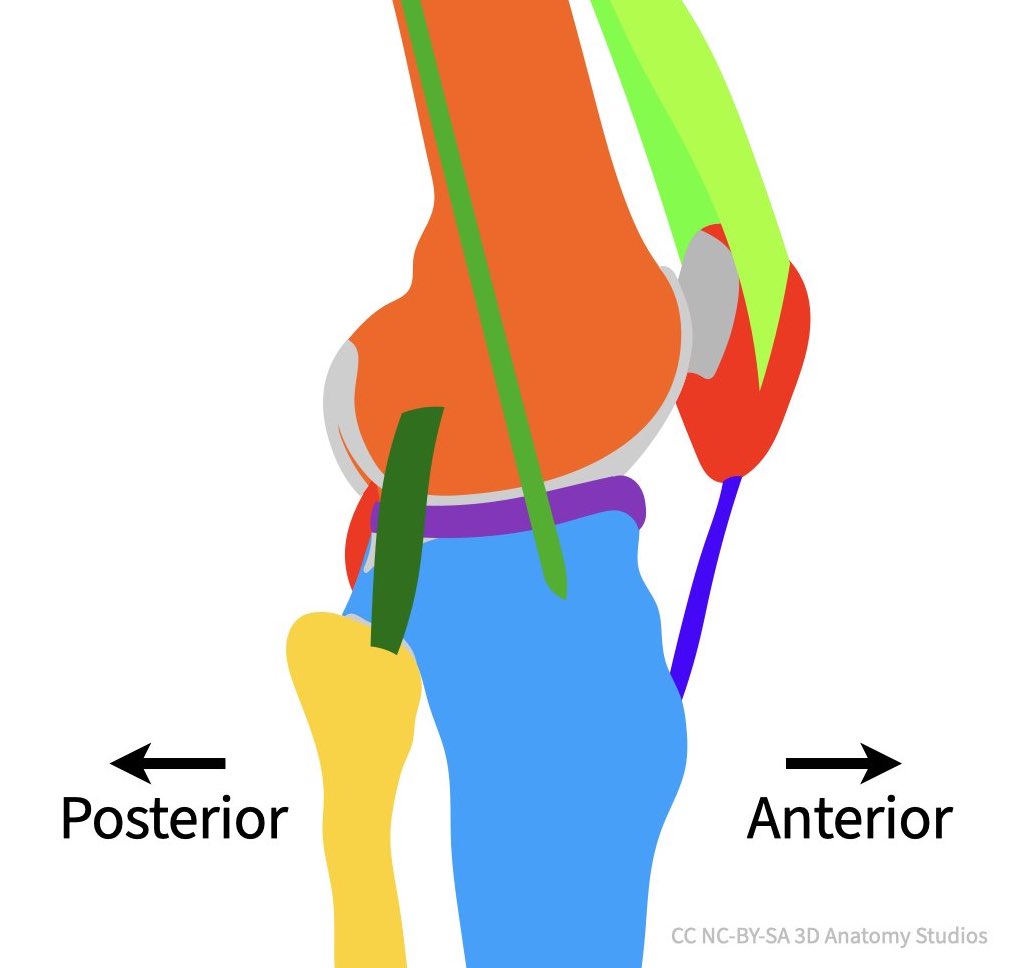
A diagram of the knee from a lateral view with arrows showing anterior versus posterior.
Simulate anterior-posterior translation with your knee kit (use the video below if you need help) and then draw the axes of rotation on each of the three diagrams in the fourth row of your worksheet.
Complex surfaces and ligament attachments create complex motions
As you've seen, your knee moves in complex ways. These complex motions are the direct result of the complex 3D contact surfaces between the femur and tibia and the complex network of ligaments that join the femur, tibia, and fibula to one another. In future activities, you'll use your understanding of these motion axes to investigate the knee ligaments work together to guide the motion of the knee.
References cited
The following articles/books are references cited in this activity:
- Pinskerova, V., & Vavrik, P. (2020). Knee anatomy and biomechanics and its relevance to knee replacement. In: Rivière C, Vendittoli PA, editors. Personalized hip and knee joint replacement, 159-168. Chapter 14. Cham, Switzerland: Springer. DOI: 10.1007/978-3-030-24243-5_14.
Any 3D renderings or animations in this activity were created using Blender.
All anatomical data used to make the kit and activities are from:
- National Library of Medicine. (1995–). The Visible Human Project [Digital Data Set]. Bethesda, MD: National Institutes of Health.https://www.nlm.nih.gov/research/visible/visible_human.html.