About the Human Knee Active Learning Kit
- The who, what, where, when, and why
- About the muscle color, labeling, and material scheme
- About the cross-section plates
The who, what, where, when, and why
Why was this kit developed?
The Human Knee Active Learning Kit is a life-size and fully functional reproduction of a real knee designed by 3D Anatomy Studios to engage learners in a deeper understanding of knee structure and function through hands-on activities.
Who made this kit?
The Human Knee Active Learning Kit was designed by 3D Anatomy Studios founder Aaron Olsen, PhD. Aaron is a professional anatomist and designer who has published several peer-reviewed articles on the form, function, and evolution of vertebrates and has taught comparative vertebrate anatomy at the University of Chicago and human gross anatomy at the University of Chicago's Pritzker School of Medicine and Brown University's Warren Alpert Medical School. The kit was designed in the open-source 3D modeling program Blender using public domain data from the NIH Visible Human Project. Every kit is made by hand at the 3D Anatomy Studios workshop in Portland, Oregon.
When was this kit made?
Initial development of the Human Knee Active Learning Kit began in late 2024. Prototypes were exhibited at the Society for Integrative and Comparative Biology annual meetings in January 2025 and January 2026 and the first commercially available version of the kit was completed in May 2026.
Where was this kit made?
The design process for the Human Knee Active Learning Kit began in Pawtucket, Rhode Island (where 3D Anatomy Studios was located prior 2026) and completed in Portland, Oregon (where 3D Anatomy Studios moved in January 2026). As far as manufacturing, although we source the component parts (screws, 3D printer filament, ropes, straps, etc.) from various suppliers, we do all of the remaining manufacturing work (3D printing, cord cutting and preparation, paper part printing and lamination, assembly, etc.) ourselves at our workshop in Portland, Oregon.
Pawtucket, Rhode Island was once heavily populated by the Pokanoket and Nipmuc tribal nations as well as the Narragansett, Niantic, and Manissean who are the ancestral habitants of the land we now call Rhode Island. Portland, Oregon was once heavily populated by the Multnomah, Wasco, Cowlitz, Kathlamet, Clackamas, Chinook, Tualatin, Kalapuya, Molalla, and numerous indigenous peoples who, for millennia, made their homes along the river basin we now call the Columbia River. We acknowledge the Indigenous peoples who have inhabited and continue to inhabit these lands on which we live and work and we honor with gratitude their historical and cultural relationship to the land.
Where did the anatomical data come from?
The anatomical data used to build the kit were sourced exclusively from the Visible Human Female of the NIH Visible Human Project. These data were first released into the public domain in 1995. Because these data are in the public domain, they can be used for any purpose, including commercial use. Hard tissue data (i.e., bones) were segmented from CT scans and soft tissue data (i.e., muscles, tendons, ligaments, cartilage, etc.) were segmented from cryosection image stacks. All segmentation was performed using the open-source software 3D slicer. Meshes were exported from 3D Slicer and mesh face counts were reduced using the open-source software MeshLab, before importing meshes into Blender.
How is the kit licensed? Can I copy the kit?
3D Anatomy Studios asserts copyright over the Human Knee Active Learning Kit, covering all aspects of the kit design, including packaging, that represent creative expression, beginning with its initial design in 2025. This grants 3D Anatomy Studios exclusive rights to reproduce, distribute, display, or adapt the kit. If you'd like to request permission to reproduce, distribute, display, or adapt the Human Knee Active Learning Kit, please email us at contact@3danatomystudios.com. Requests that are non-commercial may be granted at no cost; commercial requests may require a licensing fee. Please note that while 3D Anatomy Studios asserts copyright over the kit itself, the activity guides for the kit are released with a CC NC-BY-SA license.
How can I use the kit?
The Human Knee Active Learning Kit is designed for hands-on, interactive learning in multiple contexts:
- Students in human anatomy or biomechanics courses can use the kit in a lab setting either as a station (set up by an educator) or on their own for self-guided learning by following any of the available activity guides.
- Educators teaching human anatomy or biomechanics can use the kit in a lecture or lab setting to demonstrate knee form and function, muscle coordination, and joint biomechanics, using the available activity guides as a reference, to help prepare a demonstration, or to help set up a station.
- Clinicians working with patients who have knee injuries can use the kit with patients to clearly explain how the knee works, how the patient's knee was injured, and the reasoning behind a particular course of treatment without needing to use complicated jargon, using the available activity guides as a reference and for assembly and disassembly instructions.
- Clinical educators in the fields of sports medicine and orthopedics can use the kit to demonstrate to students and trainees in the healthcare profession the complex mechanics of the knee and the effects of particular injuries through knockout experiments, using the available activity guides as a reference and for assembly and disassembly instructions.
- Physical therapists working specifically with high-performing athletes can use the kit to help athletes understand how to improve their performance and reduce the risk of injury, using the available activity guides as a reference and for assembly and disassembly instructions.
How are the activity guides structured?
Every activity guide for the kit follows the same structure:
- Activity Guide: A step-by-step guide through the activity with hints, self-assessments, and a worksheet. This can be used by students for self-guided learning or by educators and clinicians as a reference.
- Activity as a Station: Materials that educators can use to set up the activity as a station, such as in a lab setting, including an instruction sheet and a modified worksheet ideal for use as a station.
- Educator Guide: An overview of the activity for educators and answer key.
How do I view the answer keys?
The activity answer keys will only be visible to logged in users who have been given educator permissions and have purchased one or more Human Knee Active Learning Kits. Once you've been granted access, you can find the answer keys in the "Educator Guide" section of each activity. If you’ve purchased one or more kits, you should have received an email to access your Educator account. If you need us to resend this email or have any other issues accessing your account, please email us at contact@3danatomystudios.com.
Can I share and/or edit the activity guides?
All of the activity guides for the kit are released under a CC NC-BY-SA license. This allows you to share and edit this module as long as you (1) do not sell the module or module derivatives ("NC"), (2) attribute the author(s) of all the content, including preserving text and graphic attributions ("BY"), and (3) share the module under the same license ("SA").
How were these activity guides made?
These activity guides were created by professional anatomists and educators at 3D Anatomy Studios using the open-source wiki software Bookstack. You can see the author of each activity by seeing who it was created by (on the main page of the activity). The guides are all hosted online at the domain guides.3das.us, which is maintained by 3D Anatomy Studios.
Was AI (artificial intelligence) used to make these guides?
No. None of the content on this site (text, images, videos, etc.) was generated by AI.
How can I purchase kits?
To purchase Human Knee Active Learning Kits, please send us an email to contact@3danatomystudios.com.
About the muscle color, labeling, and material scheme
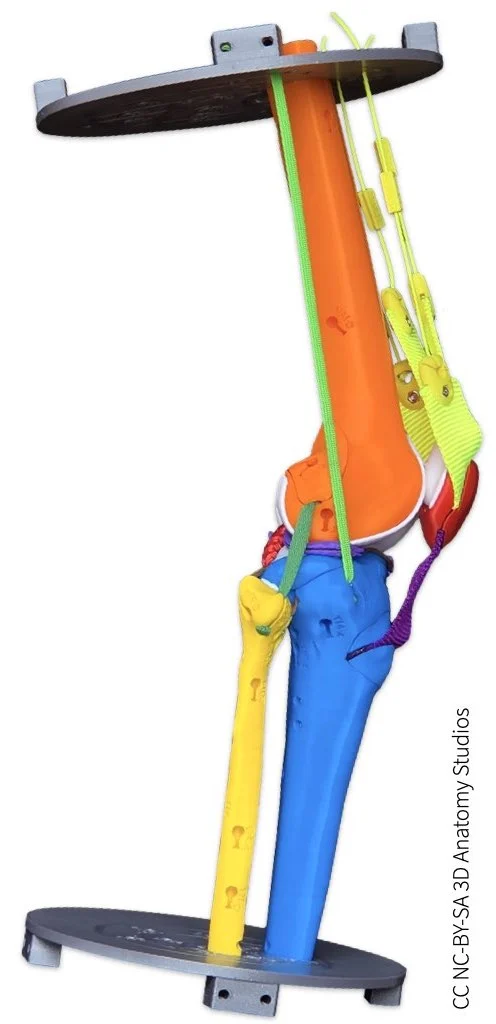
If you have a basic or full knee kit model, your kit comes with elastic muscle cords ("muscles"), color-coded by compartment and with removable labels. You can think of these elastic cords like approximate action lines for each muscle: as you simulate various knee motions, the cords shorten, lengthen, or stay the same length, enabling you to see whether—and if so, how—each muscle changes length during a particular motion.
If you have the basic knee model, you'll have four elastic muscle cords, each representing one of the quadriceps muscles.
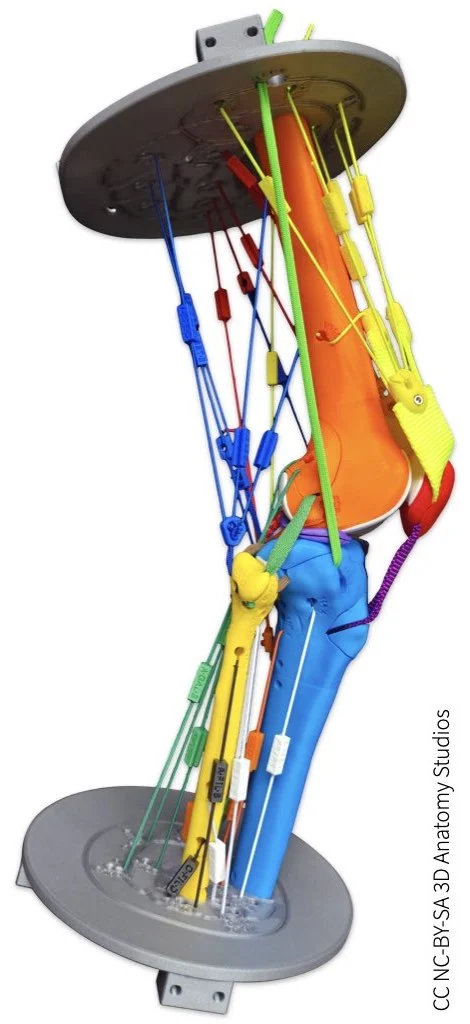
If you have a full knee model, you'll have cords for 23 muscles, representing all of the muscles between the superior and inferior cross-section plates, except articularis genu and fibularis tertius.
Color-coding by compartment
The human lower limb muscles are organized into fascial compartments: three in the thigh and four in the leg. The muscles in your knee kit are color-coded to match their corresponding compartment. The table below lists the color for each compartment.
Muscle compartment color coding |
||
|---|---|---|
Thigh |
Anterior: | Yellow |
| Posterior: | Blue | |
| Medial: | Red | |
Leg |
Medial: | White |
| Lateral: | Black | |
| Superficial posterior: | Green | |
| Deep posterior: | Orange | |
You can also refer to your kit's parts plates: the background color for each muscle section corresponds to the compartment.

Parts plate C showing how all the muscle labels are color-coded by compartment.
There is one elastic muscle cord in your kit that bridges two compartments: the cord corresponding to the hamstring portion of the adductor magnus. This portion of the adductor magnus muscle is generally considered part of the posterior compartment of the thigh (with the hamstrings) whereas the rest of the adductor magnus is considered part of the medial compartment of the thigh (with the adductors). The cord has both blue and red components to reflect this dual designation.
Muscle name abbreviations
Your knee kit uses a unique 3-letter abbreviation (all capitalized) for each muscle where it is not possible to print the full name (e.g., on the clip-on labels, bone surface). You won't see these abbreviations elsewhere- these abbreviations were developed specifically for this kit as there is no standard set of abbreviations for the muscles of the human body (presumably to avoid ambiguity in the practice of medicine). The table below lists the 3-letter abbreviation for each muscle in your kit. Also included in this list is the iliotibial tract/band, a structure that is part tendon, part ligament, and part muscle.
Muscle abbreviations |
|
|---|---|
| ALO | Adductor longus |
| AMA | Adductor magnus |
| BFE | Biceps femoris |
| EDL | Extensor digitorum longus |
| EHL | Extensor hallucis longus |
| FDL | Flexor digitorum longus |
| FHL | Flexor hallucis longus |
| FIL | Fibularis longus |
| GAL | Gastrocnemius (lateral head) |
| GAM | Gastrocnemius (medial head) |
| GRA | Gracilis |
| ITT | Iliotibial tract |
| PLA | Plantaris |
| POP | Popliteus |
| REF | Rectus femoris |
| SAR | Sartorius |
| SEM | Semimembranosus |
| SET | Semitendinosus |
| SOL | Soleus |
| TIA | Tibialis anterior |
| TIP | Tibialis posterior |
| VAI | Vastus intermedius |
| VAL | Vastus lateralis |
| VAM | Vastus medialis |
You can also refer to your kit's parts plates: the "docking site" for each muscle on the Part Plate includes the muscle's full name and abbreviation.
![]()
The muscle docking sites on each part plate has the full name of the muscle and the muscle's abbreviation. The site highlighted here is for the rectus femoris muscle (REF).
Attachment site and muscle labeling
Every elastic muscle cord in your kit has two ends: one that attaches to the muscle's origin and one that attaches to the muscle's insertion. Since the designation of an "origin" vs. an "insertion" is somewhat arbitrary, this guide simply refers to them both as the muscle's "attachment sites." To help you know where to attach each muscle cord, every attachment site in the kit is labeled. The attachment sites are labeled according to the following scheme:
[3-letter muscle abbreviation]-[Unique letter, starting at "A"]
For example, the rectus femoris attachment sites are: REF-A and REF-B. So to attach the rectus femoris, you would attach one end at the site labeled "REF-A" and one end at the site labeled "REF-B."
![]()
The attachment sites for each muscle are labeled with the muscle's 3-letter abbreviation (e.g., "REF") and a letter (e.g., "A"), separated by a hyphen.
Every elastic muscle cord also has a rectangular label that clips onto (or off of) the cord. This clip-on muscle label has inscribed letters that tell you both the muscle name (abbreviated) plus the two sites where you attach that muscle, according to the following scheme:
[Attachment site #1]-[3-letter muscle abbreviation]-[Attachment site #2]
For example, the muscle label for the rectus femoris has the following inscription: A-REF-B. This tells you that one end attaches to "REF-A" and the other end attaches to "REF-B." These muscle labels should be oriented so that the inscribed letters point toward their corresponding attachment site.
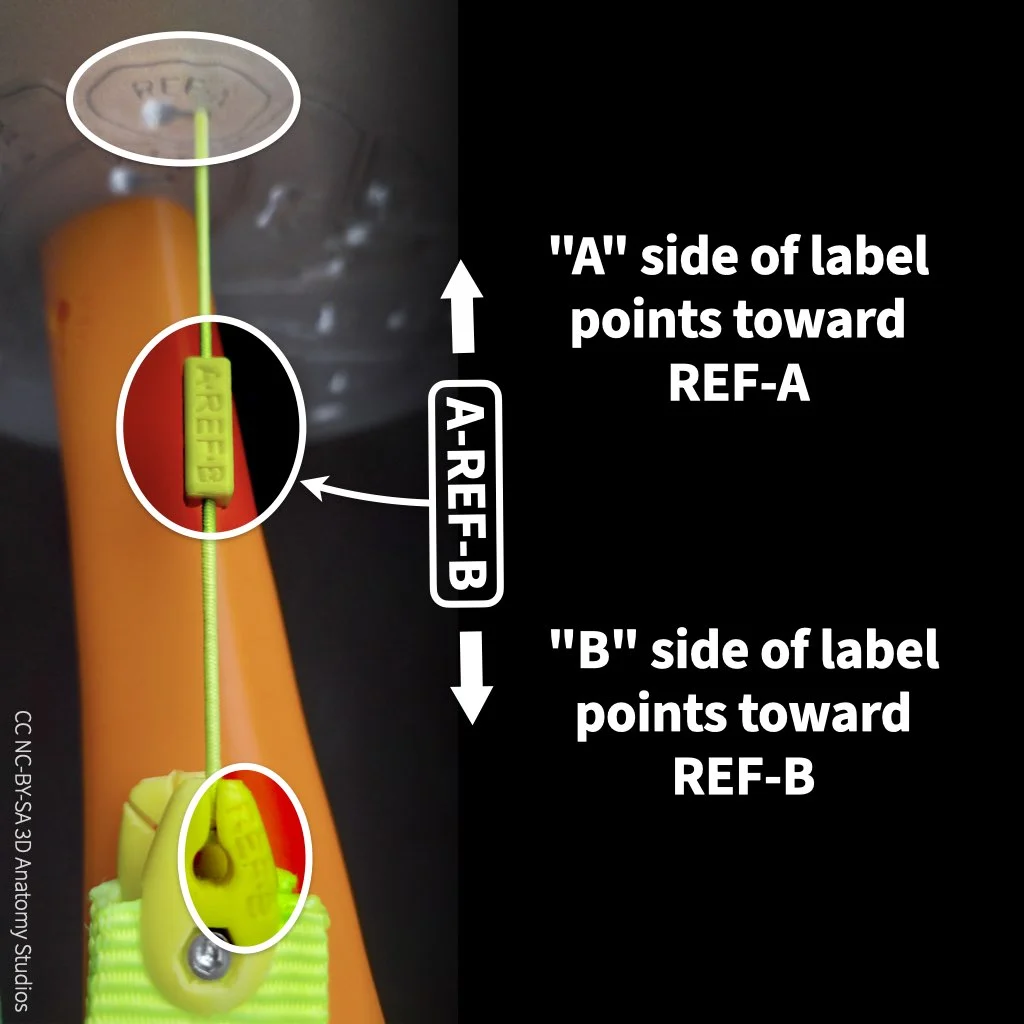
Each muscle label tells you where to attach each end of the muscle. For example, the rectus femoris muscle label "A-REF-B" tells you to connect one end to "REF-A" and the other end to "REF-B."
This same attachment labeling scheme is repeated at the "docking site" for each muscle on the parts plates to make it as easy as possible to detach and reattach the muscles: each end has the corresponding attachment site while the middle has the same inscription found on the muscle's label.
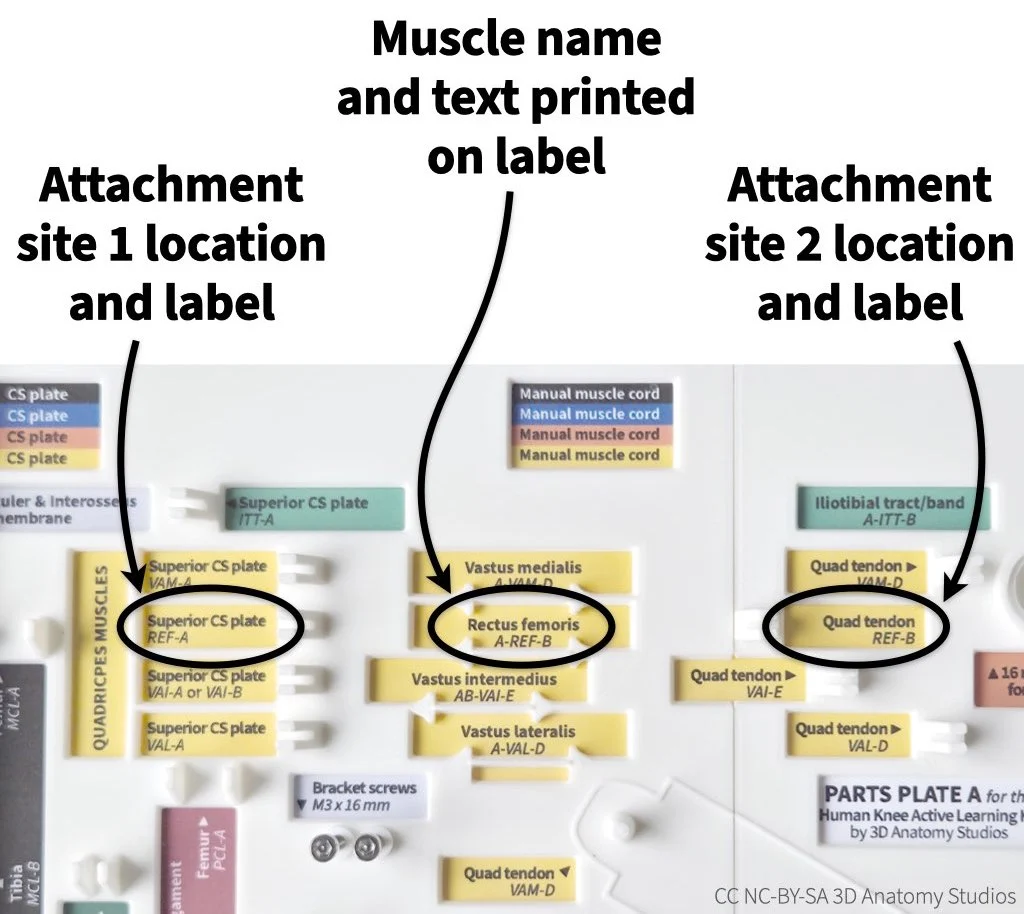
The docking site for each muscle on the parts plate has the muscle name, attachment site locations and labels, and the text printed on the muscle's clip-on label.
Some muscles of the lower limb have broad origins and/or insertions (e.g., adductor magnus, the vasti muscles), and thus cover a large area of bone. Muscles like these have more than one muscle cord in your kit to represent the wide range of action lines contained within that single muscle. This is why the full knee kit model has 35 elastic cords representing 23 muscles. For muscles with more than two attachment sites (i.e., more than one elastic cord), the attachment site labels proceed in alphabetical sequence. For example, the labels and corresponding attachment sites for the adductor magnus muscle cords are:
A-AMA-B (attaches from AMA-A to AMA-B)
C-AMA-D (attaches from AMA-C to AMA-D)
E-AMA-F (attaches from AMA-E to AMA-F)
If you see a label with multiple letters for the attachment site (e.g., "AB-VAI-E"), this means you can attach the cord to either of those sites (e.g., "A" or "B").
Elastic+Inelastic muscle cords
While both muscles and tendons can shorten and lengthen, muscles generally change length to a far greater extent than tendons. Thus, muscles are generally more "stretchy" than tendons. Most, if not all, of the muscles in the lower limb have a tendinous component. However, for most muscles, the tendon is contained within the muscle itself or forms part of the external surface of the muscle so that muscle fibers can attach to the tendon along its length, resulting in some degree of pennation. That is, if you were to cut the muscle in cross-section, you would see both muscle and tendon in the same cross-section slice. For this reason, most muscles in your kit are represented by a single elastic cord, without any stiffer tendinous component.
However, there are some muscles that have a tendinous component that continues beyond the muscular portion of the muscle (e.g., semimembranosus, semitendinosus, plantaris). That is, if you were to cut the muscle in cross-section, in some cross-section slices you would see only tendon. If you have a full knee model, the cords representing these muscles have an elastic cord (representing the muscle+tendon part) coupled to a thicker inelastic cord (representing the tendon only part).
About the cross-section plates
If you have a basic or full knee kit model, your kit comes with cross-section plates attached to either end of the kit.
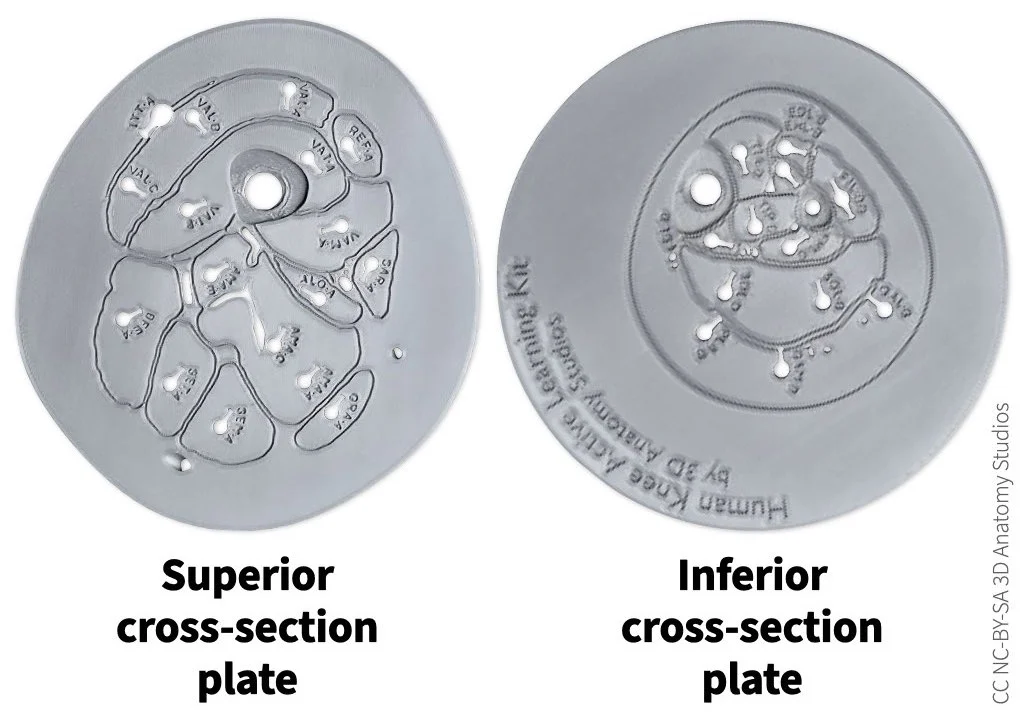
The cross-section plates included with the basic and full knee kit models.
The plates show you a cross-section of the anatomy (in the transverse plane) at the middle of the thigh (superior) and middle of the leg (inferior), including the muscles, arteries, veins, nerves, and skin line. The arteries, veins, and nerves are represented by holes in the plate. The shapes and sizes of all the structures in the cross-section plates are accurate anatomical representations, coming directly from the same cryosection data that was used to make the kit. Having these plates "bookend" the knee kit relates the 3D structures of the knee kit with a 2D cross-sectional representation (as seen in a CT slice, for example) and connects the knee kit with the structures just outside of the knee region.
The image below identifies the structures in the superior cross-section plate.
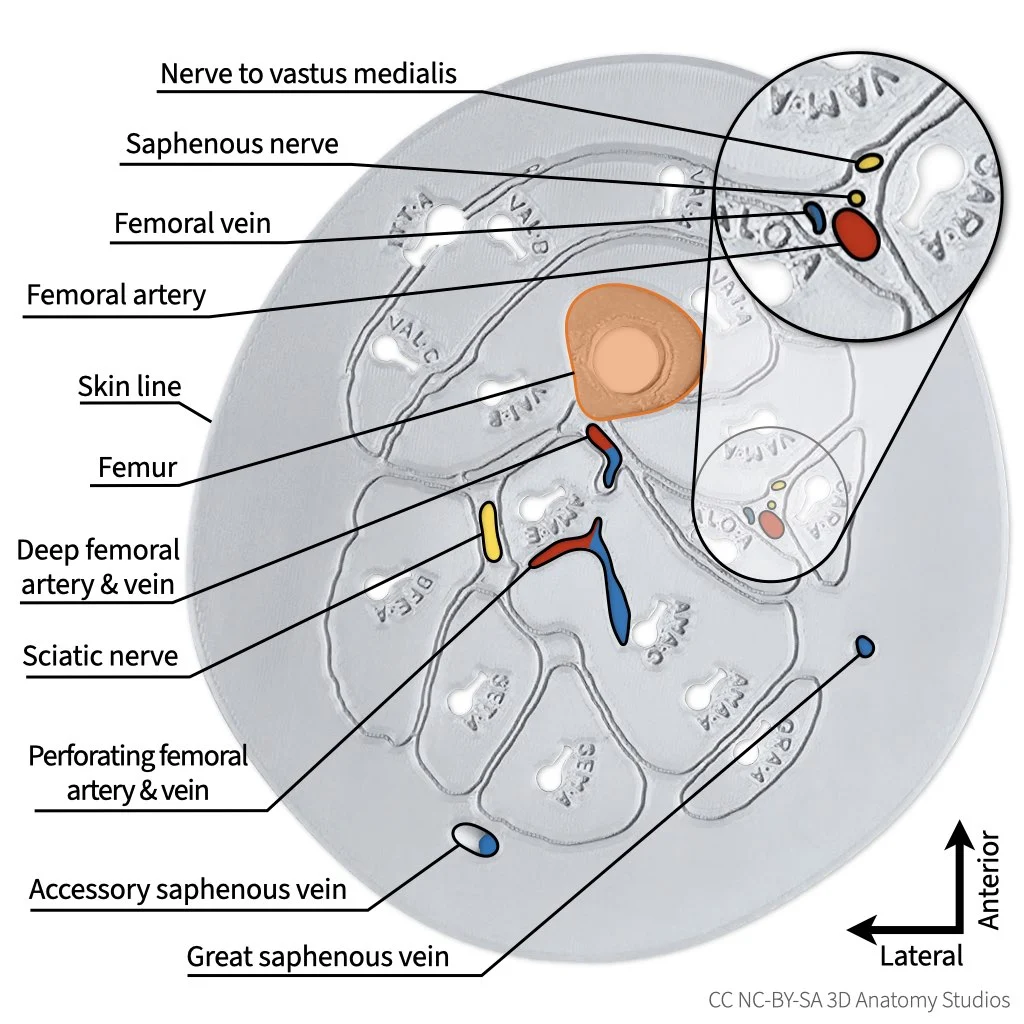
The superior cross-section plate with labels. Muscles are not labeled since they are already identified by the abbreviations printed into the plate.
And here is the superior cross-section plate with the corresponding slice in the cryosection data.
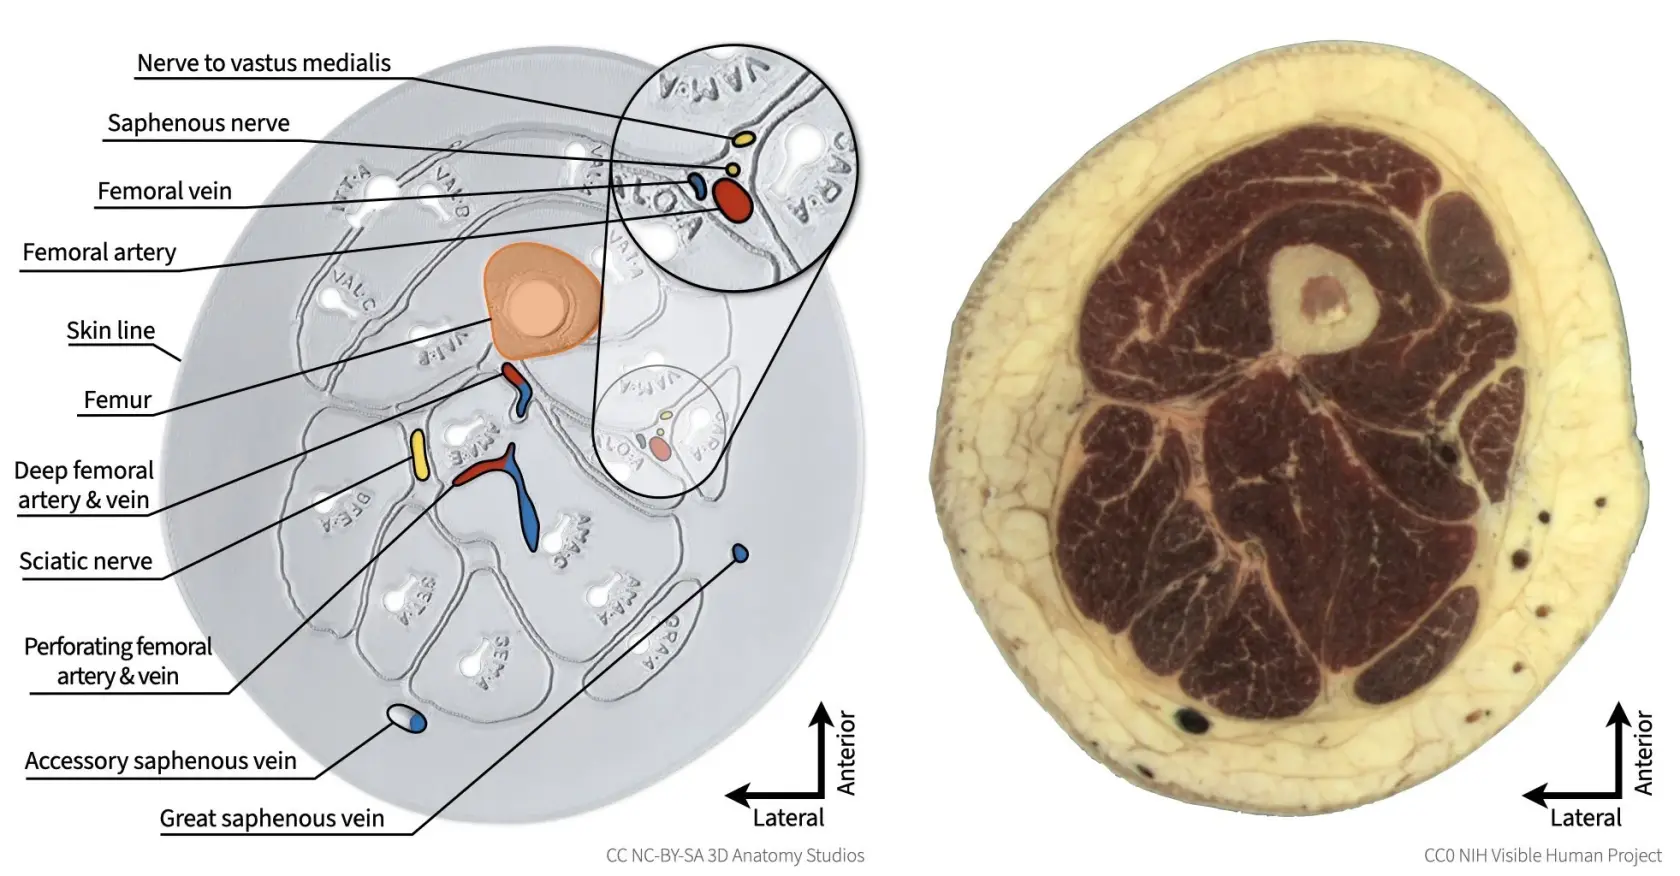
The superior cross-section plate (left) side by side with the corresponding cryosection (right). Note that the entire edge of the superior cross-section plate represents the skin line, with the space between the skin and muscles being filled primarily with subcutaneous adipose tissue.
The image below identifies the structures in the inferior cross-section plate. For the superior cross-section plate, the entire outer edge represents the skin line. However, for the inferior cross-section plate, the plate is larger than the leg itself (expanded outward to provide a larger base for stabilizing the knee kit) and the skin line is represented instead by a single, continuous indented line.
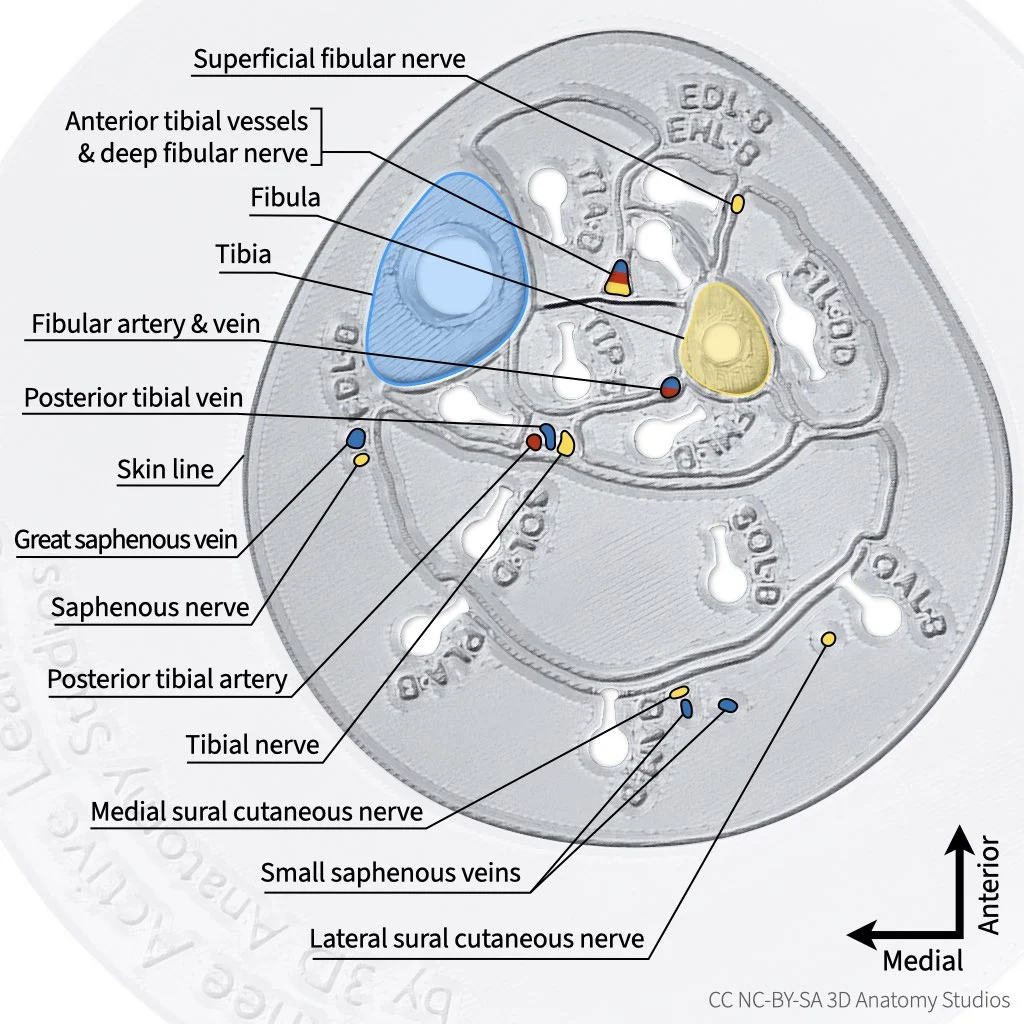
The inferior cross-section plate with labels. Muscles are not labeled since they are already identified by the abbreviations printed into the plate. The area of the plate outside of the skin line has been grayed out and the image zoomed in.
And here is the inferior cross-section plate with the corresponding slice in the cryosection data.
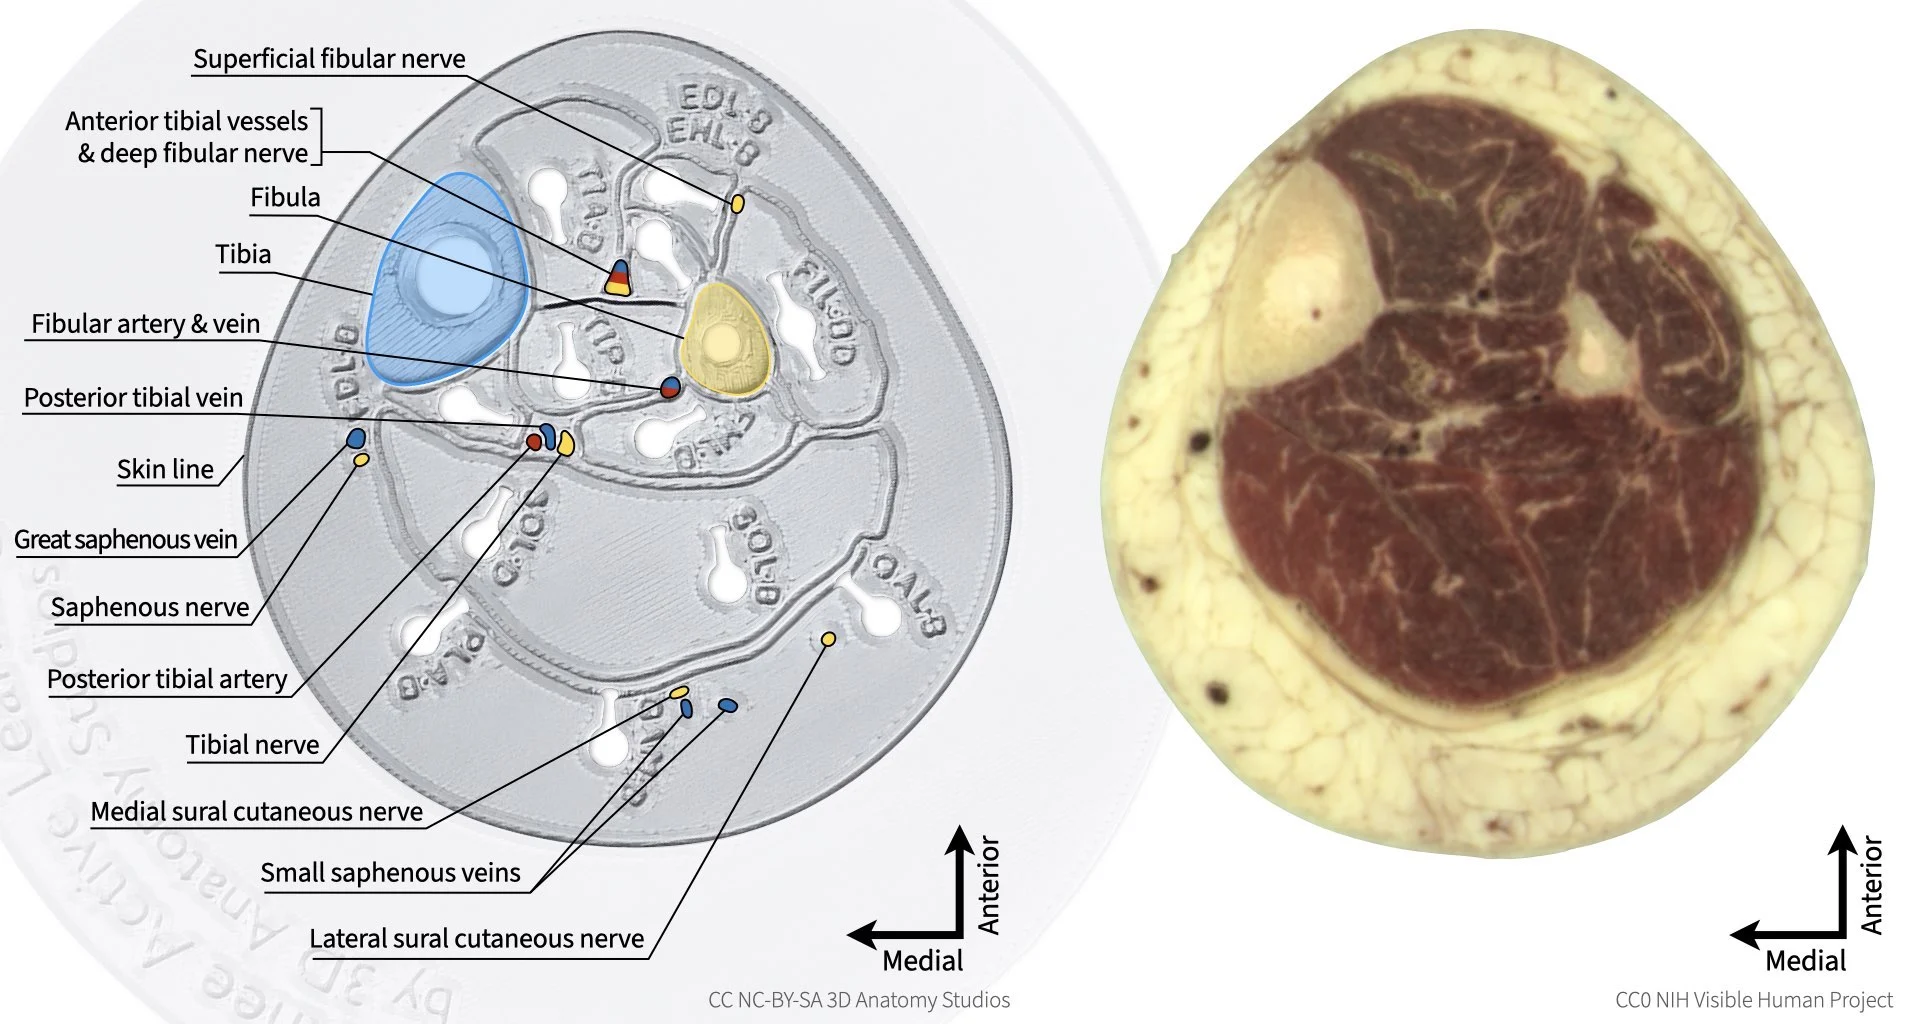
The inferior cross-section plate (left) side by side with the corresponding cryosection (right).